Long Wave Stitch
Hello, my dear! Welcome to our lovely blog Handmade Learning Here. Today, we’re going to talk about a stitch that is just as relaxing as a walk along the beach, the Wave Stitch. With its gentle curves and soft texture, this stitch is perfect for adding movement and charm to your crochet creations.
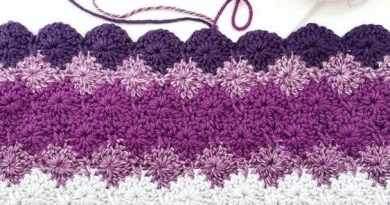
The Wave Stitch (sometimes called the Rolling Wave Stitch or Wavy Stitch) is made by combining stitches of different heights. This little trick gives the illusion of waves rolling one after another, almost like the ocean dancing on a calm day. The effect is soothing, timeless, and oh-so-pretty!
Why You’ll Love the Wave Stitch 💙
Beautiful Texture: The natural curves make it eye-catching without being overly busy.
Beginner-Friendly: If you can crochet basic stitches like single crochet, half double crochet, and double crochet, you’re all set!
Versatile: Works wonderfully for blankets, scarves, beanies, pillow covers, and even summer tops.
Soothing to Make: Once you get into the rhythm, it feels like crocheting to the beat of gentle waves.
How the Wave Effect Works 🌊
The “wave” comes from playing with stitch heights in a single row, starting with short stitches (like single crochet), moving to taller stitches (like double crochet or treble crochet), then gradually coming back down. By repeating this up-and-down motion across your work, you create those lovely peaks and valleys.
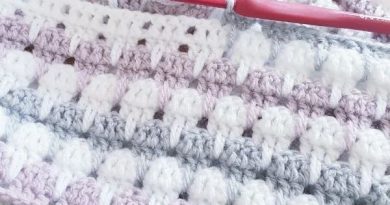
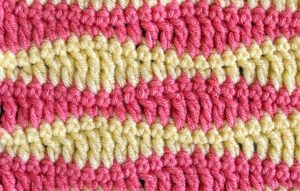
For even more impact, you can use color changes. Switching colors every few rows can give your project a striped, beachy vibe. Think shades of blue for a sea-inspired blanket, or warm sunset tones for a cozy shawl.
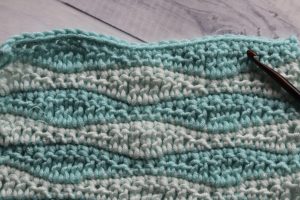
Wave Stitch. This stitch creates a pretty wavy pattern, perfect for blankets, scarves, or anything that needs a soft ripple look. We’ll work with basic crochet stitches, so just take it slow and enjoy the rhythm.
Row 1 – Setting the Foundation
Make a chain in a multiple of 10 + 3 extra chains.
(Example: 33, 43, 53… depending on how wide you want it.)
Work 1 single crochet (sc) into the 2nd chain from your hook.
Now start your wave:
*1 sc, 1 half double crochet (hdc), 2 double crochets (dc), 2 treble crochets (tr), 2 dc, 1 hdc, 1 sc.
Repeat this wave sequence from * across until you have 1 chain left.
Work 1 sc in the last chain, turn your work, and change colors if you want stripes.
Row 2 – The Downhill Wave
Chain 3 (this counts as your first tr).
For the wave: *1 tr, 1 dc, 1 dc, 1 hdc, 1 sc, 1 sc, 1 hdc, 1 dc, 1 dc, 1 tr, repeat from * until last chain, 1 tr. Turn your work.
Row 3 – Straight Line
Chain 1. Work 1 sc into each stitch across. Change color if you like.
Row 4 – Another Uphill Wave
Ch 1, 1 sc,*1 sc, 1 hdc, 1 dc, 1 dc, 1 tr, 1 tr, 1 dc, 1 dc, 1 hdc, 1 sc, repeat from * until last chain, 1 sc, turn.
Tip for Beginners:
Keep your stitches loose so the waves look soft and even.
Use a stitch marker at the beginning of your row so you don’t lose track.
Don’t worry if the first rows look a bit wobbly—after a few repeats, the waves will smooth out beautifully!
How to Crochet the Wave Stitch
The wave stitch is one of the most beautiful and popular crochet stitches. It creates a wavy, rolling look by using stitches of different heights. You might also hear it called the rolling wave stitch or wavy stitch.
It’s perfect for projects like blankets, scarves, and hats. The way it’s made makes the “peaks” of one row fit right into the “valleys” of the next row. The different stitch heights create the curves, and it looks extra stunning if you use colors that fade from dark to light, then back again. But of course you can use any color combo you love!
What You’ll Need:
Yarn – any weight and colors you like
Crochet hook – match the size to your yarn (check the yarn label for suggestions)
Scissors – for cutting yarn
Tapestry needle – for weaving in ends
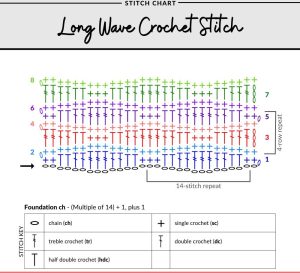
Abbreviations (US Terms)
Here’s a quick cheat sheet for the stitches used:
sc – single crochet
hdc – half double crochet
dc – double crochet
tr – treble crochet
ch – chain stitch
sk – skip
st(s) – stitch(es)
sl st – slip stitch
tog – together
BLO – back loop only
RS – right side
WS – wrong side
Pattern Instructions
Foundation Chain:
Start by chaining a multiple of 10 + 3.
(Example: 33, 43, 53… depending on how wide you want it.)
Row 1
Work 1 sc in the 2nd chain from your hook.
Then: 1 sc, 1 hdc, 2 dc, 2 tr, 2 dc, 1 hdc, 1 sc.
Repeat this sequence across until the last chain.
End with 1 sc, turn your work, and change to your next color (optional).
Row 2
Ch 3 (this counts as your first tr).
Then: 1 tr, 2 dc, 1 hdc, 2 sc, 1 hdc, 2 dc, 1 tr.
Repeat across.
End with 1 tr, turn your work.
Row 3
Ch 1.
Work 1 sc in each stitch across.
Change colors (optional).
Row 4
Ch 1, work 1 sc.
Then: 1 sc, 1 hdc, 2 dc, 2 tr, 2 dc, 1 hdc, 1 sc.
Repeat across.
End with 1 sc, turn your work.
Row 5
Repeat Row 3.
Change colors (optional).
Keep repeating Rows 2–5 until your piece is as long as you want. For a neat finish, end with the same color you started with.
VIDEO TUTORIAL
The Wave Stitch is one of those patterns that looks fancy but is surprisingly easy to learn. Once you’ve made a few rows, you’ll find yourself relaxing into its rhythm, almost like you’re crocheting to the sound of ocean waves. Whether you’re creating a blanket for a loved one or a scarf just for you, this stitch will bring movement, beauty, and a touch of the sea into your work.
So, my dear, why not pick up your hook, choose your favorite yarn, and start riding the crochet waves? 🌊💙 I promise, it’s a journey you’ll enjoy every stitch of.