Christmas Wreath Crochet Pattern
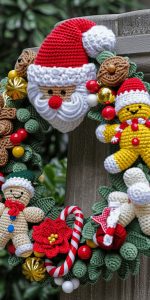
Hello my dear friends, and welcome back to Handmade Learning Here! I’m so excited you’re here today because we’re about to make something truly special — a Crochet Christmas Wreath that’s packed with tiny handmade details and festive charm!
This little wreath is more than just decoration — it’s a bundle of joy stitched together with love. Whether you’re an experienced crocheter or just learning your first few stitches, this project will fill your heart (and home!) with the magic of the holidays.
A Wreath Full of Memories
Each piece in this pattern — the jingling bells, the cozy Santa hat, the tiny gingerbread man, and those sweet snowflakes — is crocheted separately and then sewn onto a round base. Every little part tells its own Christmas story.
It’s such a lovely way to use up leftover yarns too! You can mix soft reds, cozy greens, creamy whites, and a touch of gold for sparkle. Don’t stress too much about color matching — the more variety, the cuter your wreath will look!
This pattern has so many tiny motifs that are fun to learn — and each one teaches you something new! You’ll practice basic stitches like single crochet (sc), half double crochet (hdc), and double crochet (dc), plus a few cute decorative techniques like picots and clusters.
Even if you’re just starting, you’ll do great. The key is to take your time, finish one motif at a time, and enjoy the process. Before you know it, you’ll have a collection of adorable mini-ornaments ready to stitch onto your wreath!

What You’ll Need
To make your wreath, you’ll just need:
Hook: 2.0 mm or 2.5 mm
Yarn: Fine (Size 2) or Superfine (Size 1)
Other: Stitch markers (optional), yarn needle, small decorations (eyes, beads, etc.)
Optional stitch markers and a small foam or crocheted ring for your base
Finished size: about 6 inches (15 cm) in diameter
Abbreviations (US Terms)
-
ch = chain
-
sl st = slip stitch
-
sc = single crochet
-
hdc = half double crochet
-
dc = double crochet
-
tr = treble crochet
-
inc = increase (2 sts in same stitch)
-
dec = decrease (crochet 2 sts together)
-
blo = back loop only
-
flo = front loop only
-
st(s) = stitch(es)
-
MR = magic ring
Notes
-
Always join each round with a slip stitch to the first stitch.
-
Use a stitch marker at the start of each round if you’re new — it helps keep track!
-
The wreath is made by creating small Christmas-themed motifs (bells, leaves, Santa, etc.) and sewing them onto a ring base.
Step-by-Step Motifs
Bell (make 2)
Yellow yarn
-
Rnd1: 6 sc in MR. (6)
-
Rnd2: 6 inc sc. (12)
3–5. Rnd3–5: sc around. (12)
White yarn -
Rnd6: sc around. (12)
Yellow again -
Rnd7: [1 sc, 1 inc] x6. (18)
-
Rnd8: sc around. (18)
👉 Gently shape it like a bell and stuff a bit of fiber if you wish.
Candlestick
Red yarn
-
Rnd1: 6 sc in MR. (6)
2–14. Rnd2–14: sc around. (6)
Use white or yellow yarn to wrap around like a spiral stripe for decoration.
Snowflake
White yarn
-
Make 6 sc in MR. (6)
-
Snowflake points: Go to the 2nd st, sl st, then work:
-
[ch3, sl st in 1st ch, ch5, sl st in 1st ch, ch3, sl st in 1st ch]
Repeat around to form 5–6 branches. Fasten off.
-
Christmas Tree
Green yarn
-
Rnd1: 6 sc in MR. (6)
-
Rnd2: [sc, inc] x3. (9)
-
Rnd3: [2 sc, inc] x3. (12)
-
Rnd4: sc around. (12)
-
Rnd5: [3 sc, inc] x3. (15)
-
Pick the half loop near the center and work 15 sc.
-
Rnd7: [4 sc, inc] x3. (18)
-
Rnd8: sc around. (18)
-
Pick half loop again, [5 sc, inc] x3. (21)
-
Rnd10: sc around. (21)
-
[6 sc, inc] x3. (24)
Tree Leaves:
At rounds 5, 7, and 11 — in the unused loops — work: (ch1, 3 dc, ch1, sl st). Repeat around to make branches.
Snowflakes on leaves:
(ch2, sl st in middle dc, ch2, sl st). Repeat 4 times around.
Tree Trunk:
Rnd1: 8 sc in MR. (8)
Rnd2–6: sc around. (8)
Leave a tail for sewing under the tree.
Star:
-
Rnd1: 5 sc in MR.
-
For each point: [ch3, sl st in 2nd ch, hdc in next ch, sl st in next st]. Repeat around (5 points).
Leave a tail to sew on top.
Christmas Leaves
Green yarn
-
Ch13, work back:
sc, hdc, (dc, ch3 picot, dc) in next st, dc x2, (tr, ch3 picot, tr), dc x2, (tr, ch3 picot, tr), dc, hdc, (sc, ch3 picot, sc). -
Work along the other side of chain with the same pattern.
Leave a 4” tail to sew onto wreath.
Nuts (or berries)
Red yarn
-
Rnd1: 6 sc in MR.
-
Rnd2: 6 inc sc. (12)
-
Rnd3: 6 dec sc. (6)
Stuff lightly if desired.
Santa Hat
Red yarn
-
Rnd1: 4 sc in MR.
-
Rnd2: [sc, inc] x2. (6)
-
Rnd3: [2 sc, inc] x2. (8)
-
Rnd4: [3 sc, inc] x2. (10)
-
Rnd5: [4 sc, inc] x2. (12)
-
Rnd6: sc around. (12)
White yarn: -
Rnd7: sc around. (12)
Add a tiny pompom or white cluster on top.
Gingerbread Man
Brown yarn
-
Body: 10 dc in MR. (10)
-
Without cutting yarn, continue for limbs:
-
Arm: ch5, 3 dc back in BLO, skip 1 st, sl st twice.
-
Legs: ch7, 5 dc back, skip 1 st, sl st twice (do both legs).
-
Repeat arm again.
-
-
Head: 12 dc in MR, sl st to join.
-
With white yarn, sl st around edges for icing effect.
-
Add a bowtie (magic ring, [2 ch, dc, 2 ch, sl st] twice).
Stocking
Green yarn:
-
Rnd1: 6 sc in MR. (6)
-
Rnd2: 6 inc sc. (12)
Red yarn:
3–8: sc around. (12) -
(1 sc, 2 hdc inc, 1 sc)
-
(1 sc, 2 hdc dec, 1 sc)
6–9: sc around. (9)
White yarn: -
Rnd10: sc around. (9)
Santa Face
Skin color yarn:
-
Rnd1: ch2, 12 dc in MR. (12)
White yarn: -
Rnd2: ch2, [dc inc] x12. (24)
-
Rnd3: (ch3, skip 1 st, sl st) x6 → makes 6 spaces.
-
Rnd4: (sc, 3 dc, sc) in each space.
-
Rnd5–8: Repeat the process to form beard layers.
Nose: red yarn – MR, (3 hdc cluster, ch3, sl st). Sew on.
Hat: red yarn – ch3, 3 dc, 3 hdc, 2 sc, sl st. Then turn and decrease slightly in next rows to shape. Add pompom on top.
Gift Box
Green yarn (base):
-
MR, ch7, 6 sc back.
2–6: sc across rows. (6) -
sc around edges, 2 sc in corners.
Red yarn:
Slip stitch in a cross pattern (ribbon).
Bow: MR, ch1, hdc, ch1, sl st, repeat once.
Assembly
-
Arrange all finished motifs around a circular base (foam, wire, or crocheted ring).
-
Stitch or glue them carefully in layers — bells and Santa near the bottom, leaves and snowflakes spread evenly.
-
Add ribbon for hanging and secure all ends neatly.
Final Tip
Don’t worry if your stitches aren’t perfect , the charm of handmade wreaths is in their uniqueness! Take breaks, enjoy the colors, and have fun decorating your little Christmas treasure.
Here, another option for you, in another format…
VIDEO TUTORIAL
The Heart of the Project
There’s something so heartwarming about crocheting holiday pieces. Each stitch feels like a little wish for warmth, family, and joy. I always picture hanging this wreath by the door and smiling every time I walk past it, it’s like being wrapped in a cozy Christmas hug.
And the best part? You can personalize it however you like! Add tiny beads, jingle bells, ribbons, or even small handmade bows. There’s no “wrong” way to decorate your wreath, only your way. ❤️
If you’re feeling nervous, remember: crochet is about patience and joy, not perfection. Every handmade stitch adds character. Even if your snowflake looks a little funny or your Santa hat leans to one side — it’ll still look absolutely charming once it’s all put together.
You’ve got this, my friend. Take a sip of cocoa, grab your yarn, and let’s make something beautiful together!
Thank you so much for stopping by Handmade Learning Here today! I hope this Christmas Wreath Crochet Pattern brings warmth and creativity to your home this holiday season.
I hope see you soon here, my dear.
With love and yarn,
Handmade Learning Here 💕


