Brick Crochet Blanket
Hello dear, welcome to our lovely blog Handmade Learning Here. I’m so glad you want to make this cozy blanket! I will walk you through the pattern slowly and clearly, step by step. Take your time, brew a cup of tea, and enjoy crocheting.
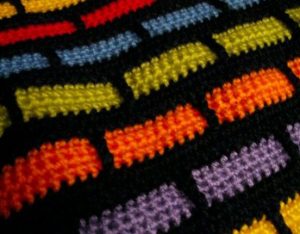
There’s something so comforting about settling down with a warm drink, a soft ball of yarn, and a simple stitch pattern that grows beautifully right in your hands. Today, I’m excited to share with you a charming project: the Brick Crochet Blanket, a wonderful pattern inspired by a lovely old make that feels both classic and modern.
This blanket uses simple stitches, mostly single crochets, double crochets, and a few treble crochets, to create a beautiful “brick-like” texture. It’s perfect for beginners who already know the basics and want to take their skills just a tiny step further. And don’t worry, dear… I’ll walk you through it all, nice and slow.
A Pattern Filled With Texture and Simplicity
The beauty of this blanket lies in its repeating groups of rows. The stitches build up in such a steady rhythm that it becomes one of those relaxing “evening projects” you can enjoy while watching your favorite show or listening to music.
You’ll begin with a long foundation chain and a row of double crochets. From there, the texture starts forming through little chain-spaces and the occasional treble crochet that reaches down several rows to create the illusion of bricks. It’s such a clever technique — simple, yet striking.
The blanket feels warm, thick, and comforting, making it a wonderful choice for gifting, decorating your home, or curling up on chilly nights.
ABBREVIATIONS (US TERMS)
Ch – chain
sc – single crochet
dc – double crochet
tc / tr – treble crochet
sl st – slip stitch (used in the border)
sp – space (refers to the chain-1 spaces)
sk – skip
st / sts – stitch / stitches
rep – repeat
yo – yarn over
fo – fasten off
STEP BY STEP
Foundation Row
Make a slipknot, then chain 131 with your main colour.
In the 4th chain from the hook, make 1 double crochet (dc). Then make 1 dc in each chain until the end — that will give you 128 double crochets total.
Change to Colour A (if you’re using a different colour), then turn your work.
Row 1
With Colour A, chain 1.
Make 1 single crochet (sc) in each of the first 4 double crochets.
Then * chain 1, skip (miss) 1 dc, and make 1 sc in each of the next 9 dc. *
Repeat from * until you reach the last 5 double crochets.
At the end: chain 1, skip 1 dc, then make 1 sc in each of the last 4 dc.
Turn your work.
Rows 2–4
Chain 1.
Make 1 sc in each stitch across the row — this includes the little “gap” created by your chain-1 from the previous row (so you work into the gap where that ch-1 was).
At the end of Row 4, join your main colour again.
Row 5 — The Row that Makes the Brick Pattern!
With your main colour: chain 1.
Make 1 sc in each of the first 4 stitches.
Then * make 1 treble crochet (tc) into the stitch that is 4 rows below (i.e. skip down four rows vertically). Do not put a sc in the stitch directly behind that tc.
Continue by making 1 sc in each of the next 9 stitches. *
Repeat from * across until you reach the last 4 stitches.
At the end: make 1 tc into the stitch 4 rows below, then finish with 4 sc.
Turn your work.
Row 6
Chain 3 (this chain-3 counts as your first double crochet (dc)).
Then make 1 dc in every stitch across the entire row. Turn.
Row 7 — similar to Row 1, but with a shift to continue the brick-like look:
Make 1 sc in each of the first 9 stitches.
Then chain 1, skip 1 dc.
Continue repeating: 1 sc in each of next 9 dc, ch 1, skip 1 dc, until end of row. Turn.
Rows 8–10
These are just like Rows 2–4: chain 1, then 1 sc in each stitch across.
You will continue alternating these groups of rows — so the “brick” pattern emerges as you progress.
Border / Edging (optional, but makes your blanket look so finished!)
Once your blanket has reached the size you like, you can add a border like this:
- Round 1: Using your main colour, work single crochets (sc) evenly all around the blanket. In each corner, make 3 sc to help it lie flat and square.
- Round 2: Switch to an alternate colour. Work 2 sc, then chain 1, skip one sc — repeat this all around. In each corner: again 3 sc.
- Round 3: Return to main colour. In each “skipped” stitch from Round 2, make 1 double crochet (dc) into the sc beneath; then 2 sc into each of the next 2 scs. Continue this around, and make 3 sc in each corner.
- Round 4: Finish with a round of slip stitches (sl st) in your main colour.
A Few Gentle Notes, Dear:
- “Ch” means chain (correntinha).
- “sc” means single crochet (ponto baixo).
- “dc” means double crochet (ponto alto).
- “tc” means treble crochet — a taller stitch that helps create that lovely brick-like vertical offset.
- When I say to “skip” or “miss” a stitch — that simply means you don’t work into that stitch, you move past it.
- If you’re unsure — count your stitches, especially after you skip and chain; you should end each row or round with the correct number of stitches so the shape stays even.
Take it slow, sweetie. Crocheting is like a gentle dance — stitch by stitch, row by row — and soon you’ll have a beautiful, warm blanket made by your own hands.
VIDEO TUTORIAL
A Blanket Filled With Love
Handmade blankets carry such a tender kind of magic. They warm not just the body, but the heart of whoever receives them. This Brick Crochet Blanket is the perfect example of a project that looks thoughtful, feels luxurious, and isn’t too complicated to make, even if you’re still building your crochet confidence.
Whether you’re making it for a grandchild, a dear friend, or your own cozy corner of the couch… each stitch will be filled with love. And that’s what handmade crafting is all about.
Thank you so much for visiting Handmade Learning Here today, sweetheart. I hope this lovely Brick Crochet Blanket inspires you to sit down, breathe deeply, and enjoy the simple pleasure of creating something with your hands.
You’re always welcome back anytime, there are so many other patterns waiting here to keep your hook busy and your heart happy. Don’t forget to explore the rest of our crochet tutorials and patterns… I’m sure you’ll find something perfect for your next project. See you soon, my dear.