
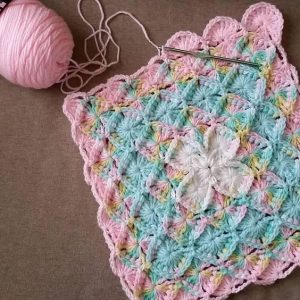
Bavarian Square
Bavarian Square
Hello crochet enthusiasts! Welcome to our charming blog, Handmade Learning Here. Today, we’re thrilled to present another exquisite pattern. Let’s delve into learning a new stitch together! I’m excited to introduce the Bavarian Square, which may seem complex at first glance but becomes straightforward once you grasp it. I’ve curated a detailed and comprehensive tutorial for you to follow along. Hope you enjoy!
Historical Origins:
The Baravian Square pattern, as the name suggests, has its roots in the Bavarian region of southern Germany. This region is known not only for its rich culture and history but also for its artisanal traditions, including crochet. The Baravian Square incorporates traditional elements of Bavarian crochet, combining intricate stitches and delicate details.
Complexity and Beauty of Bavarian Square:
What makes the Baravian Square pattern so special is its intricate complexity. It consists of a skillful combination of different crochet stitches, including basic stitches like chain, single crochet, and double crochet, as well as more elaborate stitches like popcorn stitch and relief stitch. This variety of stitches creates a rich texture and visually captivating pattern, which is the hallmark of this pattern.
Versatility:
One of the most notable features of the Baravian Square pattern is its versatility. While traditionally used to create individual squares that can be joined together to form blankets, pillows, or even garments, this pattern can also be adapted in various ways. For example, the squares can be scaled up to create larger pieces such as afghans or rugs, or scaled down to make smaller accessories like brooches or Christmas ornaments.
Additionally, the Baravian Square pattern can be worked in a variety of yarns and colors, allowing for endless creative combinations. From thick, chunky yarns for a cozy, rustic look to fine, delicate yarns for a more sophisticated, feminine appearance, the possibilities are truly endless.
Challenge and Reward:
While the Baravian Square pattern may seem daunting at first glance due to its complexity, many crocheters find it to be a rewarding challenge to master. As they work on each square, crafters develop their skills and gain a deeper understanding of the different crochet stitches and how they come together to create complex patterns.
Moreover, the end result – whether it’s a luxurious blanket, a decorative pillow, or any other piece created with the Baravian Square pattern – is truly a work of art that can be appreciated and admired for years to come.
BAVARIAN SQUARE TUTORIAL
MATERIALS:
- DK or worsted weight yarn in assorted colors (Using DK yarn will result in a slightly smaller project compared to worsted weight. I’ve opted for DK in this demonstration.)
- Size H crochet hook
- Yarn needle
- Scissors
ABBREVIATIONS (US TERMS)
tr – treble crochet
bptr – back post treble crochet
ch – chain
sl st – slip stitch
sk – skip
sc – single crochet
Bavarian Square – STEP BY STEP
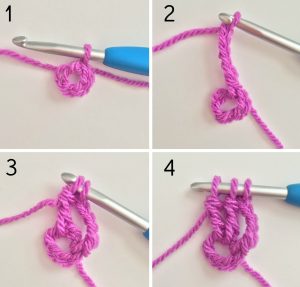
Step 1: Make a loop by chaining 6 stitches, then slip stitch to join the ends to form a ring. Chain 1, and single crochet into the ring.
Step 2: Chain 5.
Step 3: Now, make a treble crochet into the ring, but don’t finish the stitch completely; leave the last loop on the hook. We’re going to make a cluster of 4 treble crochets together.
Step 4: Make another treble crochet into the ring, but again, don’t complete the stitch entirely, leaving the last loop on the hook. At this point, you should have 3 loops on your hook.
Step 5: Go into the ring again, but don’t finish the stitch, leaving one loop on the hook. Now you should have 4 loops on your hook.
Step 6: Go into the ring one more time without finishing the stitch, leaving one loop on the hook. You should now have 5 loops on your hook.
Step 7: Wrap yarn over and pull it through all 5 loops on your hook.
Step 8: Chain 5.
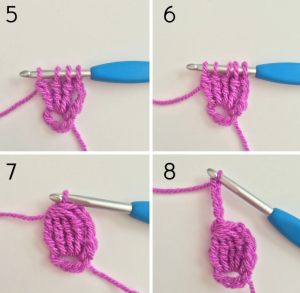
Step 9: Single crochet (sc) into the ring.
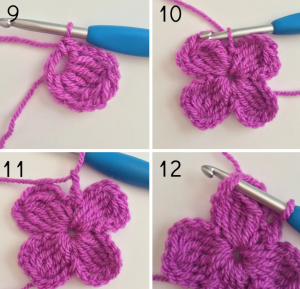
Step 10: Repeat steps 2 through 9, three more times. Join with the first single crochet (sc) made.
Step 11: Chain 1, single crochet (sc) in the same stitch (the single crochet from the previous round), then chain 2.
Step 12: Now, let’s crochet into the top of the 4-treble (4-tr) cluster. Locate the small “eye” at the top of the cluster where you’ll insert your hook to crochet.
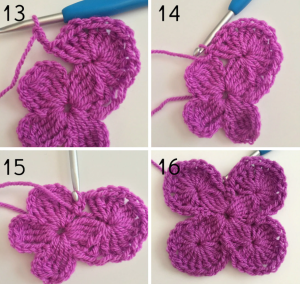
Step 13: Make 4 treble crochet stitches into the top of the group of 4 treble crochet stitches from the last round. Then, chain 1, make 4 treble crochet stitches into the same top spot again. Do this one more time.
Step 14: Chain 2.
Step 15: Single crochet into the single crochet stitch from the previous round.
Step 16: Repeat steps 13 through 15 three more times. Then, finish off by fastening off the yarn.
Step 17: Add the next color by putting your hook into any chain 1 space from the previous round. Chain 1, then single crochet into the same chain-1 space.
Step 18: Chain 5.
Step 19: Let’s do something called “back post treble crochet 4 together” or “bptr 4 together”. Wrap your yarn around your hook, then go around the treble crochet from the round before, making sure to leave the last loop on your hook. You should now have 2 loops on your hook.
Step 20: Do another back post treble crochet around the next treble crochet from the previous round, again leaving the last loop on your hook. Now, you should have 3 loops on your hook.
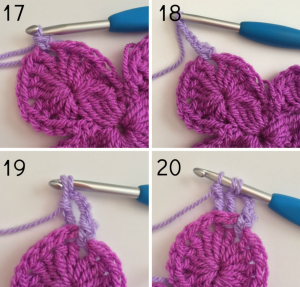
Step 21: Begin by making a back post treble crochet (Bptr) around the next treble crochet (tr) from the previous round, but keep the last loop on your hook. Now, you’ll have 4 loops on your hook. Make another Bptr around the next tr from the previous round, leaving the last loop on the hook again. This time, you should have 5 loops on your hook.
Step 22: Yarn over and pull through all 5 loops on the hook.
Step 23: Chain 5.
Step 24: Single crochet (sc) into the chain-1 space from the previous round.
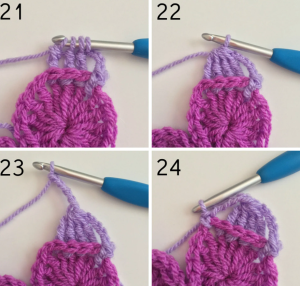
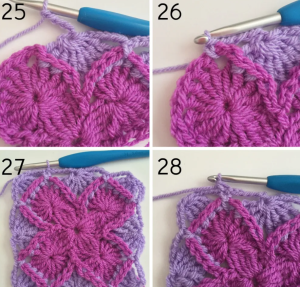
Step 25: Chain 5. Bring together 8 stitches by crocheting them into one (check the picture). Chain 5 again.
Step 26: Single crochet into the next space with one chain.
Step 27: Repeat steps 18 through 25 until you reach the beginning. Connect with the first single crochet made.
Step 28: Chain 1, single crochet into the same stitch (which was a single crochet from the previous round).
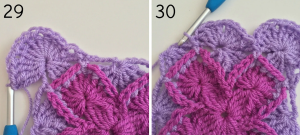
Step 29: Make 4 treble crochet stitches into the top of the group of 4 treble crochet stitches from the previous round. Then, chain 1 and make 4 more treble crochet stitches into the same top. Repeat this process once more. Finally, single crochet into the single crochet stitch from the previous round.
Step 30: Make 4 treble crochet stitches, chain 1, and make 4 more treble crochet stitches all into the top of the group of 8 treble crochet stitches. After that, single crochet into the single crochet stitch from the previous round.
Step 31: Repeat steps 29-30 around.
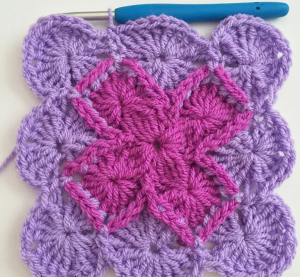
To create a bigger square, proceed with steps 17-30, ensuring to incorporate a set of 8-tr clusters to every side of the square as you progress. For an 8×8 square, you’ll need to crochet 6 rounds (using DK yarn, fewer for worsted weight). Optionally, you can add an edging to give it a squared-off look, though I skipped this step as I’m crafting a larger afghan.
Though the process involves several steps, don’t be discouraged. Once you grasp the stitch pattern, it’s quite straightforward. Have fun!
Bavarian Square – VIDEO TUTORIAL
Dear reader, we always love to provide various different tutorial formats so you can follow along in the best possible way. Therefore, we’ve also included a video tutorial from NAZTAZIA YouTube channel here for you to better understand and create your beautiful Bavarian Square. The video tutorial is very instructional, and you can watch it below:
Conclusion:
We appreciate your presence here on our lovely blog, dear reader. We hope you enjoyed this beautiful pattern; with it, you’ll be able to create a wonderful project, whether it’s a blanket made of several squares or just one huge blanket resembling a large square. Whatever your idea may be, enjoy and dive into this wonderful journey!
The Baravian Square pattern is more than just a crochet technique – it is a celebration of Bavaria’s rich artisanal tradition and a testament to the skill and creativity of crocheters around the world. With its enchanting complexity, endless versatility, and rewarding challenge, this pattern continues to inspire and captivate crafters of all skill levels. May each square worked be not only a step towards an extraordinary final piece but also a journey of discovery and achievement in the world of crochet.
Wow, this is the best tutorial of the Bavarian stitch. I love it that you have step-by-step photos along with the instructions. Thank you.