Slanted Shell Throw Blanket
Hello, my dear! Today we’re going to make a wonderfully cozy and festive blanket called the Slanted Shell Throw. I rewrote the entire pattern using simple, gentle instructions so even beginners can follow along without worry. So take a deep breath, grab your yarn and hook, and let’s enjoy some peaceful crocheting together.
If you’re looking for a comforting project that feels like a warm holiday hug, the Slanted Shell Throw Blanket is a perfect choice. This beautiful pattern brings together soft textures, gentle rhythm, and a festive color palette that instantly brightens any space. Whether you’re crocheting it for yourself, gifting it to someone special, or adding it to your holiday décor, this blanket is a wonderful way to enjoy slow, peaceful moments with yarn.
A Stitch Pattern That Looks Fancy but Feels Relaxing
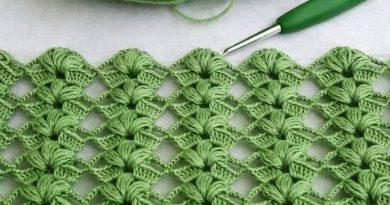
One of the reasons this blanket is so enjoyable is the charming slanted shell stitch. At first glance, it looks intricate, almost like something only advanced crocheters could manage. But don’t let the elegant texture fool you! The stitch is made with simple, beginner-friendly repeats that quickly become easy to follow.
Once you work through the first few rows, the pattern develops a soothing rhythm—almost meditative. The shells lean gently to one side, creating that lovely “slanted” effect that gives the blanket its unique character.
It’s the kind of project you can take to the couch, settle in with a warm drink, and enjoy row after row of calm stitching.
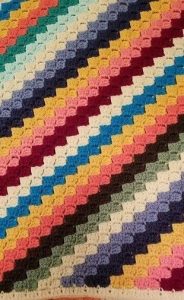
Perfect for Playing with Color
The Slanted Shell Throw Blanket is traditionally worked in festive Christmas colors, usually red, green, and white. But you can truly make it your own! This pattern is incredibly flexible:
- Want something classic? Stick to holiday shades.
- Prefer a soft and cozy vibe? Try pastels like cream, blush, and sage.
- Want a modern look? Neutrals like charcoal, ivory, and tan look stunning with this stitch.
Because the shells stack beautifully, each section of color stands out without overwhelming the design.
Materials
Worsted weight yarn (#4).
In the original project, the designer used Premier Basix yarn in the colors Red, Holly Green, and White.
You’ll need about 3 skeins of each color.
Crochet hook size J/10 (6 mm)
Scissors
Yarn needle
Feel free to use any yarn you like, as long as it’s the same weight!
Finished Size
46 in × 54 in (about 117 × 137 cm).
You can make your blanket bigger or smaller if you want — I’ll explain how below!
To adjust the width:
Make a starting chain that is a multiple of 4, plus 2 extra chains.
To adjust the length:
Simply work more or fewer rows.
Abbreviations (US Terms)
- CH – Chain
- SC – Single Crochet
- DC – Double Crochet
- CH-2 space – The space created by a CH 2 in the previous row
Blanket Pattern
We will start at the bottom of the blanket and work our way up.
The whole blanket is based on a simple rhythm: a shell (4 DC), a CH-2, and a SC, repeated across the row.
Once you get the hang of Row 3, the rest becomes wonderfully relaxing.
Row 1 — Foundation Row
With Red, chain 142 (or your custom number: multiple of 4 + 2).
- SC in the 2nd chain from your hook.
- SC across the entire row, one SC in each chain.
- At the end of the row, CH 3 and turn.
This CH 3 counts as your first DC of the next row.
Row 2
- Work 4 DC in the first SC of the row.
- Skip the next 3 SC.
- In the next SC, work:
(SC, CH 2, 4 DC) - Repeat this sequence all the way across the row.
- End with a SC in the last stitch.
- CH 3 and turn.
You’re doing beautifully!
Row 3
This row creates the “slanted” look of the shells.
- Work 4 DC into the first SC.
- Skip the next 4 DC.
- In the CH-2 space, work:
(SC, CH 2, 4 DC) - Repeat across the row.
- Make your last SC in the small space right before the turning chain.
- CH 3 and turn.
Rows 4 & 5
Repeat Row 3 for both rows, still using Red.
When you finish Row 5, cut the red yarn and switch to Holly Green.
Suggestion Color Sequence
From here on, you will continue repeating Row 3 for the WHOLE blanket, while following this color pattern:
- 4 rows of Holly Green
- 4 rows of White
- 4 rows of Red
Repeat these color blocks until you have 88 shell rows total
(89 rows including the very first SC row).
Start and end your blanket with Red, just like the original.
Finishing the Blanket (Border)
Row 1 of Border
- CH 1
- SC in every stitch and every DC across the row
- CH 1 and turn
Row 2 of Border
- SC across the entire row again
- Fasten off and weave in all your ends gently with a yarn needle
Your beautiful Christmas blanket is complete!
Helpful Notes
If you ever get lost, remember:
A shell = 4 DC
The next shell always goes into the CH-2 space
This stitch pattern becomes very relaxing once you memorize the rhythm.
Changing colors every 4 rows looks neat and keeps the blanket beautifully festive.
Don’t pull too tightly when working into the CH-2 space — let your hook glide comfortably.
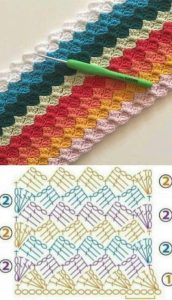
GRAPH
VIDEO TUTORIAL
Whether you’re crocheting for your own home or preparing a thoughtful handmade gift, the Slanted Shell Throw Blanket brings so much charm and joy to the season. The combination of soft texture, rich colors, and beginner-friendly stitching makes it a delightful project from start to finish.
And of course, handmade blankets have a magic of their own. Every stitch carries a bit of love, warmth, and intention—making this throw a cozy treasure year after year.
I hope this lovely pattern inspires you to pick up your hook, choose your favorite yarn colors, and let yourself enjoy the simple pleasure of creating something beautiful with your hands. Thank you so much for visiting Handmade Learning Here!
Feel free to explore more patterns, tutorials, and inspiration on the blog. And remember, sweetheart…you’re always welcome back anytime. Happy crocheting!