
Crochet Star Stitch
Hello my loves! As always we have new discoveries and we bring great patterns for you to work with. You know a point that is a charm and makes any piece more beautiful? The star stitch! This stitch is one of the most beautiful patterns I’ve had the opportunity to work with. I know, it looks pretty complicated, but the truth is, it’s a pretty easy crochet stitch to make if you know where to insert the hook.
When I worked with this stitch, I remember that just seeing it I imagined it to be something very difficult and challenging, that’s where I was wrong. I read the complete pattern and even watched the video tutorial to ensure that everything went as planned, I was doing it together and when I saw it I was already doing it with practicality.
As with the other stitch patterns, I made a few small samples of squares with star stitches to be able to try new combinations or to test how it would look in finished projects, like napkins, just giving a special touch on the edges. I suggest you use this tip, it is very practical and can help you to optimize your time.
This beautiful stitch pattern can give some works a special beauty and make the most beautiful pieces you can imagine! Blankets, sweaters, caps, scarves, coats… Any project of yours can be more elegant with this beautiful pattern. With that star aspect, he brings with him an air of coziness comfort.
The crochet stitch known as Star Stitch or daisy stitch (as it is also known), is a crochet stitch pattern. To do this you will need a double treble crochet and half treble crochet and a simple two-row repeat that starts a beautiful star pattern sequence on the right side of your project.
You can make a beautiful blanket with Star Stitch or strings of star stitch lines through your blanket, combining with other stitch patterns that can give you a beautiful project! You can alternate colors, having the blanket in one color and the stars in another, resulting in a beautiful, differentiated project.
Here on our nice blog we have the most beautiful patterns, and we want to make available the complete crochet star stitch tutorial here. I hope you like it and apply it to your projects and in this way create beautiful pieces with this pattern.
STEP BY STEP INSTRUCTIONS:
Note: Utilize the hook size recommended on the yarn label you’re working with.
This stitch pattern consists of multiples of 2 plus 7 stitches.
For crafting a sample swatch, begin with a chain of 19.
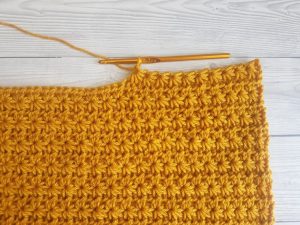
Row 1: Place your hook into the second chain from the hook, yarn over, and pull through the chain (resulting in 2 loops on the hook). [Insert the hook into the next chain, yarn over, and pull through the stitch] four times, ensuring all loops are maintained on the hook (total of 6 loops on the hook). Yarn over and pull through all 6 loops, then chain 1 to secure.
Note: The chain-1 space just created forms the center of the star stitch.
Insert your crochet hook into the chain-1 space of the star stitch you’ve just created, yarn over, and pull it through the chain-1 space (2 loops on your hook). Working down the side of the same star stitch, insert your hook between the last post and the next-to-last post on the edge of the star stitch, yarn over, and pull through the space (3 loops on your hook). Insert your hook into the chain at the base of the same star stitch, yarn over, and pull through the chain (4 loops on your hook). [Insert your hook in the next chain, yarn over, and pull through the chain] twice (6 loops on your hook). Yarn over and pull through all 6 loops, then chain 1 to secure. Repeat from * to * across until you reach the last chain, work a half double crochet (hdc) in the last chain, and then turn.
Row 2: Chain 2, work 2 hdc in the chain-1 eye of each star stitch across, work 1 hdc on top of the ending post of the last star stitch, and then turn.
Row 3: Chain 3, insert your hook into the 2nd chain from the hook, yarn over, and pull through the chain (2 loops on your hook). Insert your hook into the next chain, yarn over, and pull through the chain (3 loops on your hook). [Insert your hook in the next stitch, yarn over, and pull through the stitch] 3 times (6 loops on your hook). Yarn over and pull through all 6 loops on your hook, then chain 1 to secure. Insert your hook into the chain-1 space of the star stitch you’ve just made, yarn over, and pull through the chain-1 space (2 loops on your hook). Working down the side of the same star stitch, insert your hook between the last post and the next-to-last post on the edge of the star stitch, yarn over, and pull through the space (3 loops on your hook). Insert your hook in the stitch at the base of the same star stitch, yarn over, and pull through the stitch (4 loops on your hook). [Insert your hook in the next stitch, yarn over, and pull through the stitch] twice (6 loops on your hook). Yarn over and pull through all 6 loops, then chain 1 to secure. Repeat from * to * across until you reach the ending turning chain-2, work 1 hdc on top of the ending chain-2, and then turn.
Row 4: Repeat Row 2.
Repeat Rows 3 & 4 to continue the pattern, and end the pattern after completing Row 4.
Access the PDF/ Crochet Star Stitch
Dear reader, if you still have doubts about how to carry out the project, we want to make available a video tutorial by Crafting Happiness blog that you can follow.
We also have other pattern models that can even match the star stitch, how about you take a look? You can check below:
Tell me if you already knew or worked with this pattern! And if you didn’t know them, tell me what you think of them. I love reading your comments about the patterns and I’m sure your testimony can inspire others too!
Enjoy your day, we hope it is pleasant and full of good things. Enjoy good times doing what you love and close to those you love! Now let’s crochet!
Ty for your pats
Thank you❣️❣️❣️ I’m a novice, but I’d like to try this one!!!🤞🏻🤞🏻🤞🏻🤞🏻
Gonna give it a try
I am currently making placemats with this stitch. As I am a novice, I have to be VERY careful at the end of each row. Love how it is coming out.
Can’t wait to try this pattern.
I love learning all the new stitches I can’t wait to see what next I’ve been trying for years to learn the name of a stitch so I can learn how to do it it’s the star stitch thank you for solving the mystery
Just wondering how many I should chain at the start to do a baby blanket with this stitch? Your tutorial was so easy to follow and I love how my swatch came out.