
The Crochet Crocodile Stitch Pattern
Hi my dears! How about embarking on a new journey of craft news? The pattern I’ve separated for you today is simply amazing, fun with its texture and has a very beautiful look that reminds me of scales. I tested a project with this pattern and I loved working with it, so I decided to share it with you! I bet he will win you over and beautify your projects even more: The crochet crocodile stitch pattern.
The crochet crocodile stitch or sequin stitch, which is what I brought here for you to learn, is a distinctive crochet stitch pattern, but calm down because it’s not difficult!
This is a very adorable and versatile technique. The name of this technique is Crochet Sequin Stitch also known as the crochet crocodile stitch pattern, it is very beautiful and gives your project a kind of 3D effect, because of its different texture.
As you can see, we always try to bring different patterns here, as each crochet stitch has its differential and can adapt in impressive ways in different types and styles of pieces. Just let your creativity flow!
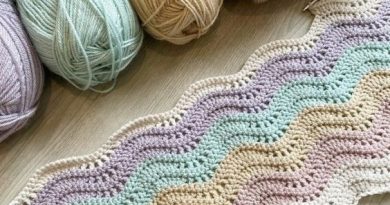
The crocodile stitch has a distinctive look. I already mentioned here that it reminds me of scales, but if you look closely you will also remember beautiful petals, with one overlapping the other as well as beautiful roses and flowers that we see around. This is the perfect stitch pattern for beautiful decorative quilts.
OPTIONS FOR YOU TO USE:
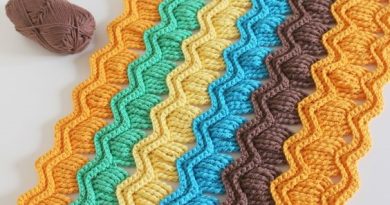
As you can see, it is a stitch pattern in which different colors and shades can be used. The more vibrant and colorful, the more prominent the dot is. You can also make beautiful color gradients, working with a specific color and exploring its tones from the lightest to the darkest.
You can innovate a lot! And with crochet this is how it works, the way you use the stitch can bring a different aspect to your piece. You can make different projects using this beautiful stitch pattern.
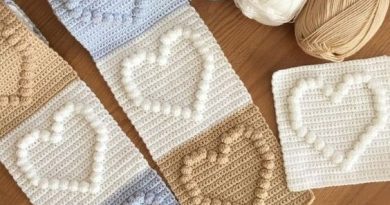
Look how beautiful these projects are, they are some of the ideas to inspire you in future works that you can do too!
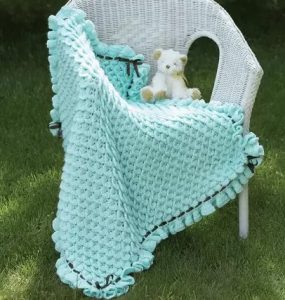
One more beautiful than the other, and also very exclusive. As the sequin stitch pattern is quite versatile, it combines well with other stitches, giving your piece a special charm. You can do whatever you want with this stitch, for sure you will have a beautiful result!

And let me tell you, it doesn’t take a lot of effort to make these beautiful pieces. Of course, you will need to learn, but after that, just your hook, your line of colors that you prefer and your creativity is enough. You will notice in the walkthrough that we make available that it is not a seven-headed animal, quite the contrary, and it is quite repetitive.
Practice comes with perfection, you will test and soon you will be making beautiful gifts for yourself and for those you love. This beautiful stitch can be combined in other projects with other stitches and become something totally unique and original. The details of your work or ready-made pieces can be done in sequin stitches, they will give your piece a charm of its own.
The versatility of this sequin stitch pattern technique is sure to win you over! As mentioned here, there are several examples that can inspire you to work on spectacular projects. The sequin stitch crochet pattern is available below that we make it available in both ways, written step by step or in a video tutorial if you prefer. We recommend that you watch the video before starting so you can understand it more clearly.
PATTERN:
Note: When working with any stitch pattern, make sure to use the recommended hook size from the yarn label you are using to achieve the best results.
Begin by creating a chain with a multiple of 6 plus 4 stitches.
For a sample swatch, create a chain of 22 stitches.
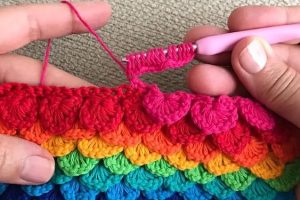
Row 1 (Wrong Side): Double crochet (dc) in the 4th chain from the hook, chain 2, skip the next 2 chains, work 2 dc in the next chain, repeat from * to * across, then turn.
Row 2: Chain 3 (counts as the first dc), while keeping the right side facing you, turn the work so that the first dc is oriented sideways facing you, while the rest of the work faces away from you. Work 4 dc around the post of the first dc, working from top to bottom. Chain 1, and again keeping the right side facing, turn the work so that the next dc is sideways facing you. Half of the scale just made should be facing away from you. Work 5 dc around the next dc, working from bottom to top (completing one full scale). Chain 1, fold the scale down, now with the right side of the work facing you, skip the next set of 2 dc, then work 5 dc from top to bottom around the post of the first dc of the next set of 2 dc, chain 1, and turn the work while keeping the right side facing. Work 5 dc from bottom to top around the post of the next dc. Repeat from * to * across the row.
Note: Placing a stitch marker in the last stitch of the row before working the last scale can be helpful to locate the last stitch.
Turn the work with the wrong side facing, and slip stitch in the center of the last scale made to secure it. Row 3: Chain 3 (counts as the first dc) in the same space where you just slip stitched to secure the scale. Dc in the same space at the center of the scale. Chain 2, work 2 dc between the next 2 dc through the center of the stitches towards the front of the work, where the scales are joined with a chain-1 space. Make sure to work your stitches around the chain-1 space as well as between the 2 dc to secure the scales. Chain 2, work 2 dc in the center of the next scale. Repeat from * to * across the row, and then turn.
Row 4: Chain 1, skip the first set of 2 dc. Work 5 dc around the post of the first dc of the next set of 2 dc, working from top to bottom. Chain 1. With the right side facing, turn the work so that the hook inserts from the side of the next dc and points towards the center of the just-worked scale. Work 5 dc from bottom to top around the next dc, chain 1, then skip the next set of 2 dc. Repeat from * to * across the row, ending with a slip stitch between the last 2 dc. Turn.
Row 5: Chain 3 (counts as the first dc), dc in the same space between the first 2 dc. Chain 2, work 2 dc in the center of the next scale, chain 2, work 2 dc between the next 2 dc through the stitches to the front of the work where the scales are joined by a chain-1 space. Ensure that your stitches go around the chain-1 space as well as between the 2 dc to secure the scales. Chain 2, work 2 dc in the center of the next scale. Repeat from * to * across the row, ending with 2 dc between the last 2 dc. Turn.
Row 6: Repeat Row 2.
Continue to repeat Rows 3-6 to create the pattern, ending the pattern with Row 6.
If you still have doubts about the written pattern, we want to make available a Creative Grandma video tutorial that you can follow along.
This is an adorable crochet stitch! It also resembles the tail of mermaids and fish, kids love it and have fun with it!
Tell me, what do you think of this sequin stitch pattern? Have you heard of him or worked with him before? tell us! Your feedback is sure to inspire others. If you have any questions or suggestions, let us know in the comments below. We are always on the lookout!
Dear reader, here are several patterns available for you, if you are in doubt about how to execute your project, bellow we suggest some beautiful options that can inspire you. You might also like these super fun patterns:
The Handemade Learning team lovingly extends warm wishes to all our dear readers for amazing days ahead, filled with lots of creativity and positive vibes. We want you to make your beautiful crochet project and experience joy and fulfillment in the process. We hope your week is blessed and your days full of good things. Now.. Let’s do what we love: CROCHET!
See you soon!!!
Tutorial de las botitas
Will variegated colored yarn work with this stitch?
I think it would work if you made it like a rainbow would be beautiful
Thank you for sharing this pattern and doing a video tutorial, the video has helped me grasp the position of the stiches and of the pattern, being left handed and cack handed using the hook and wool together, it takes me a bit of time to grasp what I’m doing.
I hope to learn this stitch. So glad I found this page. I want to make dragon wings. I might crash and burn. But must learn the stitch first. Think this stitch will be perfect 👌. Would also be beautiful for Mermaid dress if dragon wings work. We shall see.