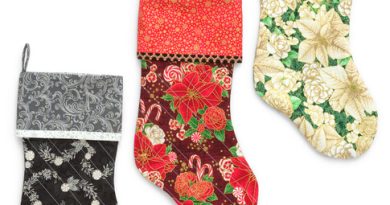
Quilted Fabric Teacup
Welcome to Handmade Learning Here, dear creative friend. We’re so happy you stopped by our cozy little corner filled with fabric, stitches, and handmade inspiration. Whether you’ve been quilting for years or are simply looking for a charming new sewing project to brighten your day, we hope you’ll feel right at home here with us. Today we’re creating an absolutely delightful Quilted Fabric Teacup, a soft and whimsical handmade project inspired by vintage tea parties, cottage-style décor, and the comforting beauty of slow crafting.
With its quilted texture, delicate floral fabrics, curved handle, and matching saucer, this sweet little teacup is the perfect project for anyone who loves sewing pieces that feel both decorative and heartfelt. It’s a wonderful opportunity to practice quilting, hand stitching, and soft sculpted fabric techniques while creating something truly unique and full of personality. So gather your prettiest fabric scraps, pour yourself a warm cup of tea, and let’s make something beautiful together.
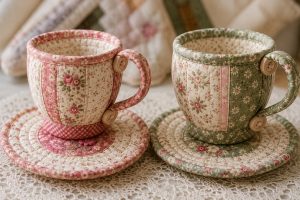
There’s something truly magical about combining quilting and tea-time inspiration into one handmade project. Soft fabrics, delicate stitching, tiny embroidered details, and a sweet little fabric teacup resting on its matching saucer, it feels like something straight from a cozy cottage sewing room.
This beginner-friendly quilted teacup project is inspired by classic fabric teacup crafts and is designed to help newer sewists create a soft sculpted teacup entirely from fabric, batting, and simple hand-finishing techniques. While the finished piece looks wonderfully detailed, we’ll take everything slowly and step by step together.
This little teacup makes a lovely: sewing room decoration, pincushion, gift for tea lovers, spring décor piece, or handmade display for a tea party table.
So gather your prettiest floral fabrics, warm up the iron, and let’s begin stitching something charming together.
Finished Project Size
Your finished fabric teacup will be approximately:
- 4” tall
- with a saucer measuring about 6½” wide
Because this is a handmade fabric craft, slight variations are perfectly normal and part of the charm.
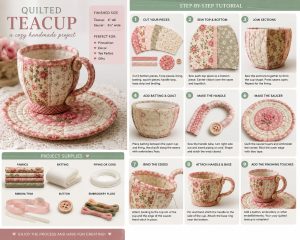
Supplies You’ll Need
Fabrics
- 3 coordinating cotton fabrics
- Cotton lining fabric
- Small scraps for decorative details
Other Materials
- High-loft polyester batting
- Cotton piping or thick yarn
- Embroidery floss
- Ribbon or trim
- 1 decorative button
Sewing Tools
- Sewing machine
- Hand-sewing needle
- Embroidery needle
- Pins or clips
- Rotary cutter and ruler
- Fabric scissors
- Turning tool or chopstick
- Safety pin
- Iron and pressing mat
Soft florals, faded roses, tiny ginghams, tea-themed prints, and vintage cottage fabrics work beautifully for this project.
Understanding the Project Structure
Before sewing, it helps to understand how the teacup is built.
The project includes:
- A soft quilted outer teacup
- A fabric lining
- Batting between layers
- A padded fabric handle
- A matching fabric saucer
- Decorative embroidery and finishing details
The cup itself is formed from several curved fabric panels sewn together into a rounded shape.
Don’t worry if that sounds intimidating right now, we’ll build it one gentle step at a time.
PATTERN
Step 1 — Prepare Your Fabric Pieces
Begin by cutting your teacup pieces.
For a beginner-friendly version, you’ll need:
- 5 lower cup panels,
- 5 upper cup panels,
- lining pieces,
- one saucer circle,
- and long fabric strips for the handle and base.
If possible, cut curved pieces on the bias (diagonally across the fabric grain). This helps the fabric bend more smoothly around the rounded cup shape.
Take your time with cutting.
Accurate pieces make assembly much easier later on.
Step 2 — Create the Decorative Cup Panels
Now we’ll build the outer sections of the teacup.
Take:
- one upper panel,
- and one lower panel.
Place them right sides together and sew along the joining edge using a ¼” seam allowance.
Press the seam open carefully.
To add a sweet vintage detail:
- center a ribbon or decorative trim over the seam,
- then topstitch it in place.
Repeat this process until all 5 cup sections are complete.
Already, your teacup begins to feel wonderfully charming.
Step 3 — Sew the Cup Shape Together
Now the magic begins.
Place two cup sections right sides together.
Pin carefully along one side edge and sew from top to bottom.
Continue joining sections one at a time until the cup forms a rounded bowl shape.
Press seams open gently after sewing.
At this stage, your project will finally begin looking like a little teacup.
Step 4 — Create the Lining
Repeat the same process using your lining fabric.
The lining should match the shape of the outer cup.
Once finished:
- place the lining aside temporarily.
Step 5 — Add the Batting
Now prepare the batting layer.
Place batting pieces between the outer cup and the lining.
Carefully align:
- seams,
- edges,
- and curves.
The batting gives the teacup its soft quilted structure.
If your batting feels bulky, trim excess carefully around the seam allowances.
Step 6 — Quilt the Cup
Using embroidery floss or thicker thread:
- hand quilt along the vertical seams.
A simple running stitch works beautifully for beginners.
This step:
- secures the layers,
- adds texture,
- and gives the cup its cozy handmade appearance.
Don’t worry about making stitches perfectly identical.
Handmade stitching is part of what makes projects like this feel warm and personal.
Step 7 — Make the Fabric Handle
Now let’s create the handle.
Take a long narrow fabric strip and fold it lengthwise with right sides together.
Sew along the long edge to create a tube.
Turn the tube right side out using:
- a safety pin,
- turning tool,
- or chopstick.
To help the handle hold its shape:
- insert cotton piping,
- soft cord,
- or folded yarn inside the tube.
Gently shape the handle into a curved teacup handle and hand stitch the ends closed.
Step 8 — Create the Teacup Base Ring
Using another fabric tube:
- repeat the same process.
This strip becomes the soft rounded base attached near the bottom of the cup.
Insert piping or yarn again if desired for extra structure.
Join the ends to form a ring.
Step 9 — Make the Saucer
Now we’ll create the matching saucer.
Cut:
- a larger saucer circle,
- batting,
- backing fabric,
- and a smaller center circle.
Layer:
- backing,
- batting,
- saucer top.
Place the smaller center circle in the middle and stitch around it.
Add several rows of circular quilting around the center.
This creates the sweet padded saucer effect.
For extra charm:
- embroider tiny flowers,
- hearts,
- or decorative stitches in the center.
Step 10 — Bind the Edges
Prepare bias binding strips by folding and pressing them neatly.
Attach binding around:
- the top rim of the teacup,
- and the outer edge of the saucer.
Fold the binding over the raw edges and hand stitch in place using small hidden stitches.
This step gives the project a beautiful polished finish.
Step 11 — Attach the Handle and Base
Position the handle carefully on the side of the cup.
Pin first before sewing.
Hand stitch securely using strong thread.
Then attach the rounded base ring near the bottom of the teacup.
Take your time here.
Balanced placement helps the teacup look more realistic and elegant.
Step 12 — Add the Final Details
Now for the sweetest part — embellishing.
You may add:
- embroidery,
- tiny buttons,
- lace,
- bows,
- decorative stitches,
- or little floral details.
A small button near the base of the handle adds especially lovely vintage character.
This is where your personality truly shines through.
Beginner Tips for Success
- Clip curved seam allowances carefully
- Press often while sewing
- Use pins generously around curves
- Don’t rush the hand stitching
- Soft fabrics work best
- Florals and cottage prints create a vintage feel
- Hand quilting does not need to be perfect
Most importantly:
enjoy the process.
Projects like this are meant to feel peaceful, cozy, and handmade.
Lovely Ways to Use Your Quilted Teacup
Your finished fabric teacup can become:
- a pincushion
- sewing room décor
- shelf decoration
- tea party centerpiece
- handmade gift
- spring cottage décor
- or a tiny fabric treasure for your craft room
Many quilters also enjoy making several teacups in coordinating fabrics to create an entire decorative collection.
A Cozy Handmade Treasure
This quilted fabric teacup is one of those projects that feels both nostalgic and joyful at the same time. Between the soft quilting, curved shapes, delicate embroidery, and cozy fabrics, every stitch adds warmth and personality to the finished piece.
And perhaps the loveliest part of all is that no two teacups ever turn out exactly alike, each one becomes its own tiny handmade treasure.
VIDEO TUTORIAL
Dear reader, we have selected two beautiful video tutorials for you on how to make your own lovely quilted teacups. I hope they serve as inspiration, the tutorials are very well explained.
Thank you so much for spending part of your day here with us at Handmade Learning Here. We truly hope this cozy quilted teacup tutorial inspired you to slow down, enjoy the creative process, and fill your sewing space with a little extra warmth and charm. Handmade projects like these have such a lovely way of bringing comfort, personality, and joy into our homes, and we feel honored to share that inspiration with you.
Before you go, we warmly invite you to explore our other articles filled with unique quilt patterns, beginner-friendly tutorials, creative sewing ideas, and beautiful handmade projects designed to spark your imagination. We’ll be posting brand new quilting and crafting articles every single week, so we would absolutely love for you to come back and visit us again soon. Until next time, dear friend, we wish you a beautiful day filled with peace, creativity, cozy stitching, and many happy handmade moments ahead. See you again very soon here at Handmade Learning Here.