Crochet Pumpkin Stitch
Welcome to Handmade Learning Here, dear friend! We’re so happy to have you visiting our cozy little corner filled with creativity, yarn, fabric, and handmade inspiration. Today we’re exploring the beautiful Pumpkin Stitch, a wonderfully textured crochet pattern that creates soft, rounded shapes resembling tiny pumpkins nestled together row after row. This stitch is perfect for adding warmth and charm to blankets, scarves, pillows, fall décor, and so many other cozy projects. Even though it looks richly detailed and elegant, it’s surprisingly relaxing once you learn the rhythm of the stitches. So grab your favorite yarn, settle into your favorite chair, and let’s create something beautiful together, one stitch at a time.
There is something wonderfully comforting about textured crochet stitches, and the Pumpkin Stitch is one of those patterns that instantly feels warm, cozy, and welcoming. With its soft raised texture and lovely repeating design, this stitch creates fabric that looks beautifully rich while still being approachable for beginners willing to practice patiently.
This article, however, has been completely rewritten in original wording and teaching style, inspired by the technique itself while carefully avoiding reproduction of the original text, layout, or instructional formatting. The goal here is to teach the method in a fresh, beginner-friendly voice while respecting the creator’s work.
And sweetheart, let me tell you something after many years of crochet, textured stitches may look fancy, but they’re often simply made from repeating a few gentle motions over and over again.
So make yourself a cup of tea, gather your yarn, and let’s crochet together.
What Is the Pumpkin Stitch?
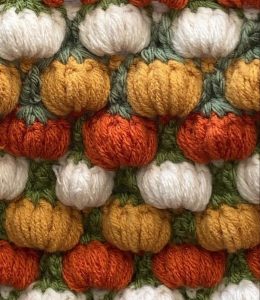
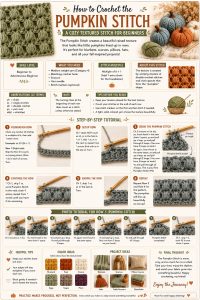
The Pumpkin Stitch is a richly textured crochet pattern that creates raised vertical sections resembling little pumpkins lined up side by side. The texture comes from working groups of stitches together in a repeating sequence that forms soft ridges and rounded shapes across the fabric.
It works beautifully for:
- blankets;
- scarves;
- fall décor;
- pillow covers;
- baby blankets;
- hats;
- and cozy seasonal projects.
One of the loveliest things about this stitch is how dimensional it feels while still remaining soft and flexible.
Skill Level
Beginner to adventurous beginner.
If you already know:
- chain stitch;
- single crochet;
- double crochet;
- and how to work into stitches carefully,
then you absolutely can learn this pattern.
Do not worry if the texture looks complicated at first glance. Once the repeat begins, your hands will settle into a comfortable rhythm.
Materials You’ll Need
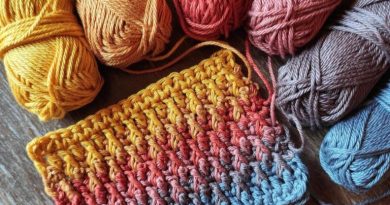
You may use almost any yarn you like, but medium-weight yarn works especially well because it helps the texture stand out beautifully.
You’ll need:
- yarn;
- matching crochet hook;
- scissors;
- yarn needle;
- stitch markers (optional, but helpful).
Lighter-colored yarns are especially nice for learning textured stitches because the stitch definition is easier to see.
Before You Begin
Now dear, before we crochet:
- sit somewhere comfortable;
- relax your shoulders;
- and remember not to hold the yarn too tightly.
Textured stitches need a little breathing room.
Many beginners accidentally crochet too tightly when learning raised stitches, which can make the fabric stiff and difficult to work into later.
Gentle hands make beautiful crochet.
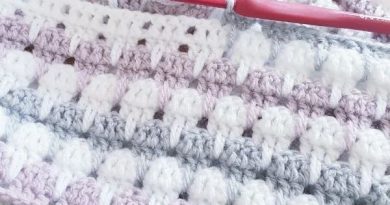
Understanding the Texture
The Pumpkin Stitch creates texture by combining taller stitches with spacing and repeated shaping.
As the rows stack on top of one another:
- the rounded sections become more defined;
- the vertical texture appears;
- and the fabric starts developing that charming “pumpkin patch” appearance.
The beauty of this stitch really begins to show after several rows, so don’t judge it too early.
That’s one of the secrets of crochet.
Sometimes the magic appears slowly.
Starting Your Foundation Chain
Begin with a foundation chain long enough for your project.
For practice:
- create a small swatch first;
- something around 25–35 chains is perfect.
Always make your foundation chain slightly loose.
A tight starting chain is one of the most common beginner frustrations because it causes the bottom edge to pull inward.
If needed:
- use a hook one size larger just for the chain;
- then switch back to your regular hook.
That tiny trick has saved many crocheters over the years.
Row 1 — Building the Base
Work your first row carefully and evenly.
This row acts as the foundation for all the texture that comes later, so consistency matters more than speed.
Count your stitches often.
And sweetheart, never feel embarrassed about counting repeatedly.
Even experienced crocheters still count constantly.
Row 2 — Beginning the Texture
This is where the stitch begins to transform.
As you work the repeating sections:
- you’ll notice raised areas forming;
- little curved sections appearing;
- and the fabric beginning to puff gently.
At first it may look uneven.
That is perfectly normal.
Textured crochet usually looks much better after several completed rows.
Keeping Your Edges Straight
One of the biggest beginner challenges with textured stitches is accidentally increasing or decreasing at the edges.
To help avoid that:
- count stitches at the end of every row;
- place a stitch marker in the first and last stitch if needed;
- and pause occasionally to lay your work flat.
Straight edges make finishing projects much easier later.
Maintaining Consistent Tension
Texture becomes most beautiful when your tension stays relaxed and even.
Try not to:
- pull loops too tightly;
- rush through rows;
- or force the hook through stitches.
If your hands begin feeling tense:
- pause;
- stretch gently;
- and return with relaxed fingers.
Crochet should feel calming, not stressful.
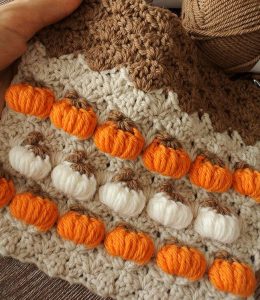
Choosing Colors
This stitch looks especially beautiful in:
- warm autumn shades;
- creamy neutrals;
- dusty oranges;
- soft greens;
- deep browns;
- and cozy farmhouse palettes.
Solid colors usually show the texture best, though subtle variegated yarns can also create a lovely effect.
Project Ideas Using Pumpkin Stitch
Once you learn the stitch, you can use it in so many ways:
- fall table runners;
- textured blankets;
- mug cozies;
- scarves;
- decorative pumpkins;
- tote bags;
- and cushion covers.
It creates fabric with wonderful depth and softness.
Blocking Your Finished Piece
After completing your project:
- gently weave in ends;
- lightly block the fabric if needed;
- and allow the texture to settle naturally.
Do not flatten textured stitches too aggressively with steam or heavy pressing.
The raised texture is the charm of the design.
The Pumpkin Stitch is one of those crochet patterns that feels both cozy and elegant at the same time. It brings warmth, texture, and personality into every project, whether you’re making a simple dishcloth or a large heirloom blanket.
And perhaps the loveliest part of all is this:
Once your hands learn the rhythm, the stitch becomes wonderfully relaxing, the kind of crochet you can enjoy slowly on a peaceful afternoon while listening to music or chatting with loved ones.
So take your time, enjoy every stitch, and remember:
Beautiful crochet is never about perfection.
It’s about warmth, patience, and joy woven gently into every row.
PDF PATTERN
VIDEO TUTORIAL
We have two tutorial videos available here that we’ve specially selected to help you understand how to make your own beautiful pumpkin stitch. You’re sure to create something lovely! I hope you enjoy it. If you don’t like these videos, we suggest you look for other versions on YouTube.
The Pumpkin Stitch is a beautifully textured crochet pattern that creates soft, rounded shapes that resemble tiny pumpkins lined up in neat rows. Its rich texture gives projects a warm and cozy appearance, making it especially popular for autumn-inspired blankets, scarves, pillow covers, and seasonal home décor. One of the loveliest things about this stitch is the way it combines elegance and comfort, creating fabric that feels both decorative and wonderfully soft at the same time.
CROCHET PUMPKIN STITCH PDF PATTERN
Although the stitch may look intricate at first glance, it becomes surprisingly relaxing once you learn the repeating rhythm. The raised texture grows more defined with each completed row, giving the finished project a charming handmade look full of depth and personality. Whether worked in warm pumpkin shades, soft neutrals, or modern earthy colors, this stitch brings a beautiful touch of texture and creativity to any crochet project.
Thank you so much for spending a little time crocheting with us today here at Handmade Learning Here. We truly hope this tutorial inspired you to try something new and enjoy the peaceful joy that handmade crafting brings into everyday life. Don’t forget to explore our other articles filled with unique crochet stitches, quilting ideas, creative tutorials, and beautiful handmade patterns designed for makers of all skill levels. We’ll be sharing brand-new projects and inspiring tutorials every single week, and we would absolutely love to see you back again soon. Until next time, dear friend, we wish you a beautiful day filled with creativity, warmth, and happiness. Happy crocheting, and come visit us again anytime!