Crochet Baseball Cap
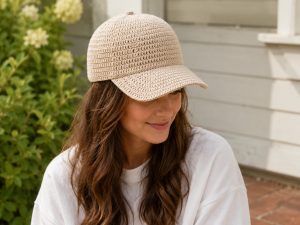
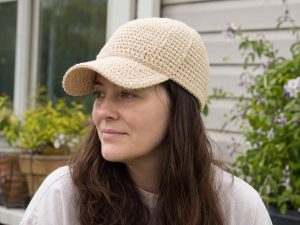
Welcome to Handmade Learning Here! If you love discovering creative crochet projects that turn everyday pieces into something a little more special, you’re going to enjoy today’s pattern. This crochet baseball cap project gives the classic cap a cozy handmade makeover, combining a familiar shape with the texture and personality that only crochet can bring. It’s a playful project, a little different from the usual hats and beanies, and a wonderful way to try something new with your yarn and hook.
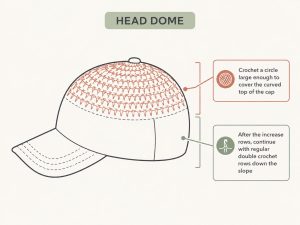
What makes this pattern especially interesting is the way the crocheted pieces are shaped around an existing baseball cap. Instead of building a traditional hat completely from scratch, you crochet sections that follow the curves of the crown and brim. The top begins with a circular section that gradually expands to cover the rounded part of the cap, while the following rows help create the slope and depth needed for a comfortable fit.
A Fun Twist on a Classic Cap
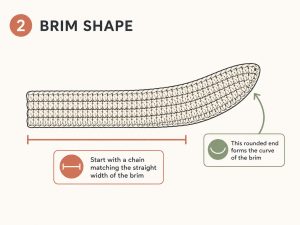
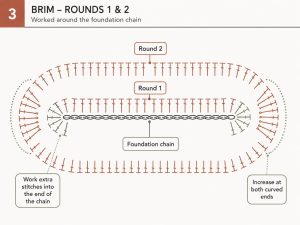
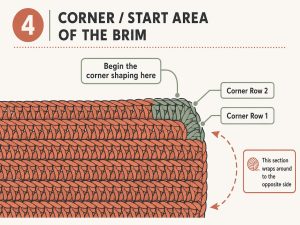
The brim is worked separately and has its own shaping process. You begin with a foundation chain based on the straight portion of the cap’s brim, then work around it to create the rounded ends and gradually build the necessary width. Increases help form the curved areas, while additional shaping around the corners allows the crochet fabric to sit more naturally around the original brim. It may look a little unusual while you are working on it, but seeing the shape develop row by row is part of the fun.
Another nice thing about this project is that it leaves plenty of room for personalization. You can experiment with different yarn colors, create a neutral everyday cap, or choose something brighter for a more playful statement piece. Because baseball caps can vary in size and shape, it’s also helpful to check your crochet against the cap as you work and make small adjustments when necessary. Think of the pattern as a guide while allowing the cap itself to help you achieve the best fit.
This fun crochet project is a lovely way to give an ordinary baseball cap a handmade touch. The crochet covering is worked in two separate pieces, a rounded top and a curved brim, and then carefully sewn onto a baseball cap.
Materials
- Medium-weight yarn
- 4 mm crochet hook
- A baseball cap that fits comfortably
- Sewing needle
- Matching sewing thread
- Scissors
- Tapestry needle
Gauge
Gauge is not essential for this project. The most important thing is to check the crochet pieces against your own baseball cap as you work.
US Crochet Abbreviations
- ch – chain
- dc – double crochet
- sl st – slip stitch
- inc – increase
- dec – decrease
- st – stitch
- rep – repeat
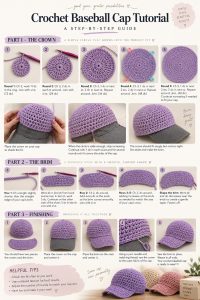
PART 1 – CROCHET CROWN
The crown is worked in joined rounds, creating a gently rounded piece that will cover the top of the baseball cap.
Round 1
Ch 3 and join with a sl st to the first chain to form a small ring.
Ch 3, then work dc stitches into the center of the ring.
Join with a sl st to the top of the beginning ch-3.
Do not pull the center too tightly—the opening should close neatly while leaving enough room for your stitches.
Round 2
Ch 3.
Work 2 dc in each stitch around.
Join with a sl st to the top of the beginning ch-3.
You should now have a noticeably larger circle.
Round 3
Ch 3.
Work 1 dc in the next stitch, 2 dc in the following stitch.
Repeat this sequence around the entire circle.
Join with a sl st.
Round 4
Ch 3.
Work 1 dc in each of the next 2 stitches, then 2 dc in the following stitch.
Repeat around.
Join with a sl st.
Round 5
Ch 3.
Work 1 dc in each of the next 3 stitches, then 2 dc in the following stitch.
Repeat around.
Join with a sl st.
At this point, place the crochet circle over the top of your baseball cap.
The piece should be large enough to cover the curved top without pulling tightly.
If necessary, continue adding increase rounds using the same principle until you reach the width you need.
PART 2 – WORKING THE SIDES
Once the crochet circle reaches the appropriate width, stop increasing.
Next Rounds
Ch 3.
Work 1 dc in each stitch around.
Join with a sl st to the top of the beginning ch-3.
Repeat for several rounds, checking the piece against your cap as you go.
The fabric should begin curving naturally around the sides of the cap.
Beginner Tip
Don’t worry if your crochet piece looks a little loose before it is attached.
Yarn can stretch, and the final shape will be determined when the piece is positioned and sewn onto the baseball cap.
PART 3 – CROCHET BRIM
The brim is worked separately.
First, measure across the straight portion of your baseball cap’s brim, before the visor begins to curve.
Create a foundation chain that is slightly shorter than this measurement. Crochet has some natural stretch, so starting a little smaller can help create a snug fit.
Row 1
Ch a length appropriate for your brim.
Beginning in the second chain from the hook, work dc across the chain.
When you reach the final chain, work several dc into the same stitch to gently round the end.
Continue working dc along the opposite side of the foundation chain.
Work several dc into the opposite end to create a second rounded corner.
Join with a sl st.
You should now have an elongated oval shape.
Row 2
Ch 2.
Work dc around the entire brim.
At each rounded end, add increases where needed so the crochet fabric can curve smoothly around the shape of the visor.
Join with a sl st.
Lay the piece over the baseball cap’s brim to check the fit.
Rows 3–5
Ch 2.
Work dc evenly around.
Join with a sl st at the end of each round.
Continue checking the piece against the visor.
If the brim begins to flare too much, reduce the number of increases. If it starts pulling inward, you may need additional increases.
PART 4 – SHAPING THE BRIM
Now we will give the brim a slightly tapered shape.
Work across one side of the brim with dc stitches.
When you reach the area where the brim begins to narrow, use a dc decrease to bring the edge inward.
Continue with dc stitches, then work another decrease near the opposite side.
Repeat as needed until the brim follows the shape of the original visor.
Remember that the exact number of stitches can vary depending on the baseball cap you are using.
PART 5 – FINISHING
Fasten off and leave a yarn tail.
Use a tapestry needle to weave the tail securely through the back of the stitches.
Repeat with the second piece.
Before attaching anything permanently, place both crochet pieces onto the baseball cap.
Make sure:
- The crown is centered.
- The brim is centered.
- The edges sit smoothly.
- There are no large gaps or unwanted folds.
Once everything is positioned correctly, use matching sewing thread to attach the crochet pieces to the outer fabric layer of the baseball cap.
Work small, secure stitches around the edges.
There is no need to sew through the entire thickness of the hat. Attaching the crochet to the outer fabric makes the process much easier.
A Few Helpful Tips
Check the fit often.
Your crochet tension may be different from someone else’s, so measuring directly against your cap is more reliable than following measurements alone.
Don’t crochet too tightly.
A relaxed tension will make the fabric easier to shape.
Try different colors.
A single color creates a classic look, while stripes or contrasting colors can make the cap much more playful.
Wash before attaching.
If your yarn allows it, washing and drying the crochet pieces before sewing them onto the cap can help them settle into their final shape.
And most importantly, enjoy yourself! Handmade projects don’t have to be perfect to be beautiful. ❤️
VIDEO TUTORIAL
I hope you enjoy making this crochet baseball cap and that the illustrations and instructions make the shaping process a little easier to understand. Projects like this are such a great reminder that crochet doesn’t always have to follow the expected path — sometimes a familiar object can become something completely new with just a bit of yarn and creativity.
Before you go, take a look around Handmade Learning Here for more crochet patterns, handmade inspiration, and creative projects to add to your list. And be sure to visit us again soon, we update the blog every week with new patterns and ideas, so there’s always something new waiting for you. Happy crocheting!