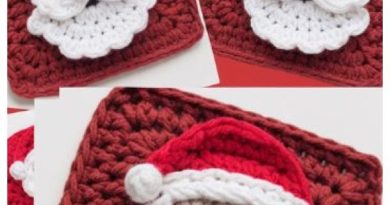
Santa Coaster Crochet Pattern
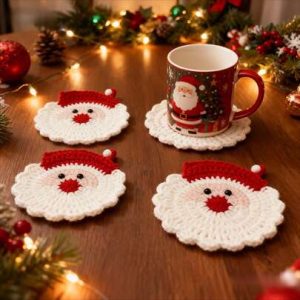
Welcome to Handmade Learning Here! I’m so happy you are here today. Let’s make a Santa Coaster Crochet Pattern with a rounded face, a pointed Christmas hat, and a white beard that follows the edge of the circle. Each section has its own small job, so you can concentrate on one technique before moving to the next.
Have a look through your cotton yarn and choose three shades that sit nicely together. Red and white give the piece its Christmas character, while the color in the middle becomes Santa’s face. A smooth yarn makes the tops of the stitches easier to see when you are counting.
The circular center comes first. After that, a short section of its edge becomes the starting point for the hat. We will narrow that section into a triangle, cover the join with a white band, and decorate the rest of the circle with shells. The eyes and nose are stitched on at the end.
Keep this first coaster as your practice piece, dear. It is a useful way to become familiar with increases, decreases, and working several stitches into one place. Stop after each round or row to count; a quick check now saves having to undo a finished section later.
Where Your Little Santa Can Go
The round part is the place for the bottom of a cup. The hat sits outside that area as a decorative extension. Choose flat embroidered features rather than raised decorations, and check the coaster with the cup you intend to use before making a matching set.
A single coaster also makes a cheerful addition to a mug gift or a Christmas place setting. If you make several, use the same yarn weight and hook for each one. You can vary the face color without changing the pattern or the number of stitches.
What to Have Beside You
Gather cotton yarn in a skin-tone shade, red, and white. Use the same yarn weight for those three colors. You will need a little black yarn or embroidery thread, a crochet hook suited to your chosen yarn, a tapestry needle, scissors, a ruler, and two removable stitch markers.
This version does not specify a fixed yarn quantity, gauge, or finished size. Those depend on your yarn and tension. Work the five-round center as a sample and compare it with your cup. If you need a different size, choose another yarn and an appropriate hook, then start again. Extra rounds would require new placement counts for the hat and beard.
The Stitches We Will Use
All instructions use US crochet terminology. Ch means chain, sc means single crochet, dc means double crochet, and sl st means slip stitch. St or sts means stitch or stitches. Sc2tog means single crochet two stitches together. A number in parentheses tells you how many stitches you should have after completing that instruction.
For a dc increase, put 2 double crochets into the same stitch. You use one stitch from the old round and create two in the new round. For sc2tog, insert the hook into the next stitch and draw up a loop, then do the same in the following stitch. Yarn over and pull through all three loops. This uses two old stitches and makes one new stitch.
A shell here is simply 5 dc worked into one stitch. Keep using that same insertion point until all five double crochets are complete. You do not put chains between them.
Read These Notes Before Starting
Work the face in joined rounds, with the same side facing you throughout. Do not turn between rounds. The ch 2 at the beginning is for height only and does not count as a dc. Join each round to its first actual double crochet, and start the next round in that same stitch. Never treat the joining slip stitch as an extra stitch.
For the hat and band, you will turn between rows. Their beginning ch 1 does not count as a stitch. Work into both top loops, beginning in the first actual stitch and finishing in the last actual stitch. The turning chain stays outside your count.
This project is intended for beginners who already know the basic stitches. If the magic ring is new to you, form a loop with the yarn tail crossing over the working yarn. Draw the working yarn through the loop with your hook and make a chain to secure it. Crochet into the ring around the loop and tail, then pull the tail to close the opening.
Part One: A Round Center for the Face
Round 1: Begin with your skin-tone yarn and a magic ring. Ch 2 and make 12 dc inside the ring. Pull the tail to close the center. Sl st into the first dc to finish the round. (12 dc)
Round 2: Ch 2. Starting in the stitch where you joined, make 2 dc in every stitch around. Close with a sl st in the first dc. (24 dc)
Round 3: Ch 2. Work 2 dc in the next stitch, then 1 dc in the following stitch. Repeat that two-stitch sequence 12 times altogether. Sl st in the first dc. (36 dc)
Round 4: Ch 2. Work 2 dc in the next stitch and 1 dc in each of the next 2 stitches. Complete this sequence 12 times. Sl st in the first dc. (48 dc)
Round 5: Ch 2. Work 2 dc in the next stitch and 1 dc in each of the next 3 stitches. Repeat 12 times, then sl st in the first dc. Cut the yarn and fasten off. (60 dc)
Spread the circle out with its right side toward you. Number the stitches of the last round starting at the first dc, following the direction you crocheted. Put one marker in stitch 1 and the other in stitch 20. These 20 stitches belong to the hat. Keep the other 40 stitches free for the beard.
Part Two: Build the Hat from Its Base
Row 1: Keep the right side of the circle facing you. Join red yarn with a sl st in marked stitch 1. Ch 1, then sc in that same stitch. Sc in each of the next 19 stitches, finishing in marked stitch 20. Turn the work. (20 sc)
Row 2: Ch 1. Combine the first 2 stitches with sc2tog, sc in the next 16 stitches, then combine the last 2 stitches with sc2tog. Turn. (18 sc)
Row 3: Ch 1. Sc2tog over the first 2 stitches, sc in the next 14 stitches, and sc2tog over the last 2 stitches. Turn. (16 sc)
Row 4: Ch 1. Sc2tog, sc in the next 12 stitches, sc2tog. Turn. (14 sc)
Row 5: Ch 1. Sc2tog, sc in the next 10 stitches, sc2tog. Turn. (12 sc)
Row 6: Ch 1. Sc2tog, sc in the next 8 stitches, sc2tog. Turn. (10 sc)
Row 7: Ch 1. Sc2tog, sc in the next 6 stitches, sc2tog. Turn. (8 sc)
Row 8: Ch 1. Sc2tog, sc in the next 4 stitches, sc2tog. Turn. (6 sc)
Row 9: Ch 1. Sc2tog, sc in the next 2 stitches, sc2tog. Turn. (4 sc)
Row 10: Ch 1. Work sc2tog twice, using all 4 stitches of the previous row. Turn. (2 sc)
Row 11: Ch 1. Work one sc2tog across the remaining pair. Fasten off. (1 sc)
The hat is now attached to the face along its base. Do not sew its triangle down over the center; it extends beyond the circle. If an edge looks uneven, check that you have not accidentally worked into a turning chain.
Part Three: A Simple White Band
Band Row 1: With white yarn, ch 21. Insert your hook into the second chain from the hook and make 1 sc. Continue with 1 sc in every remaining chain. Turn. (20 sc)
Band Row 2: Ch 1, then sc in each of the 20 stitches. Fasten off and leave enough yarn to sew along both long edges of the band. (20 sc)
Place the band over the curved line where the hat joins the face. Line up its 20 columns with the 20 stitches at the bottom of the hat. Sew the long edges in place, letting the band follow the curve. Use small stitches and relaxed tension so you do not gather the circular center.
Part Four: Ten Shells Around the Beard
Turn the piece so its right side faces you. Join white yarn with a sl st in face stitch 20 at one end of the hat. This attachment holds the yarn in place; it is not the first stitch of the shell repeat.
Across the unused face stitches, repeat this sequence 10 times: skip 1 stitch, make 5 dc in the next stitch, skip 1 stitch, and sl st in the next stitch. Each repeat uses 4 stitches of the face. Begin with stitch 21 and finish with stitch 60. (10 shells: 50 dc and 10 sl sts)
Here is the first shell written out: leave stitch 21 unworked, make all 5 dc in stitch 22, leave stitch 23 unworked, and sl st in stitch 24. Continue in the same way. Your final shell uses stitches 57 through 60.
After that last repeat, sl st into face stitch 1 to anchor the other end beside the hat. Fasten off. This extra anchoring slip stitch does not belong to the count above. There are no shells on the hat-base stitches.
Part Five: Stitch the Face and Finish
Before adding the features, set a cup on the circular center to check the resting area. Take the cup away before sewing. Keep all embroidery flat; a button or bead beneath a cup would create an uneven surface.
Thread your needle with black yarn or embroidery thread. Make two short horizontal stitches beneath the white hat band, one on either side of the face’s center line. Use red yarn for a small horizontal nose stitch below and between the eyes. Secure the yarn on the back and weave the tails through neighboring stitches without pulling the face out of shape.
Weave in the remaining ends, including the magic-ring tail, and remove the markers. Follow the yarn label when blocking. If wet blocking is suitable, dampen the coaster, arrange the circle, triangle, and shells on a flat surface, and allow everything to dry completely.
A Few Checks for a Neat Result
If the face curls upward, look for a missing increase. If it develops waves, look for extra stitches. The circle counts should be 12, 24, 36, 48, and 60. Correct counts do not guarantee identical results with every yarn and tension; if the sample still will not lie flat after gentle blocking, try a different hook with a new sample.
Count the beard by shells rather than individual stitches: there should be ten. For the hat, each row loses two stitches until only two remain; the last decrease turns those two into one. Keep a note of your yarn and hook if you plan to make more coasters.
VIDEO TUTORIAL
A Little More Christmas Crochet
Give yourself a moment to look over the finished Santa before starting another. Smooth the band, spread the shells, and make sure the eyes sit where you like them. It is easier to adjust those little details while you still have the first piece in front of you.
For your next coaster, you can use the same stitch counts and try another shade for the face. Let the first sample guide your finishing so the set feels consistent. There is no need to rush through every hat and beard before seeing one complete Santa.
I’m glad you joined me at Handmade Learning Here, dear. Thank you for making room for a little Christmas crochet today. Whenever you have your next ball of yarn ready, you are welcome back for another project to work through together.