Quilt-As-You-Go Fabric Scrap Basket
If your fabric scrap bin is starting to overflow, this is exactly the kind of project that makes saving all those little pieces worth it.
This Quilt-As-You-Go Fabric Scrap Basket turns leftover strips of quilting cotton into a colorful, sturdy storage basket with a completely handmade look.
The best part is that there is no need to make every strip match.
Mix florals, geometrics, tiny prints, solids, old jelly roll strips, and those random pieces you have been saving from previous quilts. Once they are stitched together, all those different fabrics become part of one beautiful scrappy design.
The finished basket is roomy enough for yarn, fabric scraps, sewing supplies, toys, magazines, or even a work-in-progress quilt.
And because the exterior is quilted as you build it, you get to piece and quilt the basket at the same time.
It is also a great project when you want something useful without committing to a full quilt. You still get the fun of choosing fabrics, piecing, and quilting, but in a smaller project that comes together much faster.
The scrappy look also means there is very little pressure for everything to match perfectly. A few contrasting prints or unexpected colors can actually make the finished basket feel more interesting and handmade.
Once you finish one, it is easy to imagine making another in a completely different palette. A soft floral version, a bold modern one, or even a seasonal basket can all start from the exact same basic construction.
Finished Size
The finished basket measures approximately:
12 inches wide × 10 inches tall × 6½ inches deep
Small differences are completely normal depending on the batting, foam, seam allowance, and quilting density you use.
Skill Level
Confident Beginner
You should be comfortable using a sewing machine and sewing a basic straight seam.
If you have never tried quilt-as-you-go before, this is a great small project to learn the technique.
Materials
You will need:
- Assorted quilting cotton scraps or fabric strips
- About 8 to 10 jelly roll strips, if using precut 2½-inch strips
- ½ yard lining fabric
- 2 pieces fusible fleece, batting, or soft foam stabilizer measuring 15 × 21 inches
- Fabric for the handles
- Lightweight batting or interfacing for the handles
- Coordinating sewing thread
- Rotary cutter
- Cutting mat
- Quilting ruler
- Fabric clips or pins
- Iron and ironing board
- Sewing machine
- Walking foot, optional
- Decorative buttons or appliqués, optional
You can use coordinated scraps for a more polished basket or mix everything together for a completely scrappy look.
Cutting Instructions
Exterior
Cut:
2 pieces batting, fusible fleece, or foam: 15 × 21 inches
You will cover these completely with fabric and trim them afterward.
Lining
Cut:
2 rectangles: 14 × 20 inches
Handles
Cut:
2 fabric strips: 4 × 32 inches
And:
2 strips lightweight batting or interfacing: approximately 1 × 32 inches
The handles can easily be made longer or shorter depending on how you plan to use the basket.
Preparing Your Fabric Strips
Most strips between 2 and 3½ inches wide will work beautifully.
They do not need to be identical.
In fact, varying the widths slightly helps create that relaxed scrappy look.
If a scrap is not long enough to stretch across the panel, simply sew two smaller pieces together first.
Press the joining seam open.
You need each finished strip to extend beyond the width of your batting or stabilizer.
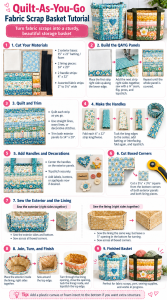
Making the Quilt-As-You-Go Panels
You will make two identical quilted panels, one for the front and one for the back.
Place one 15 × 21-inch piece of batting or stabilizer in front of you with the long edge horizontal.
Choose your first fabric strip and place it right side up across the lower edge.
Stitch close to the bottom raw edge to hold it in place.
Take your second strip and place it right sides together with the first strip, aligning the upper raw edges.
Sew across using a ¼-inch seam allowance.
Flip the second strip upward and press it flat.
If you are using foam or heat-sensitive stabilizer, check the manufacturer’s instructions before pressing directly onto it.
Topstitch close to the seam.
Now place another strip right sides together with the exposed upper edge.
Sew.
Flip.
Press.
Topstitch.
Continue working your way up the panel until the entire piece of batting or stabilizer is covered.
Repeat for the second panel.
Have Fun With the Quilting
This is where you can give the basket more personality.
You do not have to quilt every strip the same way.
Try:
- Straight lines
- Wavy lines
- Zigzag stitches
- Decorative machine stitches
- Double rows of stitching
- Stitching in the ditch
- Free-motion quilting
You can even change thread colors between strips.
The basket in this style looks especially pretty when each section has slightly different quilting.
There is no need for perfection here.
The small differences are what give a scrap basket its charm.
Trim the Exterior Panels
Once both panels are completely quilted, trim each one to:
14 × 20 inches
Check that the corners are square before moving on.
You should now have two sturdy quilted rectangles.
Add Decorations
If you want to add appliqués, buttons, labels, patches, or other embellishments, now is the easiest time to do it.
Lay one quilted panel flat and decide which one will become the front.
You could add:
- Fabric flowers
- Hearts
- Birds
- Butterflies
- Sewing-themed appliqués
- Decorative buttons
- Handmade labels
Sew everything securely to the exterior panel before assembling the basket.
Make the Handles
Fold one 4 × 32-inch handle strip in half lengthwise and press.
Open it again.
Fold both long raw edges toward the center crease and press.
Place the thin strip of batting or interfacing inside.
Fold the handle in half again.
The raw edges should now be enclosed.
Topstitch along both long edges.
You can also sew one or two additional rows through the center for a quilted look.
Repeat with the second handle.
Position the Handles
Lay one exterior panel right side up.
Measure approximately 6 inches inward from each side edge.
Position the two ends of one handle along these marks, creating a large loop above the top of the basket.
The bottom ends of the handle should extend toward the bottom edge of the panel.
Pin or clip securely.
Topstitch along both vertical sections of the handle.
For extra strength, sew a small rectangle or X near the upper attachment points.
Stop your decorative stitching approximately 1½ inches below the upper raw edge so the handle can move comfortably once the basket is finished.
Repeat on the second exterior panel.
Create the Boxed Corners
On both exterior panels, mark a:
3½ × 3½-inch square
at each bottom corner.
Cut the squares away.
Repeat with both lining pieces.
You should now have two notched exterior panels and two notched lining panels.
Assemble the Exterior
Place the two quilted exterior panels right sides together.
Make sure the handles are tucked safely toward the center.
Sew down both sides and across the bottom using a ½-inch seam allowance.
Do not sew across the cut-out corners.
Press the seams as flat as the stabilizer allows.
Box the Corners
Take one open bottom corner.
Pull the two cut edges apart until the side seam and bottom seam meet.
Match the seams carefully.
The opening will flatten into a straight line.
Sew across the opening using a ½-inch seam allowance.
Repeat on the opposite corner.
Turn the basket right side out.
You should now be able to see the final three-dimensional basket shape.
Sew the Lining
Place the two lining pieces right sides together.
Sew down both sides.
Sew across the bottom but leave approximately 5 inches open in the center.
You will use this opening later to turn the basket.
Box both lining corners in exactly the same way as the exterior.
Do not turn the lining right side out yet.
Attach the Lining
Keep the exterior basket right side out.
Keep the lining wrong side out.
Place the exterior basket inside the lining.
The right sides of the exterior and lining should now be touching.
Match the side seams.
Tuck the handle loops between the exterior and lining so they remain safely inside while you sew.
Clip around the entire upper edge.
Sew around the top using a ½-inch seam allowance.
Turn the Basket
Reach through the opening you left in the lining.
Gently pull the entire basket through.
Take your time around the bulky corners and handles.
Once everything is turned right side out, push the lining inside the basket.
Press the upper edge carefully.
Close the opening in the lining with a small machine stitch or ladder stitch.
Topstitch the Edge
Topstitch approximately ⅛ inch from the upper edge around the entire basket.
For an extra polished finish, add a second line of stitching approximately ¼ inch below the first.
This helps keep the lining from rolling outward and gives the basket a crisp finished edge.
Give the Basket More Structure
The combination of quilting and stabilizer should already create a sturdy basket.
If you want an even firmer bottom, cut a piece of:
- Plastic canvas
- Heavy interfacing
- Foam stabilizer
- Thin template plastic
to fit inside the bottom.
Cover it with fabric before placing it inside.
This is especially helpful if you plan to use the basket for heavier items.
Use Your Fabric Scraps
This project is perfect for scraps because almost anything can become part of the design.
Instead of throwing away narrow pieces left from previous quilts, keep them in a small basket and save them for projects like this one.
You can also organize scraps by color and make completely different versions.
Try a basket made with:
Pinks and reds
Blue and white
Rainbow scraps
Vintage florals
Black and cream
Christmas fabrics
Pastel scraps
Even the exact same basket shape can look completely different depending on the fabrics you choose.
Jelly Roll Version
DOWNLOAD JELLY ROLL FABRIC BASKET
If you have a jelly roll waiting in your fabric stash, this is a wonderful project for it.
Standard jelly roll strips are already 2½ inches wide, which makes them perfect for the quilt-as-you-go sections.
Cut the strips into pieces slightly longer than the panel width and arrange them in whatever order you like.
You can work in a color gradient or mix the strips randomly.
Make a Matching Set
Once you make one basket, it is easy to adjust the measurements and create a whole set.
A small version could hold sewing clips or thread.
A medium basket is great for fat quarters.
A larger one could hold knitting or crochet projects.
Using the same collection of fabric for several sizes makes a beautiful coordinated storage set for a sewing or craft room.
What Can You Use a Quilted Fabric Basket For?
There are so many possibilities.
Use yours for:
- Fabric scraps
- Fat quarters
- Yarn
- Crochet projects
- Sewing patterns
- Magazines
- Toys
- Nursery supplies
- Towels
- Craft supplies
- Gifts
- Works in progress
You can even fill one with fabric, notions, and thread to create a handmade gift basket for another quilter.
VIDEO TUTORIAL
A Scrap Project Worth Making
There is something especially satisfying about turning fabric that might otherwise sit forgotten in a drawer into something useful.
Every strip brings a little bit of another project with it, and once they are quilted together, they create an entirely new piece.
Make it colorful, coordinated, perfectly neat, or wonderfully scrappy.
That is really the fun of this basket.