
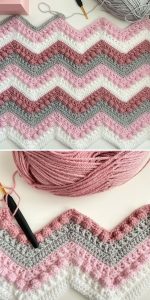
Hugs & Kisses Blanket
Hugs & Kisses Blanket
Hello my dear, how are you feeling today? I hope you are doing very well! Today I want to bring you an amazing pattern that is beautiful and at the same time soooo cute. It’s the Kisses and Hugs blanket pattern. This pattern is very popular wherever it goes and is mainly used for baby blanket projects. But, that doesn’t mean that even if you don’t have a baby you can’t have your own Hugs & Kisses blanket, right?
In the world of crochet, where each stitch carries a story, the Hugs & Kisses crochet blanket appears as a sincere and affectionate design. The creation of this blanket transcends mere artistic pursuit; it becomes a means of interweaving warmth, love and tenderness into each strand of wool. Let’s delve into the charm, adaptability and emotional journey inherent in crocheting the Hugs and Kisses Blanket.
At the center of the Hugs & Kisses blanket pattern is a beautifully symbolic design. The XOXO motif, symbolizing hugs and kisses, elevates a basic crochet project to a sincere expression of affection. With each stitch, you’re not just making a blanket; you are molding a tangible representation of love and warmth.
The symbols X and O have a universal allure that transcends linguistic and cultural boundaries. They convey feelings of love, concern and connection, making the Hugs & Kisses blanket an ideal gift for cherished moments such as weddings, birthdays or the arrival of a new family member. The recipient not only gets a comfortable blanket, but they also receive a tangible reminder of the affection shared between you.
LET YOUR CREATIVITY GUIDE YOU…
This pattern is perfect for you to create the most diverse color combinations, leaving it very colorful or working with different shades of the same color, whatever your choice. I guarantee that the result will be impressive, because the design of this pattern alone It’s very fabulous!
Special Stitches:
Bobble Stitch: Create a Dc5tog in the same stitch. In the following stitch, *yarn over the hook, pull up a loop, yarn over the hook, pull through 2 loops; repeat from * four times until there are 6 loops on the hook. Yarn over the hook and pull through all loops to form 5 double crochets together. These stitches are executed on the wrong side.
X-Stitch: Skip the subsequent stitch, double crochet in the succeeding stitch, and then double crochet in the previously skipped stitch.
Stitch Multiples = 28 + 18
If you find it challenging to identify the “peaks” and “valleys” in the chevron pattern, consider using stitch markers until you become more confident. This is particularly useful when working on the half double crochet (hdc) and bobble row. The hdc3tog stitch may tend to lean to the side, making it tricky to spot, so the markers can be a helpful guide.
Required materials:
- Yarn
- Crochet hook
- Scissors
- Yarn needle
Abbreviations (US TERMS):
Ch: Chain
Dc: Double Crochet
Tr: Treble Crochet
Rep: Repeat
Sp: Space
St(s): Stitch(es)
Hugs & Kisses Blanket – STEP BY STEP
Chain 158.
Row 1:
Start by making a double crochet in the fourth chain from the hook (consider both the chain and double crochet as two in the same stitch). Follow this by making one double crochet in each of the next five chains. Now, create a “double crochet 3 together” over the next three chains to form the valley or bottom of the chevron. After that, make one double crochet in each of the next 12 chains. Then, work three double crochets in the next chain to form the peak or top of the chevron. Finally, make one double crochet in each of the next 12 chains. Repeat this pattern until there are nine chains left. For the last part, create a “double crochet 3 together” over the next three chains, followed by one double crochet in each of the next five chains. Conclude the row by working two double crochets in the last chain. Turn.
Round 2:
Start by making a chain of 1. Then, crochet 2 stitches in the same spot. After that, crochet 1 stitch in each of the next 5 stitches. Now, repeat the following pattern: crochet 3 stitches together in the next 3 stitches, then crochet 1 stitch in each of the next 12 stitches. Following that, crochet 3 stitches in the next stitch, and afterward, crochet 1 stitch in each of the next 12 stitches. Keep repeating this pattern until you have 9 stitches left. To finish, crochet 3 stitches together in the next 3 stitches, then crochet 1 stitch in each of the next 5 stitches. Finally, complete the round by crocheting 2 stitches in the last stitch. Turn your work.
Round 3:
Chain 3 (this is like a double crochet), do 1 double crochet in the next stitch, then go back and do 1 double crochet at the base of the chain-3 (this makes an X-stitch). Repeat the X-stitch 2 more times. *Combine 3 double crochets into one (double crochet 3 together) over the next 3 stitches, then make X-stitches 6 times. After that, do 3 double crochets in the next stitch and make X-stitches 6 times. Repeat from * until only 9 stitches are left. Do a double crochet 3 together over the next 3 stitches, make X-stitches 3 times, and finish with 1 more double crochet in the last stitch. Turn
Round 4:
Start by chaining 1. Then, crochet 2 single stitches in the same stitch. Follow this by crocheting 1 single stitch in each of the next 5 stitches. Now, repeat the pattern: crochet a single crochet 3 together over the next 3 stitches, then crochet 1 single stitch in each of the next 12 stitches. After that, crochet 3 single stitches in the next stitch, and proceed to crochet 1 single stitch in each of the next 12 stitches. Continue repeating this pattern until only 9 stitches remain. To finish the round, crochet a single crochet 3 together over the next 3 stitches, followed by crocheting 1 single stitch in each of the next 5 stitches. Finally, complete the round by crocheting 2 single stitches in the last stitch. Turn your work to continue.
Round 5:
To begin, create a chain of 2 stitches, which will be considered a half double crochet for this round and throughout the project. Then, execute 1 half double crochet in the same stitch. Subsequently, form 1 bobble stitch in the next stitch, followed by 1 half double crochet in the next 2 stitches. Repeat this pattern: perform a half double crochet 3 together over the next 3 stitches. Then, alternate between executing 1 half double crochet in the next stitch, working 1 bobble stitch in the subsequent stitch, and completing 1 half double crochet in the stitch after. Repeat this sequence four times. Afterward, work 3 half double crochets in the following stitch. Continue with the previous pattern: 1 half double crochet in the next stitch, 1 bobble stitch in the next, and 1 half double crochet in the stitch after, repeating four times. Continue this pattern until only 9 stitches remain. For the last stretch, execute a half double crochet 3 together over the next 3 stitches. Then, alternate between 1 half double crochet in the next stitch, 1 bobble stitch in the following stitch, and 1 half double crochet in the stitch after, repeating twice. Finally, conclude the round by working 1 additional half double crochet in the last stitch. Turn your work.
Round 6:
Start by chaining 1, then make 2 single crochets in the same stitch. Follow this by working 1 single crochet in each of the next 5 stitches. Now, repeat the pattern: perform a single crochet 3 together over the next 3 stitches, followed by 1 single crochet in each of the next 12 stitches. Afterward, work 3 single crochets in the next stitch, and proceed with 1 single crochet in each of the next 12 stitches. Continue this sequence until you have 9 stitches left. To finish, execute a single crochet 3 together over the next 3 stitches, work 1 single crochet in each of the next 5 stitches, and finally, make 2 single crochets in the last stitch. Turn to begin the next round.
Round 7:
Begin by chaining 3, which will serve as a double crochet throughout. Execute 1 double crochet in the following stitch, then loop back to place 1 double crochet in the base of the chain 3, forming an X-stitch. Repeat this process to create X-stitches two more times.
Now, proceed with working a double crochet 3 together over the next 3 stitches. Follow this with X-stitches repeated six times. Move on to 3 double crochets in the subsequent stitch and continue making X-stitches six more times. Repeat this pattern until only 9 stitches remain. As you near the end, perform a double crochet 3 together over the next 3 stitches. Create X-stitches three times, and conclude the round by working one additional double crochet in the last stitch. Turn your work.
Round 8:
Start by chaining 1, then make 2 single crochets in the same stitch. After that, continue by making 1 single crochet in each of the next 5 stitches. Now, it’s time for a special stitch – perform a single crochet 3 together over the next 3 stitches. Following that, create 1 single crochet in each of the next 12 stitches. Lastly, wrap up the round by working 3 more stitches.
Round 9:
In the round 9, start by making 3 chain stitches, then do 1 double crochet in the same stitch. After that, make 1 double crochet in the next 5 stitches. Now, let’s create the bumpy and pointy parts: *Do a special stitch called “double crochet 3 together” over the next 3 stitches, then do 1 double crochet in the next 12 stitches. To make a pointy part, crochet 3 double crochets into the next stitch. After that, do 1 double crochet in the next 12 stitches. Repeat this pattern from * until you have only 9 stitches left.
By the way…
To add the final touch, do another set of three double crochet stitches together over the next three stitches. Then, make one double crochet in the next five stitches, and finish by working two double crochets in the last stitch. Turn your work.
To continue making the blanket, repeat rows 2 through 9 consistently until the blanket measures a total length of 40 inches. This usually means completing a total of 11 sets of the pattern.
Once you reach the desired length, carefully and precisely finish off your crochet project.
Dear reader, if you want this template in PDF format, we are ready to help you. The PDF is very educational and was created by thecrochetcrowd.com and you can view it below
VIDEO TUTORIAL
Dear reader, if you are the type of learner who prefers video tutorials, you are in for a surprise! I highly suggest exploring this comprehensive video tutorial designed specifically for those who learn best through visual means. Carefully crafted by The Crochet Crowd Channel, a lovely channel with very educational language, you can find the video tutorial provided below.
What do you think of this adorable pattern? Very cute, isn’t it? I hope you enjoy it and do a great job with it. In fact, also send this tutorial to your friends, that way they can also make incredible pieces with this pattern.
It’s great to have you here with us, dear, please come back often and follow our articles, we are always bringing new patterns for you! If you want to take a look at our website, you will see that we have many other different patterns that you will love. Now, let’s pick up our needles and put our learning into practice. Get to work! Have a happy afternoon and HAPPY CROCHETING! 🩷
Excellent tuition, very easy to follow. Thank you very much.
Excellent tuition, very easy to follow, thank you.
I hope to be able to print this pattern so I can adjust the size and make a baby afghan. It is a beautiful pattern!