
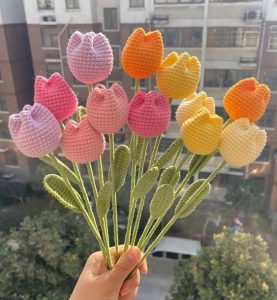
Crochet Tulips
Crochet Tulips
Welcome, dear reader… Great to have you here! Today we want to bring you a very beautiful and elegant flower pattern, this type of flower goes well with many others, being able to form a varied bouquet of flowers and also looks great when used in your home decor. We’re talking about the adorable crochet tulips.
Creating crocheted tulips is a delightful way to infuse a hint of spring into your living space and craft charming gifts for your loved ones. Despite their intricate appearance, crocheting tulips becomes quite straightforward once you grasp the technique. This guide will take you step by step through the process, providing all the information you require to crochet your own tulips.
Incorporating these plush tulips into your crochet flower bouquet will enhance its charm and adorability. Consider complementing them with additional flower varieties to make your bouquet even more vibrant.
Creating Crochet Tulips: A Therapeutic Endeavor
Crafting crochet tulips is not only about the end result; it’s a therapeutic journey of creativity and relaxation. The repetitive nature of crochet stitches combined with the vibrant colors of tulips provides a soothing experience for crafters. Whether you’re a seasoned crocheter or a beginner, these floral wonders offer a perfect blend of simplicity and complexity, making them an enjoyable project for all skill levels.
Versatility in Use: From Home Décor to Fashion Accents
The versatility of crochet tulips extends beyond their creation; they can be incorporated into various aspects of your life. Use them to adorn your living space by creating a beautiful bouquet or individual stems in a vase. Alternatively, attach them to hairpins or headbands for a whimsical touch to your wardrobe. The possibilities are endless, allowing you to infuse a bit of handmade charm into every aspect of your daily life.
Sharing the Joy: Handmade Tulips as Thoughtful Gifts
Crochet tulips aren’t just for personal enjoyment; they make for thoughtful and unique gifts. Handcrafted with love and care, a bouquet of crochet tulips is a symbol of appreciation and warmth. Whether gifted individually or as part of a larger handmade arrangement, these crocheted wonders carry a special touch that transcends the ordinary. Share the joy of handmade beauty by gifting these crochet tulips to friends and loved ones, spreading the love of crafting and the beauty of nature.
Supplies
Yarn: Pick two colors of your choice, for example: purple and green.
You can use either cotton or wool yarn for your tulip. Here’s a brief overview:
- Cotton Yarn: It’s light, airy, and great for creating crochet flowers. With a smooth texture, it comes in many colors, giving your tulip a sharp and well-defined appearance.
- Wool: Warm and soft, wool yarn adds a cozy feel to your tulip. It also brings a touch of fluffiness and warmth to your finished project.
Other materials
- Crochet Hooks: Size 2.5mm is recommended.
- Scissors
- Darning Needle
- Stitch Marker
- Iron Wire: 0.4mm thickness
- Flower Rod: 16 inches long x 0.08 inches diameter (40cm x 2mm)
- Hot Melt Adhesive
- Fiberfill
Skill Level:
This crochet pattern is suitable for those with intermediate-level skills and a grasp of fundamental stitches. It incorporates shaping through increases and decreases, both in rounds and rows, and involves the use of stitch markers for progress tracking. The project includes assembly and finishing stages, including tasks like weaving in ends and securing components. Attentiveness to detail and comfort with a darning needle are essential for achieving the optimal result.
ABBREVIATIONS (US Terminology):
- Ch: Chain stitch
- Sl st: Slip stitch
- Sc: Single crochet
- Hdc: Half double crochet
- Dc: Double crochet
- Tr: Treble crochet
- Dec: Decrease
- Inc: Increase
Pattern Notes
- These patterns use US crochet terminology.
- We recommend using a stitch marker to identify the starting point of each round or row.
- The flower component is worked in the round, while the leaf part is worked in rows.
- The tulip pattern incorporates fundamental crochet stitches such as single crochet (sc), double crochet (dc), slip stitch (ss), and chains (ch). Familiarize yourself with these points before you begin.
- Adapt the yarn weight and needle size based on your preferences and desired tulip sizes.
- Get creative by customizing colors and yarn selections to create distinct variations of the tulip.
- Simplify the finishing process and improve the overall look by interweaving the ends as you go.
Step-by-Step Instructions for Creating a Crocheted Flower:
To craft the FLOWER, follow these sequential steps:
Utilize a stitch marker to distinguish the initial stitch of each round, as the work will be executed in a continuous spiral.
Round 1: Commence with 6 single crochet stitches in the round, ensuring the stitch marker is placed in the first stitch. Close the loop tightly.
Round 2: Chain 1, then single crochet 2 stitches in each stitch. Repeat this process six times, with the stitch marker secured in the initial stitch. Remove the stitch marker, and conclude the round with 1 slip stitch.
Round 3: Chain 1, single crochet in the first stitch, and single crochet 2 stitches in each subsequent stitch. Repeat this pattern six times, with the stitch marker buckled in the first single crochet stitch. Remove the stitch marker, and finalize the round with 1 slip stitch.
Round 4: Chain 1, single crochet in the first stitch, single crochet 2 stitches in each following stitch, and conclude with 1 single crochet. Repeat this sequence six times, with the stitch marker in the first single crochet stitch. Remove the stitch marker, and finish the round with 1 slip stitch.
Round 5: Chain 1, single crochet in the first three stitches, and single crochet 2 stitches in each subsequent stitch. Repeat this process six times, and conclude the round with 1 slip stitch.
Rounds 6: Chain 1, single crochet in the first two stitches, single crochet 2 stitches in each following stitch, and single crochet in the last two stitches. Repeat this pattern six times, and finalize each round with 1 slip stitch and 1 chain.
Rounds 7-17: Work on 36 single crochet stitches in each row. Complete each round with 1 slip stitch and 1 chain. Upon finishing the rounds, secure the yarn by fastening it off, leaving a lengthy tail. Thread a tapestry needle with the extended yarn tail.
Shaping the LEAF:
Making a leaf involves using simple techniques like adding stitches and reducing them to form a pointed end.
Start with a chain 31. From the second stitch on the hook, attach a wire and do 1 single crochet.
To make it bigger, do 2 single crochets, then 3 half double crochets, and 18 double crochets. Put a marker in the first double crochet. For making it smaller, work 3 half double crochets and 2 single crochets. In the same stitch, make 1 single crochet, 1 chain, and another single crochet.
Turn your work. To make it bigger, do 2 single crochets, 3 half double crochets, and 18 double crochets (with a marker in the first double crochet). For making it smaller, do 3 half double crochets, 2 single crochets, and end with 1 single crochet.
Turn your work again. Do 1 single crochet, cut the yarn, and leave a tail.
To assemble the FLOWER and LEAF follow these steps:
- Start with the crocheted tulip you made using the provided instructions.
- Bend the top of the wire into a hook.
- Insert the wire through the tulip’s center.
- Use hot melt adhesive to secure the wire in the tulip.
- Add fiberfill and fold the tulip in half as shown in the video.
- Tidy up loose yarn ends and trim any excess yarn.
- Wrap the wire with floral tape or green yarn for a polished look and added stem stability.
- As you wrap the stem with green yarn, insert the leaf’s excess wire, covering it, and secure the end of the stem with hot melt adhesive.
VIDEO TUTORIAL
Dear reader of the lovely blog Handmade Learning Here, we always like to leave a tutorial video to help with your learning. With the video tutorial you can become more familiar with the pattern and, if you have any doubts, you can clear them up by watching it. That’s why we leave you this adorable video tutorial from the incredible YouTube channel Hookok and you can watch it below.
CONCLUSION
In conclusion, the art of crocheting tulips goes beyond the mere act of creating beautiful floral arrangements; is a celebration of the creativity, patience and joy found in artisanal endeavors. As we unravel the threads of this artistic quest, it becomes clear that the journey itself is as significant as the final product. Crocheting tulips not only allows us to adorn our surroundings with vibrant flowers, but it also offers a therapeutic outlet for self-expression and mindfulness.
So whether you are an experienced crafter or a novice exploring the wonders of crochet, may your tulip journey be a source of inspiration and a reminder of the deep satisfaction derived from the art of learning to craft.
We at the Handmade Learning Here team are very happy to have you here with us, dear readers, I hope you like this pattern and share it with your friends. Enjoy your day with this incredible crochet tulip creation. Have a great day!
Yes, please, I would love to create these beauties! It would old be a great gift to give my residents of the nursing home I work in!