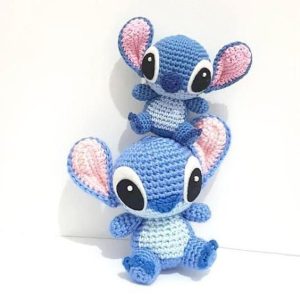
Stitch Amigurumi
Stitch Amigurumi
Hello, reader of our lovely blog Handmade Learning Here, today I want to bring you a very beautiful and fun adorable pattern… The perfect gift for Disney fans and children… It’s the Stitch amigurumi.
The enchanting universe of amigurumi, a Japanese crochet technique that creates adorable three-dimensional dolls, finds a unique expression in the character Stitch from the film “Lilo & Stitch”. This blue alien, known for its cuteness and mischief, comes to life in a special way when reproduced in crochet. The intricate process of transforming threads into a three-dimensional representation of the character adds an artistic dimension to the passion for amigurumis.
The Art of Creating Crochet Stitches: A Creative Challenge
Recreating Stitch in crochet is more than just a hobby; It’s a creative challenge. The skill and patience involved in selecting colors, textures and patterns to capture the essence of the character is truly remarkable. Dedicated artisans dive into the task of creating every detail, from the large ears to the tiny claws, transforming a ball of yarn into an adorable representation of Stitch.
A Handcrafted Gift with Meaning
In addition to the creative process, amigurumis like crochet Stitch offer a unique opportunity to give gifts with meaning. Unlike conventional toys, these handcrafted items carry the dedication and affection of those who make them with a lot of love invested there. Gifting someone with a Stitch amigurumi is not just sharing a physical object, but also a piece of the time and effort invested in making it, making it a truly special gift.
What’s more, I’m sure that whoever receives this gift will be very happy with such a well-made piece that they can keep for many years!
Sharing the Joy of Amigurumi Stitch
The amigurumi community plays a key role in spreading joy and appreciation for these artistic creations. By sharing patterns, tips and experiences, enthusiasts strengthen the bonds between amigurumi lovers. Crochet Stitch, in particular, becomes a rallying point for fans of the Disney film, providing a unique way to celebrate their passion for animation and craftsmanship.
PATTERN
Materials needed:
- 4-ply Acrylic yarn in black, salmon pink, blue, and powder blue
- Navy blue wool ease
- Tapestry Needle
- Crochet hook G
- Fiberfill stuffing
STEP BY STEP
HEAD:
Using BLUE
Rnd 1: Chain 2, work 7 single crochets in the second chain from the hook [7]
Rnd 2: 2 single crochets in each stitch around [14]
Rnd 3: Single crochet in the next stitch, 2 single crochets in the stitch after, repeat until the end [21]
Rnd 4: Single crochet in each of the next 2 stitches, 2 single crochets in the stitch after, repeat until the end [28]
Rnd 5: Single crochet in each of the next 3 stitches, 2 single crochets in the stitch after, repeat until the end [35]
Rnd 6: Single crochet in each of the next 4 stitches, 2 single crochets in the stitch after, repeat until the end [42]
Rnd 7: Single crochet in each of the next 5 stitches, 2 single crochets in the stitch after, repeat until the end [49]
Rnd 8-13: Single crochet all around [49]
Rnd 14: Single crochet in each of the next 6 stitches, 2 single crochets in the stitch after, repeat until the end [56]
Rnd 15: Single crochet in each of the next 13 stitches, 2 single crochets in the stitch after, repeat until the end [60]
Rnd 16: Single crochet all around [60]
Using POWDER BLUE
Rnd 17: Single crochet in each of the next 13 stitches, single crochet two together, repeat until the end [56]
Rnd 18: Single crochet in each of the next 5 stitches, single crochet two together, repeat until the end [48]
Rnd 19: Single crochet in each of the next 4 stitches, single crochet two together, repeat until the end [40]
Rnd 20: Single crochet in each of the next 3 stitches, single crochet two together, repeat until the end [32]
Rnd 21: Single crochet in each of the next 2 stitches, single crochet two together, repeat until the end [24]
Rnd 22: Single crochet in each of the next 2 stitches, single crochet two together, repeat until the end [18]
Fasten off. Do not weave in the ends.
EYES
with POWDER BLUE, follow these steps:
Round 1: Chain 2, then make 8 single crochet stitches in the second chain from the hook [8].
Round 2: Work 2 single crochet stitches in each of the next 2 stitches, followed by 2 half double crochet stitches in each of the next 4 stitches. Complete the round by working 2 single crochet stitches in each of the remaining 2 stitches [16].
Round 3: Single crochet in the next stitch, then work 2 single crochet stitches in the stitch after – repeat this pattern twice. Next, half double crochet in the next stitch, then work 2 half double crochet stitches in the stitch after – repeat this pattern four times. Finally, single crochet in the next stitch, then work 2 single crochet stitches in the stitch after – repeat this pattern twice more [24]. Fasten off, leaving a long tail for sewing.
Switch to BLACK yarn:
Round 1: Chain 2, then make 5 single crochet stitches in the second chain from the hook [5].
Round 2: Work 2 single crochet stitches in each of the next 2 stitches, followed by 2 half double crochet stitches in the next stitch. Complete the round by working 2 single crochet stitches in each of the remaining 2 stitches [10]. Fasten off, leaving a long tail for sewing.
Switch to WHITE yarn:
Round 1: Chain 2, then make 4 single crochet stitches in the second chain from the hook [4]. Fasten off, leaving a long tail for sewing.
NOSE
With navy blue yarn:
Round 1: Chain 2, make 6 single crochet stitches in the second chain from the hook [6 stitches].
Round 2: Make 2 single crochet stitches in each stitch around [12 stitches].
Round 3: Single crochet in the next stitch, then make 2 single crochet stitches in the stitch after that. Repeat this pattern until you reach the end [18 stitches].
Round 4: Single crochet in each stitch all the way around [18 stitches].
Fasten off, leaving a long tail for sewing.
EARS:
INNER EAR
using SALMON PINK
Round 1: Chain 21, single crochet in the second chain from the hook until the end (this results in 20 single crochets). Flip it to face the opposite side and single crochet all around (adding another 20 single crochets). [ 40]
Round 2: Single crochet in each of the next 12 stitches, half double crochet in each of the next 6 stitches, 2 half double crochets in each of the next 4 stitches, half double crochet in each of the next 6 stitches, single crochet in each of the last remaining 12 stitches. [ 44].
Round 3: Half double crochet in each of the next 10 stitches, double crochet in each of the next 10 stitches, 2 double crochets in each of the next 4 stitches, double crochet in each of the next 10 stitches, half double crochet in each of the remaining 10 stitches. [ 48 stitches].
Rounds 4-5: Single crochet all around. [48].
Fasten off, leaving a long tail for sewing.
OUTER EAR
Using BLUE:
Round 1: Chain 21. Single crochet (sc) in the second chain from the hook and continue until the end, making a total of 20 sc. Flip it to face the opposite side and single crochet (sc) all around, adding another 20 sc. [40].
Round 2: Half double crochet (hdc) in each of the next 12 stitches. Double crochet (dc) in each of the next 6 stitches. 2 double crochet (2dc) in each of the next 4 stitches.
Double crochet (dc) in each of the next 6 stitches. Half double crochet (hdc) in each of the last remaining 12 stitches.[44].
Round 3: Half double crochet (hdc) in each of the next 10 stitches. Double crochet (dc) in each of the next 10 stitches. 2 double crochet (2dc) in each of the next 4 stitches. Double crochet (dc) in each of the next 10 stitches. Half double crochet (hdc) in each of the remaining 10 stitches. [48].
Fasten off and hide all ends.
BODY:
using BLUE
Round 1: Chain 2, make 6 single crochet stitches in the second chain from the hook [6]
Round 2: Single crochet in the next stitch, then make 2 single crochets in the stitch after, repeat until the end [9]
Round 3: Make 2 single crochets in each stitch around [18]
Round 4: Single crochet in the next stitch, make 2 single crochets in the stitch after, repeat until the end [27]
Round 5: Single crochet in each of the next 2 stitches, make 2 single crochets in the stitch after, repeat until the end [36]
Round 6: Single crochet in each of the next 3 stitches, make 2 single crochets in the stitch after, repeat until the end [45]
Round 7: Single crochet in each of the next 4 stitches, make 2 single crochets in the stitch after, repeat until the end [54]
Note: Color blocking may vary; alternate color blocking as follows: first bunch = normal, second bunch = move 1 single crochet to the right, third bunch = move 1 single crochet to the right [repeat until the last color blocking bunch]
Rounds 8-12: [54]
Using BLUE: Single crochet in each of the next 18 stitches
Using POWDER BLUE: Single crochet in each of the next 18 stitches
Using BLUE: Single crochet in each of the next 18 stitches
Round 13: [45]
Using BLUE: Single crochet in each of the next 4 stitches, single crochet 2 together, repeat 3 times
Using POWDER BLUE: Single crochet in each of the next 4 stitches, single crochet 2 together, repeat 3 times
Using BLUE: Single crochet in each of the next 4 stitches, single crochet 2 together, repeat 3 times
Rounds 14-16: [45]
Using BLUE: Single crochet in each of the next 15 stitches
Using POWDER BLUE: Single crochet in each of the next 15 stitches
Using BLUE: Single crochet in each of the next 15 stitches
Round 17: [36]
Use BLUE yarn: Single crochet (Sc) in each of the next 3 stitches, single crochet 2 together (sc2tog), repeat 3 times.
Switch to POWDER BLUE yarn: Sc in each of the next 3 sts, sc2tog, repeat 3 times.
Switch back to BLUE yarn: Sc in each of the next 3 sts, sc2tog, repeat 3 times.
Rounds 18-21: [36]
Use BLUE yarn: Sc in each of the next 12 sts.
Switch to POWDER BLUE yarn: Sc in each of the next 12 sts.
Switch back to BLUE yarn: Sc in each of the next 12 sts.
Round 22: [27]
Use BLUE yarn: Sc in each of the next 2 sts, sc2tog, repeat 3 times.
Switch to POWDER BLUE yarn: Sc in each of the next 2 sts, sc2tog, repeat 3 times.
Switch back to BLUE yarn: Sc in each of the next 2 sts, sc2tog, repeat 3 times.
Rounds 23-24: [27]
Use BLUE yarn: Sc in each of the next 9 sts.
Switch to POWDER BLUE yarn: Sc in each of the next 9 sts.
Switch back to BLUE yarn: Sc in each of the next 9 sts.
Fasten off, leaving a long tail for sewing.
ARMS
With BLUE:
Round 1: Chain 2, make 5 single crochet stitches in the second chain from the hook [5]
Round 2: Make 2 single crochet stitches in each stitch around [10]
Round 3: Single crochet in the next stitch, make 2 single crochet stitches in the stitch after, repeat until the end [15]
Rounds 4-15: Single crochet in each stitch around [15]
Fasten off, leaving a long tail for sewing.
FINGERS
FINGERS:
Using NAVY BLUE (make 4)
Chain 4 stitches.
Single crochet in the second chain from the hook and continue single crocheting until the end of the chain, resulting in a total of 3 single crochet stitches.
Fasten off, leaving a tail for sewing.
LEGS
Using BLUE
Round 1: Chain 2, and work 6 single crochet stitches in the second chain from the hook. [6]
Round 2: Make 2 single crochet stitches in each stitch around. [12]
Round 3: Single crochet in the next stitch, then make 2 single crochet stitches in the stitch after. Repeat this pattern until the end of the round. [18]
Round 4: Single crochet in each of the next 2 stitches, then 2 single crochet stitches in the stitch after. Repeat this pattern until the end of the round. [24]
Round 5-6: Single crochet all around. [24]
Round 7: Single crochet in each of the next 9 stitches, single crochet 2 together (sc2tog) 3 times, then single crochet in each of the remaining 9 stitches. [21]
Round 8: Single crochet in each of the next 7 stitches, sc2tog 3 times, then single crochet in each of the remaining 8 stitches. [18]
Round 9: Single crochet in each of the next 6 stitches, sc2tog 3 times, then single crochet in each of the remaining 6 stitches. [15]
Round 10: Through the front loops, single crochet in each of the next 6 stitches; through the back loops, single crochet in each of the next 3 stitches; through the front loops again, single crochet in each of the remaining 6 stitches. [15]
Round 11-15: Single crochet all around. [15]
Fasten off, leaving a long tail for sewing.
TOES
Using NAVY BLUE (Make 4)
Chain 2. 5 single crochet in the second chain from the hook. You’ll have a total of 5 single crochets. Fasten off, leaving a tail for sewing.
“Palm”
Round 1: Chain 2, work 5 single crochet stitches in the second chain from the hook [5]
Round 2: Work 2 single crochet stitches in each stitch around [10]
Fasten off, leaving a lengthy tail for sewing.
TAIL
Using BLUE:
Round 1: Chain 2, make 5 single crochet stitches in the second chain from the hook [5]
Round 2: Make 2 single crochet stitches in each stitch around [10]
Round 3: Single crochet in the next stitch, make 2 single crochet stitches in the stitch after, repeat until the end [15]
Round 4: Single crochet in each of the next 2 stitches, make 2 single crochet stitches in the stitch after, repeat until the end [20]
Round 5: Single crochet all around [20]
Fasten off, leaving a long tail for sewing.
ASSEMBLY
Attach the fingers to the arm tips, focusing on the fingertips. Refer to the pictures for guidance.
Sew the feet’s “palms” to the lower part of the legs, as shown in the reference pictures.
Connect the toe tips (bottom of the circle) to the legs, ensuring proportional alignment with the leg “palm.”
Stitch the white eye part to the black eye part, then attach the black part to the blue, keeping it towards the bottom. Avoid covering the hdc section.
Combine the inner ear with the outer ear, using the tail of the outer ear for sewing. Retain the excess tail for future use.
Affix the ears to the stitch’s head, utilizing the extra tail from attaching the inner and outer ear.
Partially fill the head to achieve its basic shape.
Begin by sewing the left eye, ensuring it is proportionate to the ears.
Stuff the nose.
Attach the nose about 2 stitches away from the left eye horizontally, aligning it with the black eye part.
Sew the right eye in relation to the left eye and nose.
Fully stuff the head.
Proceed to stuff the arms, legs, and tail, avoiding overfilling.
Sew the tail and legs to the body’s base, ensuring the legs span the powder blue and blue sections. Maintain equal distance when sewing the tail between the right and left legs.
Half-fill the body.
Attach the stuffed arms to the upper body.
Completely fill the stitch’s body.
Sew the head to the body using the excess tail from the body.
Congratulations! Your adorable stitch is now ready for lots of love and hugs!
If you prefer to have this pattern in PDF, here we have a PDF tutorial made by SWEET N CUTE CREATIONS, it is a very educational step-by-step guide and is available to you.
VIDEO TUTORIAL
Dear reader, as we always like to help in the best way possible, we found a video tutorial for those who like this way of learning. It is subtitled in the language you prefer and is divided into 3 parts. The tutorial videos are from the channel
Nação Amigurumi by Noemi and you can follow below.
PART 1
PART 2
PART 3
CONCLUSION
Stitch’s amigurumi transcends the boundaries between art and passion for beloved characters. The meticulous care that goes into creating each piece reflects the artisans’ devotion to their art and the world of “Lilo & Stitch.” These adorable crochet representations are not just dolls, but witnesses to the transformative power of craftsmanship, becoming objects of affection and admiration for those who create and receive them.
What do you, dear reader, think of this adorable pattern? We are always bringing you amazing crochet patterns that you can follow on our blog. Send this tutorial to your best friends right now, this way you guarantee that other people have access to this beautiful amigurumi step by step.
Thank you for being here with us in our crochet love and learning space where we can share lots of free patterns. Come back often, as we are bringing new and different patterns every week. Now, let’s put everything we’ve learned into practice, shall we? See you soon. XoXo