Pink Panther Crochet
Hello, my dear reader friend! Great to have you here. We are going to treat you to a very cute, delicate and absolutely fun piece. In the world of crochet, amigurumi creations have taken the craft community by storm, and there is no more charming character to transform into an amigurumi masterpiece than the iconic Pink Panther. In this article, we bring you an amazing Pink Panther pattern and learn how to create your own cozy pink friend.
The Pink Panther: a timeless icon
The Pink Panther is more than just a character from a classic comedy film series; he is a beloved cultural icon. This charming, gentle and incredibly stealthy pink feline has captured the hearts of the public for decades. Created by Friz Freleng and voiced by the legendary Mel Blanc, the Pink Panther left an indelible mark on popular culture.
Creating a Pink Panther amigurumi brings nostalgia and fun to life in a tangible way. With the versatility of crochet, you can immortalize this beloved character with your unique style.
So, separate the necessary materials and let’s produce this beautiful piece together.
Note: For beginners, it’s essential to familiarize yourself with basic crochet stitches and techniques before attempting this project.
Pink Panther Amigurumi Pattern
Materials You’ll Need:
- Pink yarn
- Yellow yarn
- Black yarn
- Light pink yarn
- Dark pink yarn
- Crochet hook
- Fiberfill stuffing
- Safety eyes (or you can use black yarn to make embroidered eyes)
- Scissors
- Yarn needle
- Stitch markers (optional)
Abbreviations:
sc: single crochet
inc: increase (make two single crochets in the same stitch)
dec: decrease (crochet two stitches together)
ch: chain stitch
hdc: half-double crochet
PINK PANTHER STEP BY STEP
Foot (Make 2):
Using Pink Yarn
Round 1: Create a magic circle and crochet 6 single crochets (6)
Round 2: Single crochet, increase repeat 3 times (9)
Round 3: 2 single crochets, increase repeat 3 times (12)
Round 4: 3 single crochets, increase repeat 3 times (15)
Round 5: 4 single crochets, increase repeat 3 times (18)
Round 6 – 15: 18 single crochets
Start stuffing the piece. Continue to stuff as you work.
Round 16: Single crochet, decrease repeat 6 times (12)
Round 17: Decrease 6 times (6)
Finish off and leave a long tail for closing the 6-stitch opening and attach the foot to the leg.
Legs & Body:
Leg (Make 2) – Using pink
Round 1: Create a magic circle and crochet 6 single crochets (6)
Round 2: Increase in each stitch, resulting in 12 single crochets (12)
Round 3: Crochet 12 single crochets in the back loop only
Start stuffing the legs. Continue stuffing as you work.
Round 4 – 40: 12 single crochets
Finish off the first leg, leaving a long enough tail to sew the two legs together. Make a second leg and leave the yarn attached. Sew the legs together through 2 stitches.
Round 41: Crochet 24 single crochets
Round 42: 3 single crochets, increase repeat 6 times (30)
Round 43: Crochet 30 single crochets
Round 44: 4 single crochets, increase repeat 6 times (36)
Round 45 – 46: 36 single crochets
Start stuffing the body. Continue stuffing as you work.
Round 47: 7 single crochets, decrease repeat 4 times (32)
Round 48 – 49: 32 single crochets
Round 50: 6 single crochets, decrease repeat 4 times (28)
Round 51 – 52: 28 single crochets
Round 53: 5 single crochets, decrease repeat 4 times (24)
Round 54 – 70: 24 single crochets
Round 71: 2 single crochets, decrease repeat 6 times (18)
Round 72: Single crochet, decrease repeat 6 times (12)
Round 73: 2 single crochets, decrease repeat 3 times (9)
Round 74 – 78: 9 single crochets
Finish off and leave a long enough tail to sew the head to the body.
Fingers, Hand, & Arm (Make 2 – Using pink yarn):
Fingers (Make 8):
Using Pink
Round 1: Create a magic circle and crochet 4 single crochets (4)
Round 2: Single crochet, increase repeat 2 times (6)
Round 3 – 5: 6 single crochets
Finish off 3 of the 4 fingers, leaving a long enough tail to attach pieces. Leave the yarn attached to the 4th finger.
For the hand, sew 2 of the fingers together by taking the yarn tail from the first finger and weaving it through 2 stitches on both the first and second finger. Ensure that the yarn tail of the second finger is on the opposite side of this. Take the yarn tail of the second finger and weave it through 2 stitches on both the second and third finger. Ensure that the point where the yarn is attached is opposite to this. Stuff all 3 of the fingers firmly. Use the connected yarn to continue forming the hand. The 4th finger will be used as the thumb.
Hand:
Round 6 – 8: 18 single crochets
Start stuffing the piece. Continue stuffing as the piece is worked.
Round 9: 4 single crochets, decrease repeat 3 times (15)
Round 10: 15 single crochets
Round 11: 3 single crochets, decrease repeat 3 times (12)
Arm:
Round 12 – 39: 12 single crochets
Round 40: Decrease 6 times (6)
Finish off and leave a long enough tail to sew the six-stitch opening closed and to sew the arm to the body. The thumb will be attached during assembly. Repeat the above steps to create the second arm.
Head (With Pink Yarn):
Round 1: Chain 13
Round 2: Increase into the 2nd chain from the hook, crochet 10 single crochets, 2 increases, 10 single crochets, and 1 increase (28)
Round 3: 2 increases, crochet 10 single crochets, 4 increases, crochet 10 single crochets, and 2 increases (36)
Round 4: 2 single crochets, 2 increases, crochet 10 single crochets, 2 increases, 4 single crochets, 2 increases, 10 single crochets, 2 increases, and 2 single crochets (44)
Round 5: 4 single crochets, 2 increases, crochet 10 single crochets, 2 increases, 8 single crochets, 2 increases, 10 single crochets, 2 increases, and 4 single crochets (52)
Round 6 – 14: 52 single crochets
Round 15: 4 decreases, 14 single crochets, 6 decreases, 14 single crochets, and 2 decreases (40)
Round 16: 3 decreases, 10 single crochets, 5 decreases, 10 single crochets, and 2 decreases (30)
Round 17 – 21: 30 single crochets
Start stuffing the piece. Continue stuffing as the piece is worked.
Round 22: 9 single crochets, increase repeat 3 times (33)
Round 23 – 26: 33 single crochets
Round 27: 10 single crochets, increase repeat 3 times (36)
Round 28: 36 single crochets
Switch to Light Pink yarn
Round 29: 12 single crochets, 12 increases, 12 single crochets (48)
Round 30: 12 single crochets, 12 decreases, 12 single crochets (36)
Round 31: 4 single crochets, decrease repeat 6 times (30)
Round 32: 3 single crochets, decrease repeat 6 times (24)
Round 33: 2 single crochets, decrease repeat 6 times (18)
Round 34: Single crochet, decrease repeat 6 times (12)
Round 35: Decrease 6 times (6)
Finish off and weave in the tail.
Nose (Using dark pink):
Round 1: Create a magic circle and crochet 6 single crochets (6)
Round 2: Increase in each stitch, resulting in 12 single crochets (12)
Round 3: Single crochet, increase repeat 6 times (18)
Round 4: 2 single crochets, increase repeat 6 times (24)
Round 5: 3 single crochets, increase repeat 6 times (30)
Round 6: 30 single crochets
Finish off and leave a long enough tail to attach the nose to the head.
Ears (Make 2) – With pink:
Round 1: Create a magic circle and crochet 6 single crochets (6)
Round 2: Increase in each stitch, resulting in 12 single crochets (12)
Round 3: Single crochet, increase repeat 6 times (18)
Round 4: 2 single crochets, increase repeat 6 times (24)
Round 5 – 10: 24 single crochets
Finish off, fold the ear in half, and then fold the piece in half again. Sew the bottom together, leaving a long enough tail to attach the ear to the head.
Eyes (Make 2 – Using Yellow):
Round 1: Create a magic circle and crochet 6 single crochets (6)
Round 2: Increase in each stitch, resulting in 12 single crochets (12)
Round 3: Single crochet, increase repeat 6 times (18)
Finish off and leave a long enough tail to attach the eyes to the head.
Eyebrows (Make 2 with black yarn):
Row 1: Chain 7
Row 2: Increase in the second chain from the hook, crochet 4 single crochets, 2 increases, 4 single crochets, and 1 increase
Finish off and leave a long enough tail to attach the eyebrows to the head.
Stomach Patch (with Light Pink ):
Round 1: Chain 21
Round 2: Increase in the second chain from the hook, crochet 18 single crochets, and 1 increase. Turn the piece to the other side, increase, crochet 18 single crochets, and increase.
Round 3: 2 increases, crochet 18 single crochets, 4 increases, crochet 18 single crochets, and 2 increases.
Round 4: Crochet 2 single crochets, 2 increases, crochet 12 single crochets, 6 half-double crochets, 2 half-double crochets in the next 2 stitches, 4 half-double crochets, 2 half-double crochets in the next 2 stitches, 6 half-double crochets, 12 single crochets, 2 increases, and 2 single crochets.
Round 5: Crochet 4 single crochets, 2 increases, crochet 12 single crochets, 2 half-double crochets in the next 2 stitches, 8 half-double crochets, 2 half-double crochets in the next 2 stitches, 6 half-double crochets, 12 single crochets, 2 increases, and 4 single crochets. Slip stitch into the first stitch and finish off. Leave a long enough tail to attach the stomach patch to the body.
Tail (Using pink):
Round 1: Create a magic circle and crochet 6 single crochets (6)
Round 2: Single crochet, increase repeat 3 times (9)
Round 3 – 50: 9 single crochets
Stuff the piece as you work. Finish off after Round 50 and leave a long enough tail to attach the tail to the body.
Assembly:
- Attach the head to the body with the tail from the head. Weave in and out of each piece with the tail. Ensure the neck is attached where the head narrows to form the snout. Firmly stuff the neck before completely sewing the opening closed.
- Use safety eyes, insert them into the center of the yellow eyes created with yarn. Lightly stuff them and position them above the snout on the head. It may help to pin the pieces to the head first to position them correctly. Use the tail of the eyes to sew them to the head.
- Attach the eyebrows above the eyes at a diagonal angle. Use the tail from the eyebrows to sew them to the head all the way around.
- Attach the nose to the front of the snout using the tail from the piece. Center the nose on the top part of the snout, covering more of the light pink portion than the dark pink portion. Sew it into the correct position to get the right shape for the nose. Lightly stuff the nose before sewing the opening closed.
- Attach the ears to the top of the head. Pin them in the desired position on the top side of the head and sew them on with the yarn tail.
- Use black yarn to embroider a mouth, using surface crochet to create the smile.
- Use black yarn to create whiskers. Make a large knot on the inside of the snout and pull the whisker through. There should be 3 whiskers on either side.
- Attach the arms to the body with the tails from each piece. Use a whip stitch. Pin all the limbs in the desired position before attaching. Ensure to shape the shoulder by squishing down the top of the arm.
- Attach the feet to the bottom of the legs with the yarn tail. Ensure the legs are firmly stuffed before closing the opening.
- Attach the tail to the back of the doll, making sure it is positioned in the middle at the bottom.
- Attach the stomach patch to the front of the doll. Position the wider portion of the stomach at the bottom and use the tail to attach it all around.
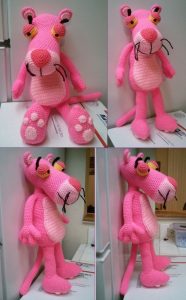
Your Pink Panther Amigurumi is complete! Enjoy making it.
VIDEO TUTORIAL
Dear reader, I would like to leave a video tutorial to help you, unfortunately I didn’t find anything in English and it is in another language, but you can activate the subtitles and also follow the movements. Use the video as a tutorial to help you move and assemble your beautiful pink panther. The video is from the Stefy Art channel and is available here.
For those who prefer the printable version, we have separated a PDF that you can access below.
Access the PDF/ The Pink Panther Amigurumi
After following the instructions for the chosen pattern and adding all the details, you will have a Pink Panther amigurumi full of charm and personality. Step back and admire your creation, knowing that you have brought a beloved character to life through the art of crochet. Very cute!
The Pink Panther amigurumi is a testament to the creative possibilities that crochet offers and is a delightful way to infuse a little pink perfection into your life. Your own Pink Panther amigurumi will undoubtedly become a treasured addition to your collection of handcrafted treasures.
Tell us, dear reader, what did you think of this beautiful pattern we made available here? Send it right now to someone who you believe will enjoy having it in their hands to do beautiful work.
By the way, if you have any suggestions or questions, let us know too, we are always ready to answer them. Hope you have a beautiful day! Now let’s do what we love most… Crochet!