
Alpine Stitch
Hey there, lovely reader! Hope y’all are doing well. You know we’re always bringing fresh and amazing content for you, and today we’ve got something special in store. We want to introduce you to a beautiful and marvelous pattern – one that’s absolutely enchanting and unique, guaranteed to leave you in awe of its beauty.
Among the myriad of stitches available to crocheters, the Alpine Stitch stands out for its elegance and versatility. Originating from the majestic Alps, this stitch encapsulates the beauty of its namesake landscapes with its undulating peaks and valleys. Let’s delve into the enchanting world of Alpine Stitch crochet and discover what makes it so captivating.
Understanding the Alpine Stitch
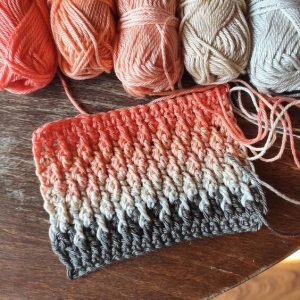
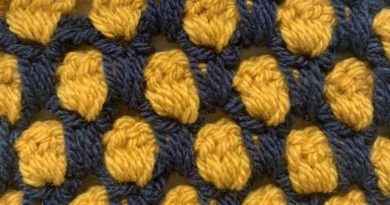
The Alpine Stitch, also known as the Raised Ripple Stitch or the Horizontal Spike Stitch, is characterized by its textured surface created by alternating front post double crochet (FPdc) and single crochet (sc) stitches. This combination results in a fabric that resembles the undulating terrain of mountain ranges, hence the name “Alpine.”
To create the Alpine Stitch, one typically alternates between a row of single crochet stitches and a row of front post double crochet stitches. The front post double crochet stitches are worked around the post of the stitch in the row below, creating a raised effect that mimics the peaks of mountains. The single crochet stitches are worked in between the front post stitches, forming the valleys.
Exploring the Versatility
One of the most appealing aspects of the Alpine Stitch is its versatility. This stitch can be used to create a wide range of projects, from cozy blankets and scarves to stylish garments and accessories. The textured surface adds depth and visual interest to any design, making it suitable for both decorative and functional items.
Furthermore, this stitch can be customized in various ways to achieve different effects. By adjusting the height of the stitches or combining multiple colors, crocheters can create unique patterns and designs. Additionally, the Alpine Stitch can be paired with other stitches to create complex textures and intricate motifs, allowing for endless creative possibilities.
Tips for Crocheting the Alpine Stitch
While the Alpine Stitch may appear complex, it is relatively straightforward to crochet with a bit of practice. Here are some tips to help you master this beautiful stitch:
Maintain Consistent Tension: Consistent tension is crucial when crocheting the Alpine Stitch to ensure that the peaks and valleys are evenly formed. Pay attention to the tightness of your stitches to achieve a uniform look.
Use the Right Hook Size: Choosing the appropriate hook size for your yarn is essential for achieving the desired texture and drape. Experiment with different hook sizes to find the one that works best for your project.
Practice Front Post Stitches: If you’re unfamiliar with front post double crochet stitches, take some time to practice them before attempting the Alpine Stitch. Once you master this technique, crocheting the Alpine Stitch will become much easier.
Count Your Stitches: To maintain the pattern consistency, count your stitches at the end of each row. This will help you identify any mistakes early on and ensure that your project turns out as planned.
ALPINE STITCH PATTERN
Materials needed
Yarn – Any weight of yarn of your color choice can be used for this beautiful stitch
Hook – corresponding to the yarn selected
Scissors.
Abbreviations (US Terms)
Ch – chain
Cont – continued
Dc – double crochet
Fptr – front post treble
Sc – single crochet
St – stitch
ALPINE STITCH DIRECTIONS
Start by making a chain with an odd number of stitches.
Row 1 (Right Side): Make a double crochet (dc) in the 3rd chain from the hook, then continue making dc stitches until the end of the row. Turn your work.
Row 2 (Wrong Side): Chain 1 (this doesn’t count as a stitch), then make a single crochet (sc) in each stitch across the row. Turn your work.
Row 3: Chain 2 (this doesn’t count as a stitch), make 1 dc in the first stitch, then *make 1 front post treble crochet (fptr) around the dc stitch from 2 rows below, make 1 dc in the next stitch; repeat from * to the end of the row. Turn your work.
Row 4: Repeat Row 2.
Row 5: Chain 2, make 1 fptr around the dc stitch from 2 rows below, *make 1 dc in the next stitch, make 1 fptr around the corresponding dc stitch from 2 rows below; repeat from * to the end of the row. Turn your work.
Row 6: Repeat Row 2.
To continue the pattern, repeat Rows 3 through 6 until you reach your desired length, and end on a repeat of Row 2.
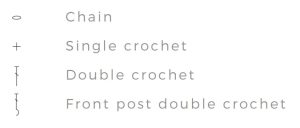
Chart

Symbols
VIDEO TUTORIAL
Dear reader, I want to make a video tutorial available to you. This tutorial can teach you how to do Alpine stitch. This tutorial is very educational and easy to follow, it’s from Bella Coco’s YouTube channel and you can watch it below:
The Alpine Stitch is a testament to the beauty and versatility of crochet. With its textured surface reminiscent of mountain landscapes, this stitch adds a touch of elegance to any project. Whether you’re a seasoned crocheter looking for a new challenge or a beginner eager to learn, the Alpine Stitch is sure to inspire creativity and awe. So grab your yarn and hook, and embark on a journey to explore the enchanting world of Alpine Stitch crochet.
I’ve always fancied trying crochet,just watched your video,I’m going to try this,it’s so much easier being shown how to do it rather than reading instructions,I’m a visual person I have to watch how something is done rather than reading instructions,so thank you.
I loved your tutorial, definitely helpful to beginners wanting to learn new and different designs.
Very good video very helpful
Thank you
I love the way you show and describe the stitch slower than normal. You make it so easy to understand and learn new stitches in a much more relaxed way. Also how you have the pattern under the video. Thankyou I will be watching more of your videos for sure.
Easy to follow through out video.
Thank you
Thank you for the directions on how to do the alpine stitch. I’m going to use this on my next project.