
Baby Cardigan
Hey, my darlings! Today, I’ve got something super special for you—an adorable baby cardigan pattern for little ones aged 0-3 months and 3-6 months! Let’s crochet these cuties together for our tiny treasures who arrived bringing so much joy, love, and, of course… a whole lot of sleepless nights! But hey, we wouldn’t trade it for the world, right?
This Baby Cardigan is pure coziness.. warm, soft, and oh-so-charming! Perfect for keeping those chubby little arms nice and toasty while they explore the world with their curious little eyes. And honestly, there’s just something magical about dressing our babies in handmade pieces, filled with love and that extra special touch of craftsmanship.
So, grab your hook, pick out a yarn that feels amazing to work with, and let’s whip up these beauties that’ll make any baby even more irresistible! I believe your Baby Cardigan will be adorable, my dear.

So, for your adorable Baby Cardigan you will need…
Materials
Here’s everything you’ll need to create this cute and cozy cardigan for the little ones:
1️⃣ Worsted weight yarn (size 4)
2️⃣ H (5mm) crochet hook – perfect for a soft and comfy fit.
3️⃣ Tapestry needle – to weave in those loose ends and keep everything nice and neat.
4️⃣ Buttons:
- 0-3 months: 4 buttons (5/8” or 16mm)
- 3-6 months, 6-12 months, and 12-24 months: 4 buttons (3/4” or 19mm)
- 2T and 3/4T: 5 buttons (3/4” or 19mm)
Sizes & Measurements
This little Baby Cardigan is designed with 3 to 4 inches of positive ease, making it roomy and extra comfy to wear!
👶 0-3 months: 9” chest width and 11” length
👶 3-6 months: 9 ½” chest width and 12” length
How Much Yarn Will You Need?
- 0-3 months: ~340 yards
- 3-6 months: ~340 yards
Gauge
To make sure your cardigan turns out just right, check your gauge:
🔹 With an H (5mm) hook, 13 double crochet stitches = 4 inches
🔹 For the skirt section, 5 pattern repeats = 4 ¾ inches
Abbreviations (US Terms)
- WS – Wrong Side of Sweater
- RS – Right Side of Sweater
- ch – chain
- sl st – slip stitch
- sc – single crochet
- dc – double crochet
- cl – cluster stitch (explained below)
- YO – yarn over
- sp – space
How to Make the Cluster Stitch
1️⃣ YO, insert the hook into the indicated stitch and pull up a loop.
2️⃣ YO and pull through two loops on the hook.
3️⃣ YO, insert the hook into the same stitch again and pull up a loop.
4️⃣ YO and pull through two loops on the hook.
5️⃣ YO one last time and pull through the remaining three loops on the hook. Done! 💫
Now, grab your favorite yarn, put love into every stitch, and crochet this adorable little cardigan that will make any baby even cuter!
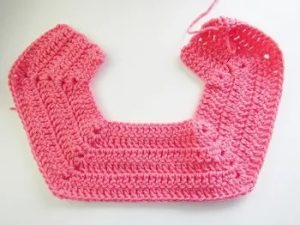
The Yoke of the Baby Cardigan Has a Gentle Curve
Alright, sweetie, let’s get this little cardigan started! The yoke is what gives the top of the cardigan its shape, and we’ll be working in rows to build that soft curve. Just follow along, and don’t worry—I’ll guide you every step of the way!
Row 1:
Chain 47. Work 1 double crochet (dc) in the 4th chain from the hook (that beginning chain 3 counts as your first dc, so don’t skip it!). Now, make 1 dc in the next 4 chains. In the next chain, work (cluster stitch cl, chain 2, cluster stitch cl). Then, 1 dc in the next 7 chains. Again, (cl, ch 2, cl) in the next chain. Continue with 1 dc in the next 15 chains. Another (cl, ch 2, cl) in the next chain. 1 dc in the next 7 chains. Another (cl, ch 2, cl) in the next chain. Finish up with 1 dc in each of the last 6 chains. Turn your work.
(You should have 41 dc + 8 clusters + 8 chain spaces.)
Row 2:
Chain 3 (this time, it doesn’t count as a stitch—just a little step up). Work 1 dc in the very first stitch. Then, 1 dc in the next 6 stitches. In the next chain-2 space, work (cl, ch 2, cl). 1 dc in the next 9 stitches. Another (cl, ch 2, cl) in the next chain-2 space. Continue with 1 dc in the next 17 stitches. Work another (cl, ch 2, cl) in the next chain-2 space. 1 dc in the next 9 stitches. (cl, ch 2, cl) in the next chain-2 space. Finish with 1 dc in the next 6 stitches and 1 dc on top of the turning chain. Turn your work.
(Now you have 49 dc + 8 clusters + 8 chain spaces.)
Row 3:
Chain 3, then work 1 dc in that same first stitch. 1 dc in the next 7 stitches. In the next chain-2 space, work (cl, ch 2, cl). 1 dc in the next 11 stitches. (cl, ch 2, cl) in the next chain-2 space. 1 dc in the next 19 stitches. (cl, ch 2, cl) in the next chain-2 space. 1 dc in the next 11 stitches. (cl, ch 2, cl) in the next chain-2 space. Finish up with 1 dc in the next 8 stitches. Turn.
(Now you’ve got 57 dc + 8 clusters + 8 chain spaces.)
Row 4:
Chain 3, then work 1 dc in that same first stitch. 1 dc in the next 8 stitches. (cl, ch 2, cl) in the next chain-2 space. 1 dc in the next 13 stitches. (cl, ch 2, cl) in the next chain-2 space. 1 dc in the next 21 stitches. (cl, ch 2, cl) in the next chain-2 space. 1 dc in the next 13 stitches. (cl, ch 2, cl) in the next chain-2 space. 1 dc in the next 9 stitches. Turn.
(Now you have 65 dc + 8 clusters + 8 chain spaces.)
Row 5:
Chain 3, 1 dc in the same first stitch. 1 dc in the next 9 stitches. (cl, ch 2, cl) in the next chain-2 space. 1 dc in the next 15 stitches. (cl, ch 2, cl) in the next chain-2 space. 1 dc in the next 23 stitches. (cl, ch 2, cl) in the next chain-2 space. 1 dc in the next 15 stitches. (cl, ch 2, cl) in the next chain-2 space. 1 dc in the next 10 stitches. Turn.
(Now you have 73 dc + 8 clusters + 8 chain spaces.)
Row 6:
Chain 3, 1 dc in the same first stitch. 1 dc in the next 10 stitches. (cl, ch 2, cl) in the next chain-2 space. 1 dc in the next 17 stitches. (cl, ch 2, cl) in the next chain-2 space. 1 dc in the next 25 stitches. (cl, ch 2, cl) in the next chain-2 space. 1 dc in the next 17 stitches. (cl, ch 2, cl) in the next chain-2 space. 1 dc in the next 11 stitches. Turn.
(Now you have 81 dc + 8 clusters + 8 chain spaces.)
And just like that, the yoke is taking shape! Keep going, and before you know it, this Baby Cardigan will be as sweet as a hug from grandma. Keep those stitches loose and enjoy the process, dear!
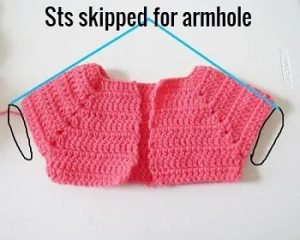
Skipping 19 Stitches to Create the Armholes
Alright, darlin’, now it’s time to shape those cute little armholes! This step is where our Baby Cardigan really starts to take form, so just follow along. I promise, it’s easier than it sounds!
Note:
In this next row, we’ll be joining the front and back of the cardigan to close up the chest while making space for the armholes.
Row 7:
- Chain 3, then work 1 double crochet (dc) in that same first stitch (this keeps our edges nice and neat).
- 1 dc in the next 11 stitches.
- Now, find that little chain-2 space between the clusters—place 1 dc right into it.
- Here’s the big step! Skip over the next 19 stitches (yep, just jump right over them!) until you reach the next chain-2 space. This creates the armhole!
- Work 1 dc into that chain-2 space.
- Now, crochet 1 dc in the next 27 stitches.
- When you reach the next chain-2 space, place 1 dc into it.
- Skip the next 19 stitches (this makes the second armhole!).
- Work 1 dc into the next chain-2 space.
- Finish off with 1 dc in the last 12 stitches. Turn your work.
(You should now have 55 dc across.)
Row 8:
- Chain 3, 1 dc in the same first stitch.
- Work 1 dc in every stitch across until you reach the end.
- Turn your work. (Still 55 dc.)
And just like that, we’ve shaped the armholes! Now, we’re ready to start working on the sweet little skirt section. Can you picture it? It’s gonna be adorable! Let’s keep going!
3-6 Month Size Only – Shaping the Yoke and Armholes
Alright, sugar, now we’re working on the next size up! If you’ve made it this far, you’re doin’ just fine. This is where we add a little extra room for those growing baby arms. Just take it one step at a time, and before you know it, you’ll have the cutest little cardigan!
Row 7:
- Chain 3, then place 1 double crochet (dc) in that same first stitch (this keeps our edges nice and smooth).
- 1 dc in the next 11 stitches.
- In the next chain-2 space, work (cluster, chain 2, cluster)—this keeps our yoke nice and rounded.
- 1 dc in the next 19 stitches.
- In the next chain-2 space, work (cluster, chain 2, cluster)
- 1 dc in the next 27 stitches.
- In the next chain-2 space, work (cluster, chain 2, cluster).
- 1 dc in the next 19 stitches.
- In the next chain-2 space, work (cluster, chain 2, cluster) one last time.
- Finish with 1 dc in the last 12 stitches. Turn your work.
(You should now have 89 dc + 8 clusters + 8 chain spaces.)
Note:
In the next row, we’ll be closing up the chest and making room for the armholes. This is where things really start to take shape—hang in there, darlin’!
Row 8:
- Chain 3, 1 dc in the same first stitch.
- 1 dc in the next 12 stitches.
- Now, let’s form those armholes! Find the two chain-2 spaces and bring them together. Work just 1 dc into both chain-2 spaces at the same time—this creates the armhole while keeping everything nice and neat.
- Skip the next 21 stitches (yep, just skip right over ‘em!).
- 1 dc in the next 29 stitches.
- Time to make the second armhole! Again, find the next two chain-2 spaces, bring them together, and work 1 dc into both chain-2 spaces at the same time.
- 1 dc in the next 13 stitches. Turn your work.
(Now you should have 57 dc across.)
And there you have it—your sweet little cardigan is really coming together now! You’ve shaped the armholes, and the next step is to work on the body of the cardigan. Ain’t it just the cutest? Keep goin’, hon, you’re almost there!
Skirt & Finishing Touches – Making Your Baby Cardigan Extra Sweet
Oh, sugar, you’re almost there! Now we’re adding the skirt to give this little cardigan a precious, flowy look. This part is super fun because the stitches create a gentle ruffle—just darling for a sweet little babe!
Starting the Skirt
(Instructions for 0-3 months and 3-6 months are slightly different, so follow the right one for your size!)
Row 1 (0-3 Months Only):
- Chain 1 (this doesn’t count as a stitch).
- 1 single crochet (sc) in the first stitch, then 1 sc in the next 4 stitches.
- Work 2 sc in the next stitch, then 1 sc in each of the next 3 stitches.
- Repeat from * to * until you reach the last 2 stitches.
- 1 sc in each of the last 2 stitches, turn.
(You should have 67 sc total.)
Row 1 (3-6 Months Only):
- Chain 1 (this doesn’t count as a stitch).
- 1 sc in the first stitch, then 1 sc in the next 3 stitches.
- Work 2 sc in the next stitch, then 1 sc in each of the next 3 stitches.
- Repeat from * to * until you reach the last stitch.
- 1 sc in the last stitch, turn.
(You should have 70 sc total.)
Continue the Skirt – Both Sizes
Row 2:
- Chain 3 (counts as a double crochet here).
- In the same stitch, work (1 dc, chain 2, 1 sc).
- Skip 2 stitches, then in the next stitch, work (2 dc, ch 2, 1 sc).
- Repeat from * to * across the row. Turn.
(You should have 23 repeats for 0-3 months and 24 repeats for 3-6 months.)
Row 3:
- Chain 3 (counts as a dc).
- In the first chain-2 space, work (1 dc, ch 2, 1 sc).
- In each chain-2 space across, work (2 dc, ch 2, 1 sc) until you have just one chain-2 space left.
- In the last chain-2 space, work (2 dc, ch 2).
- 1 sc on top of the turning chain from the previous row. Turn.
(You should have 23 repeats for 0-3 months and 24 repeats for 3-6 months.)
Keep repeating Row 3 until your cardigan measures about 11 inches for 0-3 months or 12 inches for 3-6 months. Don’t fasten off just yet—we’ve still got a bit more to do!
Buttonhole Band – Both Sizes
This is where we add those sweet little buttonholes to help keep baby snug and warm!
Before We Start:
- Lay your cardigan out and pick which side looks best to be the “Right Side” (RS).
- The buttonhole band goes on the left side, and the button band goes on the right.
- If your working yarn is already on the left corner, go ahead and keep working with it. If it’s on the right corner, just slip stitch over to the left corner before starting.
Row 1:
- Chain 1 (counts as the first sc).
- Work single crochets evenly all the way up the edge, placing 2 sc in the side of each dc row and 1 sc in the side of each sc row.
Row 2:
- Chain 1 (does not count as a stitch), 1 sc in the same stitch.
- 1 sc in each stitch across. Turn.
Creating the Buttonholes
(We’ll be skipping stitches to make space for the buttons! The stitch count for 3-6 months is in brackets.)
Row 3 (Buttonhole Row):
- Chain 1 (does not count as a stitch).
- 1 sc in the same stitch, then continue working sc until you’ve completed about ¼ of the band’s length.
- Chain 1 (or chain 2 for 3-6 months), skip 1 (or 2)
- Continue working sc until you’ve completed about ½ of the length, then make the next buttonhole the same way.
- Keep working sc, placing a buttonhole at ¾ of the way through and one near the top.
- 1 sc in each of the last stitches. Turn.
Row 4:
- Chain 1, 1 sc in the same stitch.
- 1 sc in each stitch and chain across. Turn.
Row 5 (Finishing Touch):
- Pull up a loop to make it a little bigger.
- Slip stitch loosely across the entire edge for a polished look.
- Fasten off at the neckline.
Button Band – Both Sizes
Now, let’s add the other band where we’ll sew on the buttons!
- If your yarn is already on the right corner, continue working from there.
- If it’s not, slip stitch over to the right corner and start from there instead.
Row 1:
- Chain 1 (counts as a stitch).
- Work single crochets evenly up the entire edge, using the same method as before (2 sc per dc row, 1 sc per sc row).
Row 2:
- Chain 1 (does not count as a stitch), 1 sc in the same stitch.
- 1 sc in each stitch across. Turn.
Rows 3 & 4:
- Repeat Row 2.
- Fasten off.
Sweet Little Sleeves
Alright, sugar, we’re down to the sleeves! This is where we turn that adorable little vest into a full cozy cardigan. Don’t you just love how it’s coming together? Now, let’s get those tiny sleeves done so that baby stays warm and snuggly!
For 0-3 Months – Tiny Sleeves for Tiny Arms
Round 1:
- Slip stitch under the armhole where we’ll start the sleeve.
- Chain 2 (this doesn’t count as a stitch).
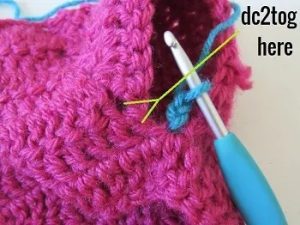
- Work a dc2tog (double crochet two together) across the post of the double crochet and the next chain-2 space—this helps shape the sleeve nicely!
- 1 dc in the next 19 stitches.
- Work another dc2tog across the next chain-2 space and the post of the following double crochet.
- Slip stitch to the first stitch to join the round. Turn. (You should have 21 stitches in total.)
Round 2:
- Chain 3 (this counts as a double crochet from here on).
- 1 dc in each stitch around.
- Slip stitch to the top of the beginning chain-3. Turn. (21 stitches.)
- Keep repeating Round 2 until the sleeve is about 5 inches long from the armhole.
A Quick Note:
-
The very last round needs to be worked on the right side (RS) of the sleeve.
-
If you’re already on the RS, just keep going.
-
If you’re on the wrong side (WS), turn your work before doing the last round!
Final Round – Adding a Cute Little Cuff!
- Chain 3 (counts as a dc).
- In the same stitch, work (1 dc, ch 2, 1 sc).
- Skip 2 stitches, then in the next stitch, work (2 dc, ch 2, 1 sc).
- Repeat from * to * until only 2 stitches remain.
- Slip stitch to the top of the beginning chain-3. Fasten off. (You should have 7 little repeats forming a soft, lacy cuff!)
Baby Cardigan For 3-6 Months – Slightly Bigger Sleeves
Round 1:
- Slip stitch to the base of the armhole where you’ll start.
- Chain 2 (this doesn’t count as a stitch).
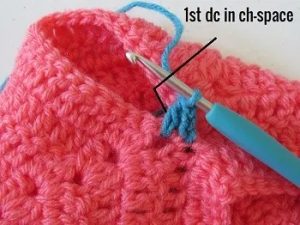
- Work 1 dc into the next chain space (this helps even things out).
- 1 dc in the next 21 stitches.
- Work 1 more dc into the next chain space.
- Slip stitch to the first double crochet to join the round. Turn. (You should have 23 stitches in total.)
Round 2:
- Chain 3 (counts as a dc).
- 1 dc in each stitch around.
- Slip stitch to the top of the beginning chain-3. Turn. (23 stitches.)
- Keep repeating Round 2 until the sleeve is about 5 inches long from the armhole.
Next Round – A Tiny Bit of Shaping!
- Chain 3 (counts as a dc).
- 1 dc in each stitch until you reach the very last stitch.
- In the last stitch, work 2 dc (this makes the sleeve slightly wider at the cuff for comfort).
- Slip stitch to the top of the beginning chain-3. (Now you have 24 stitches.)
Reminder:
- Just like before, the very last round needs to be on the right side (RS) of the sleeve.
- If you’re on the WS, turn your work before continuing.
Final Round – Sweet & Lacy Cuff!
- Chain 3 (counts as a dc).
- In the same stitch, work (1 dc, ch 2, 1 sc).
- Skip 2 stitches, then in the next stitch, work (2 dc, ch 2, 1 sc).
- Repeat from * to * until 2 stitches remain.
- Slip stitch to the top of the beginning chain-3. Fasten off. (This version has 8 repeats for a slightly bigger cuff.)
Adding the Collar – A Cozy Finishing Touch!
Alright, sugar, we’re just about done! Now we’re gonna add a soft, sweet little collar to make this baby cardigan even cuter. It’s the cherry on top, like a cozy hug around baby’s neck!
A Few Notes Before We Begin:
-
This first row of the collar will be worked into those free loops from our foundation chain (yep, the very first stitches we made!).
-
We’ll add a few increases at the back to make sure the collar sits nice and comfy.
Row 1 – Laying the Foundation
- First, leave that buttonhole band alone—we don’t wanna mess with that part!
- Slip stitch right after the buttonhole band to attach your yarn.
- Work 1 single crochet (sc) in each free loop all the way across until you reach the back of the neck.
- Along the back section, work 4 increases evenly spaced out (just do 2 sc in the same stitch at four different points).
- Keep going with 1 sc in each remaining free loop until you hit the button band on the other side. Turn. (You should have 49 stitches.)
Row 2 – The Fancy Stitch Begins!
- Chain 3 (this counts as your first double crochet).
- In that very first stitch, work (1 dc, ch 2, 1 sc)—this creates a little fan shape!
- Skip 2 stitches, then in the next stitch, work (2 dc, ch 2, 1 sc).
- Repeat from * to * all the way across. Turn. (You should have 17 pretty little repeats.)
Row 3 – Let’s Add Some Texture!
- Chain 3 (this counts as your first dc).
- In the first chain-2 space, work (1 dc, ch 2, 1 sc)—just like before.
- In each ch-2 space across, work (2 dc, ch 2, 1 sc) until you reach the very last ch-2 space.
- In the final ch-2 space, work (2 dc, ch 2), then finish off with 1 sc on top of the beginning ch-3 from the previous row. Turn. (You should still have 17 repeats.)
Baby Cardigan: Final Touches – Making It Just Right!
- For 0-3 months: Repeat Row 3 one more time.
- For 3-6 months: Repeat Row 3 two more times to give it a little extra length.
- Fasten off and weave in your ends.
Finishing Up your Baby Cardigan– The Last Steps!
- Sew on your buttons so they match up perfectly with your buttonholes.
- Weave in any loose yarn tails.

And just like that, honey, you’re DONE! You’ve made a beautiful little Baby Cardigan, stitched with love and care. I just know the little one who wears it is gonna be warm, cozy, and absolutely adorable. Now go pour yourself a cup of tea and admire your handiwork—you’ve earned it!

Thank you for this beautiful pattern!