Crochet Cable Stitch
Dear reader, how nice it is to have you here on our blog to learn adorable crochet patterns together once again. Welcome to our lovely blog Handmade Learning Here, here we have many patterns that will allow you to improve your skills and learn more every day in this incredible world of patterns in the immensity of the crochet universe. The pattern we want to bring you here today is the magnificent and impressive crochet cable stitch pattern.
This pattern has become very popular over time, this is because its interesting design draws a lot of attention from all people and the blankets made with it look incredibly beautiful. Some people asked me why I hadn’t covered the crochet cable stitch and so I decided to bring it here so that we can train together and make some really beautiful jobs using this stitch.
This point is simple and easier than you might think, despite everything, understanding how to do it is something you will master. Following the step by step you will have a very beautiful result, with a textured and very cool look and at the same time delicate as a project made in lace.
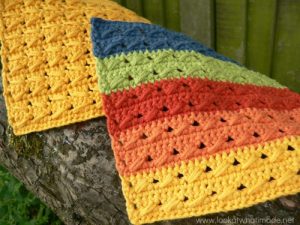
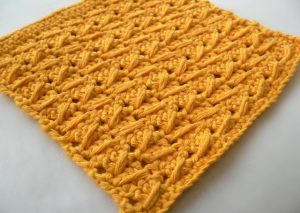
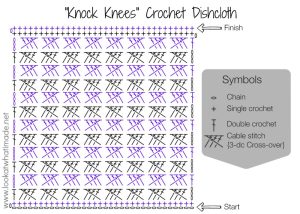
The choice of colors depends on your preference, so you can make a project using one, two, three or even a fully colored project with as many colors as you want. If it’s a baby project, choose a beautiful soft line with light tones so that the project is suited to the delicate world of babies. This stitch is ideal for several different pieces, and can be used wherever you imagine.
How to Crochet: The Cable Stitch
The crochet cable stitch, known as the 3-dc cross-over, is created using a sequence of 4 stitches. To incorporate this stitch into your work, it’s advisable to start with a foundation chain that consists of multiples of 4 stitches, as it can be a bit challenging.
When crocheting in rounds, begin with a base round that includes multiples of 4 stitches. It’s important to note that this stitch is not well-suited for increasing in the round, making it ideal for projects like cowls or boot cuffs where each round maintains a consistent stitch count. In rounds without turning, all the cable stitches will slant in the same direction.
For row-based projects, start with a base row that includes multiples of 4 stitches, plus an additional 2 stitches. These extra 2 stitches allow for the inclusion of a double crochet (dc) at either end of the row, ensuring a straight edge.
If you are working in rows, you have two options. You can either repeat the cable stitch in every row, causing your cables to slant to the right in one row and to the left in the next. Alternatively, you can alternate the cable stitch rows with rows of standard single crochet, resulting in all your cables slanting in a consistent direction.

MATERIALS
- Any worsted weight cotton
- A 4 mm crochet hook (US G/6 UK 8) or a 5 mm crochet hook (US 8/H UK 6)
- Yarn needle
STITCH ABBREVIATIONS
(Using US Terms)
Ch – Chain
Dc – Double crochet
Sc – Single crochet
St/sts – Stitch/stitches
Special Stitches
Cable Stitch: Begin by skipping the next stitch, then double crochet in the following three stitches. While working in front of these three double crochets, yarn over and insert your hook into the previously skipped stitch. Pull up a loop to match the height of the double crochets. Proceed by yarning over and pulling through two loops twice, effectively creating an extended (or elongated) double crochet.
PATTERN
To begin, initiate with a foundation row of 14 single crochets (sc). When working single crochet rows, you should augment the stitch count by adding 1 chain. Therefore, we’ll commence with 15 chains to establish a base row of 14 sc’s, which will be equivalent to (3 multiples of 4) plus 2 stitches.
Row 1: Chain 15. Single crochet in the second chain from the hook, and in each chain across (refer to Photo 1). Turn your work.
Stitch Count: 14 single crochets

Row 2:
- If you plan to use the same color, chain 3 (counting as your first double crochet – as shown in Photo 2 above), or begin with a chainless double crochet.
- If you intend to use a different color, commence with a standing double crochet in the last single crochet from the previous round.
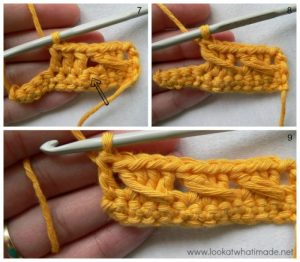
*Skip the next stitch (indicated by an arrow in Photo 2). Double crochet in the next 3 stitches (Photo 3). While working over the 3 double crochets, yarn over and insert your hook into the skipped stitch (indicated with an arrow in Photo 4). Pull up a loop to match the height of the double crochets – refer to Photo 5. This loop should encompass the 3 double crochets and should be visible on both the front and back of your work. (Yarn over and pull through 2 loops) twice, completing an extended (or long) double crochet (Photo 6).* Repeat from * to * 2 more times. Double crochet in the last stitch (Photo 9).
Stitch Count: 2 double crochets and 3 cable stitches.
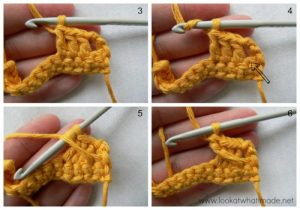
Photos 7 and 8 below illustrate the second cable stitch being created, with the skipped stitch indicated by an arrow.
This stitch can be incorporated anywhere you desire to add delicate texture to your project, provided that you have a stitch count that is a multiple of 4 and bear in mind that you will require 2 extra stitches when working in rows.
VIDEO TUTORIAL
Dear reader, here is a video tutorial on how to make this beautiful crochet stitch. The video tutorial is from the Knit and Crochet with Jeanette channel. You can find it here. You will be able to watch and follow it before executing your project, in this way everything will be clearer and easier. make your work easier when it comes to executing the official project. Training is always great and you can use any thread you have availab le to follow along with the video, thus improving your crochet technique and allowing yourself to become familiar with the pattern.
We always provide you with many beautiful patterns, our team loves to offer the best free patterns for you so that you can execute beautiful projects. In case you, reader, are still in doubt about the stitch you are going to use, or are looking for an ideal combination for this stitch, we leave here other model options available that may inspire you. You may like these patterns:
Now tell me, what did you think of this beautiful spot? Do you already have in mind the project you want to do with it? That blanket on your wish list will be perfect with this stitch, don’t you think? Well, start right now, and already take advantage and send this tip to that friend of yours who also crochets! Thanks for being here with us, we have more awesome patterns on our blog that you should check out. Check back often! Have a great day and see you soon.
With Love, Handmade Learning Here team

Thank you for sharing your patterns. Their descriptions and instructions are well put.
I’m so glad I stumbled across this site. I loved the tutorial because you described everything so well. Watching the video gave me more understanding of a stitch I’ve tried so many times and failed, I will be thinking of a project to use Moroccan stitch very soon. Thank you so much.