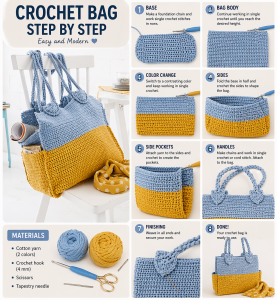
Crochet Bag
Hello, my friends, welcome to our lovely blog Handmade Learning Here. There’s something truly special about handmade bags that combine beauty and functionality in every stitch. This crochet bag design is one of those timeless projects that continues to inspire makers of all skill levels, bringing together simplicity, structure, and everyday usefulness. With its clean lines, sturdy texture, and elegant color contrast, this piece carries a modern charm while still embracing the warmth and authenticity of handmade work.
Crochet bags have gained a special place in the handmade world because they are both practical and expressive. This particular pattern shows how basic stitches, like single crochet, can be transformed into something refined and durable. Even though the finished bag looks structured and sophisticated, its construction is surprisingly approachable, making it an excellent project for beginners who are ready to explore new techniques and build confidence with their skills.
What makes this design especially interesting is the way it is constructed in separate pieces. Instead of working the entire bag at once, you create panels for the front and back, a long strip for the sides and bottom, and additional elements like straps and tabs. This step-by-step method allows you to focus on one section at a time, making the process more manageable and enjoyable while also helping you achieve a more polished final result.
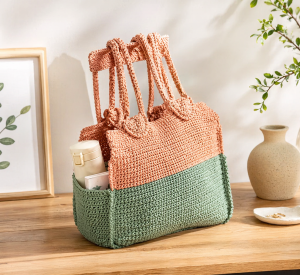
Another beautiful aspect of this project is how customizable it is. The original design uses two contrasting colors to create a modern and eye-catching look, but you can easily adapt it to match your personal style. Whether you prefer neutral tones, bold color combinations, or even textured yarns, this bag becomes a canvas for your creativity. Small additions like a lining, buttons, or decorative details can elevate the piece even further and make it uniquely yours.
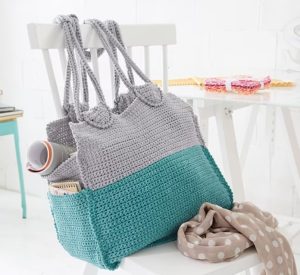
This is a roomy crochet bag worked mostly in single crochet (sc) using simple rectangular pieces that are later assembled. It’s a great project for beginners who want to practice consistency, color changes, and basic shaping.
Finished Size
Approx. 14.5” wide x 12.5” tall x 6” deep (without straps)
Materials
Medium/bulky yarn in 2 colors:
Color A (main bottom color)
Color B (top color)
Crochet hook: 7 mm (K/10.5)
Yarn needle (for sewing pieces together)
Gauge (optional but helpful)
14 single crochet x 18 rows = 4” x 4”
Skills You’ll Use
- Chain (ch)
- Single crochet (sc)
- Increase (2 sc in same stitch)
- Decrease (sc2tog)
- Sewing pieces together
- Working in rows
Pattern Notes (Important!)
The bag is worked flat in rows, not in rounds.
Each row starts with ch 2 (counts as first stitch).
You will make separate pieces and assemble later.
STEP-BY-STEP
Front Panel
With Color A, chain 52.
Add 2 extra chains (turning chain).
Start in the 3rd chain from hook.
Work 1 sc in each stitch across (52 stitches total).
Continue working rows of sc.
When piece measures about 7 inches (18 cm):
Switch to Color B
Keep going until total height is about 12¼ inches (31 cm).
Fasten off.
You now have the front of the bag.
Back Panel
Repeat the exact same steps as the front.
Bottom + Sides (One Long Piece)
With Color B, chain 22 + ch 2.
Start in 3rd chain from hook.
Work sc across (22 stitches per row).
👉 After about 2¾ inches (7 cm):
Switch to Color A
Continue until piece measures about 32¼ inches (82 cm).
👉 Then:
Switch back to Color B
Work until total length is about 35 inches (89 cm)
Fasten off.
✔️ This long strip will wrap around the bag (bottom + sides).
Straps (Make 2)
- With Color B, chain 196 + ch 2.
- Work sc across.
- Continue for 4 rows total.
- Fold the strip lengthwise.
- Sew long edges together → forms a tube.
- Join the ends → creates a loop.
✔️ Repeat to make second strap.
Handles (Make 2)
- With Color B, chain 40 + ch 2.
- Work sc rows for 9 rows total.
- Fasten off.
✔️ These wrap around the straps for comfort.
Tabs (Make 4)
- Chain 4 + ch 2.
- Row 1: 1 sc in each stitch (4 stitches).
Increase rows:
- Rows 2–4:
- 2 sc in first stitch
- 1 sc across
- 2 sc in last stitch
✔️ You’ll end with 10 stitches
Straight section:
- Continue until piece is about 3.5 inches (9 cm)
Decrease rows:
- Next 3 rows:
- Decrease at beginning AND end (sc2tog)
✔️ Back to 4 stitches
- Decrease at beginning AND end (sc2tog)
- Crochet around edges:
- 1 round of sc
- 1 round of reverse sc (crab stitch)
✔️ Make 4 total.
ASSEMBLY
Join the Bag
- Attach the long bottom/sides strip to:
- Front panel
- Back panel
👉 Tip:
Leave about 2¼ inches (6 cm) from top edge when attaching
Side Pockets (Make 2)
- Attach yarn to side edge of bag bottom.
- Work 22 sc per row.
- Continue until height is about 7 inches (18 cm).
- Fasten off.
- Crochet around edges and attach sides at the same time.
Attach Tabs & Straps
- Fold tabs in half.
- Sew them:
- Inside top of bag
- About 6 cm from each side
- About 3 cm below top edge
- Insert straps inside tabs.
- Sew tabs closed (don’t sew through straps).
Add Handles
- Wrap handle piece around both straps.
- Sew closed (without catching straps).
Finish
- Weave in all ends.
- Shape your bag.
Beginner Tips
- Use stitch markers to keep edges straight.
- Count stitches every few rows.
- Don’t worry if your first panel isn’t perfect, consistency improves quickly.
- This project is mostly repetition → great for building confidence!
Bellow you’ll find a PDF tutorial with step-by-step instructions for this magnificent crochet bag pattern. Click to access it, so you can print it out and have it on hand to better follow along when making your beautiful bag.
In the end, this crochet bag is more than just an accessory — it’s a reflection of time, care, and creativity stitched into every row. It’s the kind of project that not only helps you grow as a maker but also gives you something useful and beautiful to carry in your daily life. So take your time, enjoy the rhythm of each stitch, and remember that every handmade piece tells a story, and this one will be entirely yours.