
Crochet Easter Wreath
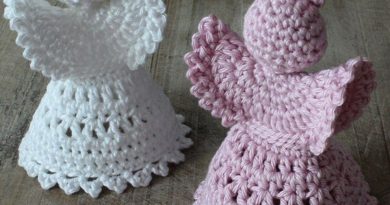
Hello, my dear reader! Today we are here to talk about a very beautiful pattern that you can use to make a charming piece! This is a beautiful Crochet Easter Wreath. You can have your home decorated with an object made by your own hands, or even give it as a gift to special people.
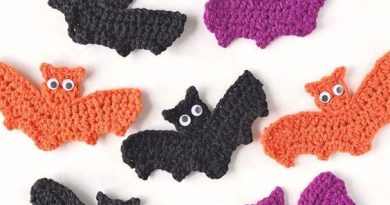
Crocheted Easter decorations evoke a special feeling of tradition and careful craftsmanship. Each piece, whether it’s a cute bunny, a decorated egg or a delicate flower, is meticulously handcrafted, bringing warmth and personality to the festive atmosphere. Crochet, with its intricate technique and color versatility, allows artisans to express their creativity in unique ways, transforming simple threads into vivid symbols of the renewal and joy that Easter represents.
In addition to aesthetic beauty, crochet Easter decorations also carry a deep symbolic meaning. Each element of the handcrafted decor, from the bouncing bunnies to the colorful eggs, resonates with these themes, reminding us of the importance of faith, family and spiritual renewal. Thus, crochet Easter decorations not only beautify our homes, but also connect us to a deeper meaning of this special season.
Crochet Easter Wreath examples:
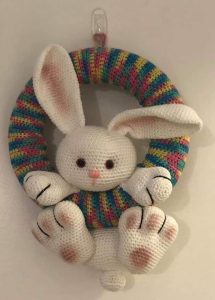

With Easter approaching, it’s time to add a touch of artisanal charm to your decor. A Crochet Easter Wreath is an adorable way to welcome the spring season and celebrate the renewal of life. In this article, we’ll explore how you can create your own crochet wreath, perfect for decorating your door or wall and delighting your guests during this festive season.
The first step before making any Crochet Easter Wreathis its base… Here we will provide an easy step-by-step guide for you to get inspired.
How to Crochet a Wreath Base
This post will describe how to make a Crochet Easter Wreath base, whether it’s a polystyrene base, cardboard, or some other options you can use. Most crochet patterns use a polystyrene circular base. You can use other things, like a circle of cardboard, with a hole cut out of the middle. But I highly recommend buying one of the polystyrene bases, as they look so much more professional for just a few dollars.
Other tools
If you are going for a covered ring, you’ll need
- Yarn
- Crochet hooks
- Scissors
- Yarn needle
Tension/ Gauge
The tension or gauge wasn’t measured, but for sizing the width (the part wrapped around the wreath), stitches were crocheted (Foundation Half Double Crochet). Ensuring it would stretch (another reason for using acrylic yarn), it was made to meet the other side sufficiently for sewing it together.
Ensure it fits snugly, with a slight stretch, and not loose at all. Recheck after approximately five rows, aiming for a width of around 16-18cm (6 1/4 to 7 inches).
Helpful Tips:
Don’t worry about sewing in the loose ends of yarn. Save them for later to stitch the wreath together when your crochet strip is the right length.
Remember, the initial chain of 2 stitches (Ch2) at the beginning of each row counts as a stitch all the way through.
When you want to switch colors, simply use the new color for the final yarn over of the last stitch in the row.
Tips for Crocheting Straight
Use a stitch marker in the ch2 (chain 2) to remind you to make a stitch in the top of the chain 2.
Lay your work down flat occasionally to check if it’s going wonky. It’s easier to spot any irregularities this way.
Count your stitches for every row. It might feel tedious, but it ensures you’ll maintain a straight edge.
If you notice you’ve missed a few stitches, don’t worry! You can compensate by doing 2 half double crochet (HDC) stitches in the last stitch on a few rows to make it bigger again.
Crochet Easter Wreath Base Pattern
ROW 1:
Using a 4mm crochet hook and Parchment yarn, create a foundation row of 22 half double crochet stitches. Check the sizing around your ring. If it fits snugly, continue; otherwise, adjust the number of stitches based on your tension and the yarn used. Aim for a width measurement of about 16-18cm (6 1/4 to 7 inches).
ROW 2:
Chain 2, then half double crochet across. Turn your work.
Repeat ROW 2 until the crochet panel wraps around the ring. For instance, it took 161 rows to cover my base.
Sewing the crochet base
First, let’s connect the two ends of your crochet strip. Fold it in half, then stitch in the back loops only to make a circle.
Next, place the crochet on a ring.
Wrap the crochet around the ring, making sure the two ends meet on one side.
Your extra ends will come in handy now!
Tie the matching ends together at about four places around the ring, like points on a clock (at 12, 3, 6, and 9 o’clock). This will keep everything secure before sewing.
Using your yarn needle and the ends, sew the matching color stripes together. Finish off, and tuck in any loose ends.
Once you have your base ready, leave it aside for a moment and let’s move on to the bunny pattern.
About the materials…
If you’re new to crocheting, don’t worry! These are the things you’ll need to make a cute figure that fits a 30 cm wreath.
You don’t have to use the exact yarn and hook size I suggest. You can choose whatever you like!
If you want your figure to be smaller, just pick thinner yarn and a smaller hook.
- Yarn (I used DROPS Air – 130 meters per 50 grams)
- Crochet hook (I used a 3.5 mm hook)
- Stuffing (to make your figure nice and squishy)
- A little bit of pink yarn for the nose, and a little bit of black yarn for the paws
- Safety eyes (I used 15 mm eyes)
- Wool or darning needle (to sew everything together)
- Optional: pink pastel chalk (for adding cute details)
Abbreviations (US Terminology):
MR: Magic Ring
inc: Increase (make 2 single crochet stitches in 1 stitch)
ch: Chain
dec: Decrease (single crochet 2 stitches together)
slst: Slip Stitch
sc: Single Crochet
st: Stitch
BUNNY PATTERN
Head
Single crochet 6 stitches in the magic ring (6)
Increase in each stitch around, you’ll have 12 stitches in total (12)
(Single crochet 1 stitch, then increase) Repeat this sequence 6 times, you’ll have 18 stitches in total (18)
(Single crochet 2 stitches, then increase) Repeat this sequence 6 times, you’ll have 24 stitches in total (24)
(Single crochet 3 stitches, then increase) Repeat this sequence 6 times, you’ll have 30 stitches in total (30)
(Single crochet 4 stitches, then increase) Repeat this sequence 6 times, you’ll have 36 stitches in total (36)
(Single crochet 5 stitches, then increase) Repeat this sequence 6 times, you’ll have 42 stitches in total (42)
(Single crochet 6 stitches, then increase) Repeat this sequence 6 times, you’ll have 48 stitches in total (48)
(Single crochet 7 stitches, then increase) Repeat this sequence 6 times, you’ll have 54 stitches in total (54)
(Single crochet 8 stitches, then increase) Repeat this sequence 6 times, you’ll have 60 stitches in total (60)
(Single crochet 9 stitches, then increase) Repeat this sequence 6 times, you’ll have 66 stitches in total (66)
12-22. Repeat this round 11 times: Single crochet in each stitch around (66)
(Single crochet 9 stitches, then decrease) Repeat this sequence 6 times, you’ll have 60 stitches in total (60)
(Single crochet 8 stitches, then decrease) Repeat this sequence 6 times, you’ll have 54 stitches in total (54)
(Single crochet 7 stitches, then decrease) Repeat this sequence 6 times, you’ll have 48 stitches in total (48)
(Single crochet 6 stitches, then decrease) Repeat this sequence 6 times, you’ll have 42 stitches in total (42)
(Single crochet 5 stitches, then decrease) Repeat this sequence 6 times, you’ll have 36 stitches in total (36)
(Single crochet 4 stitches, then decrease) Repeat this sequence 6 times, you’ll have 30 stitches in total (30)
(Single crochet 3 stitches, then decrease) Repeat this sequence 6 times, you’ll have 24 stitches in total (24)
Start stuffing the head.
(Single crochet 2 stitches, then decrease) Repeat this sequence 6 times, you’ll have 18 stitches in total (18)
(Single crochet 1 stitch, then decrease) Repeat this sequence 6 times, you’ll have 12 stitches in total (12)
Finish stuffing.
Decrease in each stitch around, you’ll have 6 stitches in total (6)
Fasten off, close, leave a very long tail for sewing.
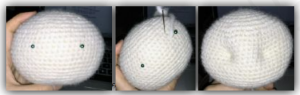
The eyes go in the middle of the head, around rounds 17-18, leaving 8 stitches in between. You can also make eye sockets this way: Place two pins where you want the eyes. Thread a long needle from the bottom to the first pin, then back one stitch away. Repeat for the second eye. Adjust the tension for deeper sockets. Look at the pictures for help.
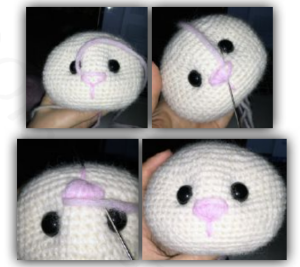
Now, let’s add some stitches to make the nose look nice! Look at the pictures to see how it’s done. First, use the pink yarn to sew the outline of the nose. Then, use a special stitch called a blanket stitch to fill in the main part of the nose. After that, go over the outline again to make it look tidy. I like to begin stitching from the bottom of the head so that I can hide the knot and ends of the yarn.
Ears (Make 2):
Start with a magic ring, crochet 6 single crochet stitches into the ring. (6 stitches)
Increase in each stitch around. (12 stitches)
(Single crochet in next stitch, increase in next stitch) repeat 6 times. (18 stitches)
(Single crochet in each of the next 2 stitches, increase in next stitch) repeat 6 times. (24 stitches)
(Single crochet in each of the next 3 stitches, increase in next stitch) repeat 6 times. (30 stitches)
(Single crochet in each of the next 4 stitches, increase in next stitch) repeat 6 times. (36 stitches)
7.-12. Single crochet in each stitch around for 6 rounds. (36 stitches per round)
(Single crochet in each of the next 16 stitches, decrease) repeat 2 times. (34 stitches)
14.-15. Single crochet in each stitch around for 2 rounds. (34 stitches per round)
(Single crochet in each of the next 15 stitches, decrease) repeat 2 times. (32 stitches)
17.-18. Single crochet in each stitch around for 2 rounds. (32 stitches per round)
(Single crochet in each of the next 14 stitches, decrease) repeat 2 times. (30 stitches)
20.-21. Single crochet in each stitch around for 2 rounds. (30 stitches per round)
(Single crochet in each of the next 13 stitches, decrease) repeat 2 times. (28 stitches)
23.-24. Single crochet in each stitch around for 2 rounds. (28 stitches per round)
(Single crochet in each of the next 12 stitches, decrease) repeat 2 times. (26 stitches)
26.-27. Single crochet in each stitch around for 2 rounds. (26 stitches per round)
(Single crochet in each of the next 11 stitches, decrease) repeat 2 times. (24 stitches)
29.-33. Single crochet in each stitch around for 5 rounds. (24 stitches per round)
Fasten off, leaving a long tail for sewing. Do not close or stuff the ears.
Front Paw (make two):
Start with a magic ring, single crochet 6 stitches into the ring. (6 stitches)
Increase in each stitch around. (12 stitches)
Single crochet in one stitch, then increase – repeat this sequence around. (18 stitches)
Single crochet in two stitches, then increase – repeat around. (24 stitches)
Single crochet in three stitches, then increase – repeat around. (30 stitches) 6-10. Single crochet in each stitch around for 5 rounds. (30 stitches)
Single crochet in eight stitches, then decrease – repeat three times. (27 stitches)
Single crochet in each stitch around. (27 stitches)
Single crochet in seven stitches, then decrease – repeat three times. (24 stitches)
Single crochet in each stitch around. (24 stitches)
Single crochet in six stitches, then decrease – repeat three times. (21 stitches)
Single crochet in each stitch around. (21 stitches)
Single crochet in five stitches, then decrease – repeat three times. (18 stitches) 18-20. Single crochet in each stitch around for three rounds. (18 stitches)
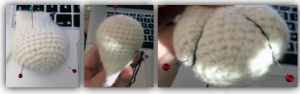
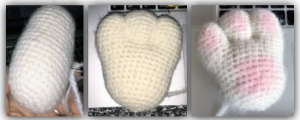
First, lightly stuff the front of the paw. Then, fold the top edge together and sew it using a single crochet stitch along the top. Now, shape the paws using black yarn. Use pins as guides and to help the yarn move smoothly. Start by inserting your needle from the bottom, just behind the first pin, leaving a tail. Wrap the yarn around to the top pin, pull tight, and adjust the tension. Repeat for the second pin, starting from the top and going to the bottom. Once you’ve reached your starting point, adjust the tension again and knot both ends securely. Hide the tails inside the paw. Refer to photos for help.
Back Paws (Make 2)
Start with an oval shape.
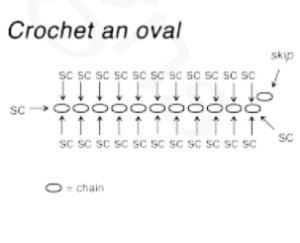
Chain 12, then single crochet (sc) in the second chain from the hook. Single crochet 9 more times along the chain. In the last chain, make 3 single crochets in the same stitch. Continue along the bottom of the chain, making single crochets in each of the next 9 chains. Finally, make 2 single crochets in the last chain. (You should have 24 stitches in total)
Increase (inc) in the first stitch, then single crochet 9 stitches. Increase 3 times, then single crochet 9 stitches again. Finish with 2 increases. (You should have 30 stitches now)
Single crochet 1 stitch, then increase in the next stitch. Single crochet 9 stitches, then repeat the pattern of 1 single crochet followed by an increase 3 more times. Afterward, single crochet 9 stitches, then repeat the pattern of 1 single crochet followed by an increase 2 more times. (You should have 36 stitches)
Single crochet 2 stitches, then increase in the next stitch. Single crochet 9 stitches, then repeat the pattern of 2 single crochets followed by an increase 3 more times. Afterward, single crochet 9 stitches, then repeat the pattern of 2 single crochets followed by an increase 2 more times. (You should have 42 stitches)
5-10. Single crochet in each stitch around. (42 stitches for each round)
Single crochet 12 stitches, then decrease (dec) by stitching 2 stitches together. Repeat this pattern 3 times. (You should have 39 stitches)
Single crochet 11 stitches, then decrease 3 times. (You should have 36 stitches)
Single crochet 10 stitches, then decrease 3 times. (You should have 33 stitches)
Single crochet 9 stitches, then decrease 3 times. (You should have 30 stitches)
15-20. Single crochet in each stitch around. (30 stitches for each round)
Single crochet 3 stitches, then decrease 6 times. (You should have 24 stitches)
Single crochet in each stitch around. (24 stitches)
Single crochet 2 stitches, then decrease 6 times. (You should have 18 stitches)
Single crochet 1 stitch, then decrease 6 times. (You should have 12 stitches)
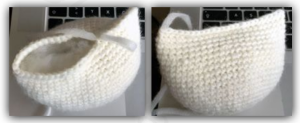
Now, stuff and shape the paw, but be careful not to overstuff it as you will add toes later.
Decrease 6 times. (You should have 6 stitches)
Fasten off, close the opening, and leave a tail for sewing.
To make the bunny’s back paws, follow the same steps you used for the front paws, but this time, use the same color yarn as the rest of your bunny instead of black yarn. You can also choose to use black yarn if you prefer. To add the pads to the paws, you can use a small amount of pink pastel chalks. Alternatively, you can crochet small rounds for the pads. Check out the instructions below the photo for details.
Small Paw Pads (make 6):
Color: Pink
Start with a magic ring, then single crochet 6 stitches into the ring. (6 stitches total)
Increase (add 1 stitch in each stitch) in each of the 6 stitches. (12 stitches total)
Fasten off, leaving a long tail for sewing.
Big Paw Pads (make 2):
Color: Pink
Start with a magic ring, then single crochet 6 stitches into the ring. (6 stitches total)
Increase (add 1 stitch in each stitch) in each of the 6 stitches. (12 stitches total)
Single crochet in one stitch, then increase in the next stitch, repeating this pattern 6 times. (18 stitches total)
Single crochet in 2 stitches, then increase in the next stitch, repeating this pattern 6 times. (24 stitches total)
Fasten off, leaving a long tail for sewing.
Assembly:
Sew the pads onto the paws.
BODY
Single crochet 6 stitches in the magic ring. (6 stitches)
Increase in each stitch around. (12 stitches)
(Single crochet 1, increase) repeated 6 times. (18 stitches)
(Single crochet 2, increase) repeated 6 times. (24 stitches)
(Single crochet 3, increase) repeated 6 times. (30 stitches)
(Single crochet 4, increase) repeated 6 times. (36 stitches)
(Single crochet 5, increase) repeated 6 times. (42 stitches)
(Single crochet 6, increase) repeated 6 times. (48 stitches)
(Single crochet 7, increase) repeated 6 times. (54 stitches)
(Single crochet 8, increase) repeated 6 times. (60 stitches)
11-18. [Repeat for 8 rounds] Single crochet in each stitch around. (60 stitches)
(Single crochet 8, decrease) repeated 6 times. (54 stitches)
Single crochet in each stitch around. (54 stitches)
(Single crochet 7, decrease) repeated 6 times. (48 stitches)
22-24. [Repeat for 3 rounds] Single crochet in each stitch. (48 stitches)
Stuff the body with stuffing, making sure not to overfill. Fold along the top edge and close the seam with a row of single crochet. Alternatively, sew the seam closed.
Finish off by fastening off, leaving a tail for sewing.
Tail – Bunny:
Start with a magic ring and single crochet 6 stitches into it (6)
Increase in each stitch around, repeating 6 times (12)
Single crochet 1 stitch, then increase in the next stitch, repeating 6 times (18)
Single crochet 2 stitches, then increase in the next stitch, repeating 6 times (24)
5.-8. Single crochet in each stitch around for 4 rounds (24)
Single crochet 2 stitches, then decrease in the next stitch, repeating 6 times (18)
Single crochet 1 stitch, then decrease in the next stitch, repeating 6 times (12)
Fasten off, leaving a long tail for sewing, and lightly stuff the tail.
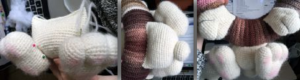
To assemble the bunny, start by sewing all the pieces together. Pin the feet to the body, then pin the body to the wreath. Next, pin the ears to the head (fold the ears in half again to shape them). Pin the tail to the body where it can still be seen from the front. Attach the front paws directly to the wreath or sew them to the side of the head. Once you’re satisfied with the placement, sew all the pieces into place. You can refer to the photos below for help and guidance.
In addition to the bunny, you can personalize your beautiful wreath with applications of small crochet Easter eggs, flowers or butterflies. Let your creativity guide you when making your beautiful wreath!
Creating a Crochet Easter Wreath is a charming way to add a handcrafted touch to your seasonal decor. With a few simple materials and a little crochet skill, you can bring your own festive masterpiece to life. This Crochet Easter Wreath will not only brighten up your home, but it will also provide moments of fun and creativity during the creation process. Let your imagination flourish as you celebrate Easter with style and handcrafted charm!
Thank you for being here with us, lovely reader, our blog is always full of special news and patterns for you, like this Crochet Easter Wreath pattern. Be sure to check out the other articles! I hope you have a beautiful day, see you soon. XoXo
I love the patterns! Keep up the GREAT WORK