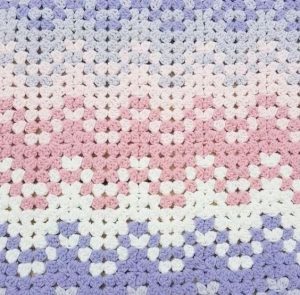
Granny Ripple Blanket
Hello, my friend! I hope you’re having a beautiful day. Welcome to our lovely blog, Handmade Learning Here, it’s so wonderful to have you here with us in our charming crochet and craft space. Today, we’re excited to introduce a fabulous pattern for a marvelous blanket: the Granny Ripple Blanket.
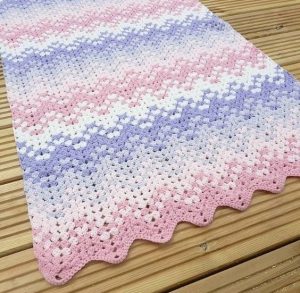
The Granny Ripple Blanket is a delightful piece that combines the classic granny stripe stitch with the flowing beauty of ripple waves. Ideal for crocheters of all levels, this pattern not only results in a beautiful and cozy blanket but also provides a fantastic opportunity to explore crochet techniques and experiment with different color combinations. In this article, we’ll explore the features of this charming pattern and how it can be a wonderful addition to your crochet project collection.
The Granny Ripple Blanket pattern is known for its versatility and simplicity. The technique combines the construction of granny stripe stitches with the formation of ripple waves, creating a visually appealing and easy-to-follow pattern.
Choosing Colors
The choice of colors can completely transform the look of your blanket. Many people prefer using a harmonious color palette for a more cohesive effect, while others choose contrasting colors to highlight the stitches in each wave. Experimenting with different combinations can lead to unique and personalized pieces.
Applications and Uses
The Granny Ripple Blanket is perfect for sofa throws, bed covers, or even as a gift for someone special. Its design is flexible enough to adapt to different sizes and decorating styles, making it both a practical and decorative piece.
So, dear reader, let’s get to what matters, shall we? Our beautiful pattern awaits.
Measurements:
Approximately 55 inches (139.5 cm) by 63 inches (160 cm).
GAUGE
In stitch pattern using Size H-8 (5mm) hook, 16 sts = 4″/10cm
Using a size H-8 (5mm) crochet hook, the stitch pattern gauge is 16 stitches = 4” / (10 cm).
PATTERN INSTRUCTIONS
BLANKET
Start with the Larger Hook and Color A:
Chain (ch) 218.
Row 1:
Make 3 double crochets (dc) in the 5th chain from the hook.
Skip (sk) 2 chains, then make 3 dc in the next chain.
Skip 2 chains again, then make (3 dc, ch 3, 3 dc) in the next chain.
Repeat: [sk 2 ch, 3 dc in next ch] two times.
Now, *skip 5 chains, repeat [3 dc in next chain, sk 2 chains] twice.
In the next chain, make (3 dc, ch 3, 3 dc), then repeat [sk 2 chains, 3 dc in next chain] twice*.
Repeat the section from * to * a total of 10 more times.
After completing the last repeat, skip 2 chains and make 1 dc in the last chain.
Fasten off the yarn and turn your work.
Row 2:
Attach Color B to your work and chain 4.
[Make 3 dc between the groups of dc stitches] twice.
In the next chain-3 space, make (3 dc, ch 3, 3 dc).
Now, *repeat [3 dc between dc groups] twice.
Skip the next 2 groups of dc.
Repeat [3 dc between dc groups] twice.
Make (3 dc, ch 3, 3 dc) in the next chain-3 space.
Repeat [3 dc between dc groups] twice*.
Continue repeating from * to * until you reach the end of the row.
Finish the row with 1 dc in the top of the chain from the previous row.
Fasten off yarn and turn your work.
Repeating Row 2 for Color Sequence:
Repeat Row 2 four times in the following color sequence:
Color A, Color C, Color D, Color C.
Continue Repeating Row 2:
Repeat Row 2 for 13 color repeats (total of 78 rows) using this color sequence:
Color A, Color B, Color A, Color C, Color D, Color C.
Finish with the Last Color Sequence:
Repeat Row 2 for three more rows using the following color sequence:
Color A, Color B, Color A.
After completing all the rows, fasten off the yarn. Do not turn your work at the end.
Edging
Row 1:
Side 1:
Attach Color A to the last stitch made.
Make 3 single crochets (sc) into the same stitch.
*Make 2 sc along the side of the double crochet (dc) stitches.
Make 1 sc on top of each dc stitch.
Make 2 sc over the chain-4 space.
Make 1 sc on top of each dc stitch.*
Repeat from * to * until you reach the last dc.
Make 2 sc over the last chain stitch.
Make 3 sc in the 3rd chain from the beginning.
Side 2:
Make 2 sc over the chain stitches.
*Make 2 sc in the chain space below 3 dc stitches.
Make 2 sc over the chain stitches.*
Repeat this twice.
Make 2 sc in the chain space below (3 dc, 3 chains, 3 dc).
*Make 2 sc over the chain stitches.
Make 2 sc in the chain space below 3 dc stitches.*
Repeat this twice.
Make 3 sc in the chain-5 space.
Repeat from * to * 10 more times.
*Make 2 sc in the chain space below 3 dc stitches.
Make 2 sc over the chain stitches.*
Repeat this twice.
Make 2 sc in the chain space below (3 dc, 3 chains, 3 dc).
Make 2 sc over the chain stitches.
Make 2 sc over the chain space below 3 dc stitches.
Make 2 sc over the chain stitches.
Make 2 sc in the chain space below 3 dc stitches.
Make 5 sc in the chain space.
Side 3:
Make 1 sc in each dc stitch.
Make 2 sc over each dc stitch.
*Make 1 sc in each dc stitch.
Make 2 sc over the chain-4 space.*
Repeat from * to * until you reach the next corner.
Make 3 sc over the dc stitches.
Side 4:
*Make 1 sc in each dc stitch until you reach the chain-3 space.
Make 3 sc in the chain-3 space.*
Repeat this 12 times.
Make 1 sc in each dc stitch until you reach the last stitch.
Slip stitch to the first stitch of the row.
Fasten off the yarn.
Row 2:
Side 1:
Attach Color D to the 2nd single crochet (sc) in the group of 3 sc from the previous row.
Make 1 sc in each sc across until you get to the next corner.
In the middle sc of the 3 sc from the previous row, make 3 sc.
Side 2:
*Make 1 sc in each of the next 8 stitches.
Make 1 single crochet decrease (sc dec) over the next 2 stitches.
Make another sc dec over the next 2 stitches.
Make 1 sc in each of the next 8 stitches.
In the next stitch, make 3 sc.*
Repeat from * to * until you reach the next corner.
In the middle sc of the 3 sc from the previous row, make 3 sc.
Side 3:
Make 1 sc in each sc across until you reach the next corner.
In the middle sc of the 3 sc from the previous row, make 3 sc.
Side 4:
Make 1 sc in each of the next 10 stitches.
In the next stitch, make 3 sc.
*Make 1 sc in each of the next 8 stitches.
Make 1 sc decrease over the next 2 stitches.
Make another sc decrease over the next 2 stitches.
Make 1 sc in each of the next 8 stitches.
In the next stitch, make 3 sc.*
Repeat from * to * a total of 10 more times.
After the last repeat, make 1 sc in each of the next 11 stitches.
Slip stitch (sl st) to the first stitch of the row to join.
Repeat Row 2:
Repeat Row 2 for 5 more rows using the following colors in this order: Color C, Color B, Color B, Color A, Color A.
Edging (Reverse Single Crochet):
Do not fasten off the yarn after the last row.
Switch to a smaller hook and use Color A.
Work a reverse single crochet (reverse sc) in each stitch all around the blanket.
Fasten off the yarn.
FINISHING
Weave in all ends to complete your project.
GRANNY RIPPLE BLANKET PDF
Dear reader, here we have a lovely PDF developed by Delma Myers with the written tutorial of this amazing pattern. You can access the step by step and print it! Just click on the button.
VIDEO TUTORIAL
We have put together a lovely video tutorial from the Cherished Memories Crochet channel for you. It is very educational and will help you get familiar with this new stitch. I hope you enjoy it! You can watch the video tutorial below:
The Granny Ripple Blanket is a crochet project that blends tradition with innovation, offering a pattern that is both functional and aesthetically pleasing. Whether you’re a beginner or an experienced crocheter, this pattern provides a rewarding and creative crochet experience. With its combination of the granny stripe stitch and ripple waves, you can create a unique blanket that will undoubtedly be a standout feature in any space.
It’s great to have you here with us, dear reader! We always strive to bring you the best from the world of crochet. Here, you’ll find a variety of patterns worth checking out!
We hope this article inspires you to try the Granny Ripple Blanket pattern and explore new possibilities in your crochet projects!