
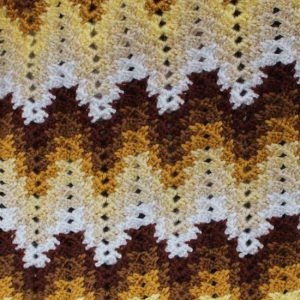
Grandma Spiked Ripple Blanket
Hello, my dear reader! I hope you’re having a beautiful day. Today, we want to introduce a very lovely pattern with a unique visual aspect to you. This pattern undoubtedly catches the eye, as its beauty doesn’t go unnoticed. It’s the Grandma Spiked Ripple Blanket pattern.
The Grandma Spiked Ripple Blanket is known for its gentle waves and distinct peaks, creating a visually appealing texture and an irresistible tactile sensation. Whether it’s to decorate a living room or to wrap someone in warmth and care, this blanket is a perfect choice.
The Grandma Spiked Ripple Blanket pattern dates back to the crochet traditions of yesteryears, being passed down from generation to generation. It pays homage to the craftsmanship and skill of grandmothers who mastered the art of crochet to create blankets that lasted a lifetime. The pattern is a fusion of simplicity and elegance, with its gentle waves and distinct peaks evoking a nostalgic feeling of home comfort.
Why Choose the Grandma Spiked Ripple Blanket?
Versatility: This blanket is incredibly versatile, suitable for any setting, from outdoor camping to a cozy afternoon on the couch.
Customization: You can adapt the Grandma Spiked Ripple Blanket pattern according to your color and size preferences. From soft, neutral tones to vibrant and bold combinations, the possibilities are endless.
Durability: Made with quality yarns and careful technique, this blanket is more than just a decorative piece; it’s an investment in comfort and durability.
Meaningful Gift: A handmade blanket carries invaluable sentimental value. Gifting someone with a Grandma Spiked Ripple Blanket is a heartfelt way to show love and care.
How to Make Your Own Grandma Spiked Ripple Blanket:
While it may seem like a complex pattern at first glance, the Grandma Spiked Ripple Blanket is surprisingly accessible for crocheters of all skill levels. With a little practice and patience, you can create your own crochet masterpiece.
Materials: Choose high-quality yarns that provide softness and durability. Additionally, you’ll need a crochet hook suitable for the weight of the chosen yarn.
Technique: Follow the pattern instructions carefully, paying special attention to the stitch changes that create the characteristic waves and peaks of the blanket.
Time and Dedication: Like any crochet project, the Grandma Spiked Ripple Blanket requires time and dedication. Set aside a quiet moment to focus on your work and appreciate the creative process.
Dimensions:
The sample measures 40 inches by 36 inches, ideal for crafting a baby blanket.
Crochet Hooks:
Employ the recommended hook size for the chosen yarn. Opt for a larger hook size to create a lacier design. The sample utilizes a US size H/8 (5.00 mm) hook.
GAUGE: Gauge isn’t crucial for this pattern; just maintain a consistent tension throughout.
Yarn: We recommend a 100% acrylic yarn, with 370 yards per 6-ounce skein.
The pattern isn’t appropriate for eyelash or similar yarns that could hide the spike stitch definition. A yarn with minimal or no halo is preferred to showcase the spike stitch effectively. The spike stitch effect becomes more pronounced with greater contrast between yarn colors. Nearly all of the skein was used for six of the seven chosen colors in the sample, along with additional yarn for the border. This sample is sized for an infant or child; to make an adult-sized afghan, you’ll need to use at least double the amount of worsted weight yarn.
Variations
Instead of using two rows of the same color, try using one, three, or four rows.
For a scarf, you can make it one or two repetitions wide and 50-60 inches long, or 50-60 inches wide and 6 inches long.
For a wrap, make it 50-60 inches wide and 15 inches long, or 15 inches wide and 50-60 inches long.
Colors Suggestion and How Much Yarn You Need
Here are some sample uses:
(A) Cocoa: 385 yards
(B) Cognac: 355 yards
(C) Honey: 355 yards
(D) Butter: 355 yards
(E) Haystack: 355 yards
(F) Biscuit: 355 yards
(G) Ivory: 355 yards
Don’t worry too much about it! Just get plenty of yarn and you’ll be fine.
To start your project, first, figure out the starting chain or foundation single crochet (fsc) you’ll need.
Determine the Starting Chain or FSC:
Because this pattern makes a ripple effect, the final width will be less than the original starting chain or fsc. Here’s how to find out:
- Begin by making one row of stitches (rows 1 and 2) with either a chain of 24 or foundation single crochet of 22. Then measure the width of this row.
- Divide the width of your sample row into the desired final width of your project. For instance, if your sample row is 3 inches wide, and your blanket needs to be 36 inches wide, you’d do: 36 inches ÷ 3 inches = 12 repetitions.
Calculate the Length of Your Starting Chain or FSC:
Each repetition consists of 18 stitches. So, multiply the number of repetitions by the number of stitches per repetition. For example, if you need 12 repetitions, you’d do: 12 repetitions × 18 stitches = 216 stitches.
Add Extra Stitches for the Starting Chain or FSC:
If you’re using a starting chain, add 7 stitches to the total, like this: 216 stitches + 7 stitches = 223 stitches.
If you’re using a foundation single crochet, add 4 stitches, as follows: 216 stitches + 4 stitches = 220 stitches.
This calculation ensures you have the right number of stitches to start your project, considering the ripple pattern.
Pattern notes:
Final blanket width divided by the width of one repetition = the number of repetitions required.
Number of repetitions * 18 stitches = the subtotal number of stitches.
For the base chain: Subtotal number of stitches + 7 stitches = the total number of chains needed.
For the foundation single crochet (fsc): Subtotal number of stitches + 4 stitches = total number of fsc needed.
Stitches Used
Chain (ch)
Slip Stitch (sl st)
Single Crochet (sc)
Double Crochet (dc)
Foundation Single Crochet (fsc)
Reverse Single Crochet (rsc)
Spike Stitch (spst) –
Abbreviations (US TERMS)
Each – ea
Hook – hk
Place Marker – pm
Repeat(s) – rep / reps
Skip – sk
Stitch(es) -st / sts
Special Stitches
Spike Stitch (spst): To make the spike stitch, you’ll be working into the row that is two rows below the row you’re currently working on.
Here’s how to do it:
Double crochet (dc) into the indicated space.
Then, double crochet loosely between the second and third double crochet on the row below the one you’re currently making.
Finally, double crochet again into the same space as the first double crochet.
If your second double crochet isn’t loose enough for your liking, you can replace it with a treble crochet.
Reverse Single Crochet (rsc) – also known as Crab Stitch:
Chain 1. With the right side of your work facing you, work from left to right. Insert your hook into the front of the next stitch to the right, yarn over, pull through, yarn over again, and pull through both loops on the hook.
Insert your hook into the front of the next stitch to the right, yarn over, pull through, yarn over again, and pull through both loops on the hook.
Repeat step 2 until you reach the first reverse single crochet, then join with a slip stitch.
PATTERN INSTRUCTIONS
Let’s start making your blanket! You have two options: you can either begin with a base chain or an fsc (foundation single crochet) row. If you’re starting with a base chain, follow the steps below:
Base Chain, Rows 1 & 2
Base Chain: Using color A, make a chain (ch) with the number of chains needed for the size of blanket you want to make. Check the Notes section above to figure out how many chains you’ll need.
Row 1: In the seventh chain from your hook (hk), make 3 double crochets (dc). This counts as your beginning double crochet (beg dc), and from now on, chain 2 (ch 2) at the beginning and throughout. Then, [skip (sk) 2 chains, make 3 dc in the next chain] twice, skip 5 chains, [make 3 dc in the next chain, skip 2 chains] two times, then [make 3 dc, chain 3, make 3 dc] all in the next chain. Repeat this pattern from * to * across your row.
Row 2: Chain 5 (ch 5) at the beginning, turn your work, and make 3 dc in the first chain-3 space (sp). [Make 3 dc in the next space] twice, skip the next space, then [make 3 dc in the next space] twice again, and finally, [make 3 dc, chain 3, make 3 dc] all in the next chain-3 space. Repeat this pattern from * to * across your row, ending with (3 dc, ch 3, 3 dc) in the last chain-2 space. Do not turn your work. Join color B by making a slip stitch (sl st) in the top of the last dc.
Foundation Row, Rows 1 & 2
Foundation Row: Start by using color A to make the base row of your blanket. Follow the instructions in the Notes section to determine how many foundation single crochets (fsc) you need for your blanket size.
Row 1: Ch 5 and turning your work. Skip the next 2 fsc stitches, then crochet 3 double crochets (dc) in the following fsc stitch. Continue by *skipping 2 chains, crocheting 3 dc in the next fsc stitch, repeating this once more, then skip 5 fsc stitches. After that, crochet [3 dc in the next chain space, skip 2 chains] twice. Finally, crochet (3 dc, chain 3, 3 dc) in the next fsc stitch. Repeat this pattern from * across the row.
Note: You’ll be placing groups of 3 dc stitches between each set of two 3 dc groups from the previous row. Check the symbol chart for precise placement instructions.
Row 2: Chain 5 and turn your work. Crochet 3 dc stitches in the first chain 3 space. Next, *crochet 3 dc stitches in the next space twice, skip the following space, crochet 3 dc stitches in the next space twice, and crochet (3 dc, chain 3, 3 dc) in the next chain 3 space. Repeat from * across the row, ending with (3 dc, chain 3, 3 dc) in the last chain-2 space. Cut the yarn, but don’t turn your work. Attach color B by slip stitching in the top of the last double crochet stitch.
Spiked Rows
Row 3: Using yarn B, make a chain of 5 stitches. Turn your work. Make 3 double crochet stitches in the first chain-3 space. Then, *single crochet in the next 2 spaces, skip the next space (this is at the bottom point), single crochet in the next 2 spaces, [3 double crochet stitches, chain 3, 3 double crochet stitches] in the next chain-3 space. Repeat this pattern from * across the row, ending with [3 double crochet stitches, chain 3, 3 double crochet stitches] in the last chain-2 space.
Row 4: Repeat row 3. After finishing row 4, cut the yarn but don’t turn your work. Join the next color by making a slip stitch in the top of the last double crochet stitch.
Rows 5 +: Repeat rows 3 and 4 using each color in sequence until your piece is as long as you want it to be, finishing with the last color. Make sure to weave in all loose ends before starting the border.
Border
Round 1: Start by connecting the border color yarn. Insert a single crochet (sc) into the side of the last double crochet (dc) made. Then, make another sc in the same dc. Continue with 2 sc in the side of each dc down the entire side of the blanket. After that, sc in the next 12 sc. Now, *work [sc, chain 2, sc] in the next sc (this creates a crest of a wave), followed by sc in the next 8 sc. Skip the next sc (this is the lowest point between two waves), then sc in the next 8 sc. Repeat this pattern from * until you reach the tip of the last wave. Next, work [sc, chain 2, sc] in the next sc (crest of the wave), then sc in the last 12 sc of the last wave. Now, do 2 sc in the side of each dc down the entire second side of the blanket. Then, sc in the top of the next 2 dc. After that, work [dc, chain 2, dc] in the first chain-3 space. Continue by *sc in the next 8 dc, [dc, chain 2, dc] in the next chain-2 space, and sc in the next 8 dc. Skip the next 2 dc. Repeat this pattern from * across the top of the blanket until you reach the last chain-3 space. In the last chain-3 space, work [sc, chain 2, 3 sc], making sure to join with a slip stitch in the first sc.
Round 2: Ch 1, make a turn (don’t simply continue, as turning helps to smooth out the edges). Single crochet in the first single crochet (the one you marked, then move the marker up into the stitch just made), and single crochet in the next 3 single crochets. Then, *work a single crochet, chain 2, and single crochet in the chain-2 space, followed by single crocheting in the next 8 single crochets, skip the next 2 single crochets, and single crochet in the next 8 single crochets*. Repeat from * to * across the top of the blanket. Single crochet in each single crochet down the side to the other end. Repeat from * to * across the bottom of the blanket. Single crochet in each single crochet down the second side. Join with a slip stitch in the marked single crochet. Fasten off if not continuing to round 3.
Round 3: (Optional) Chain 1, ensure that the side you’ve decided is the front is facing you – turn the piece if needed. Single crochet in each single crochet around, join with a slip stitch in the first single crochet. Fasten off.
CHART
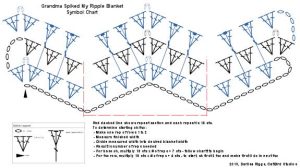
Access the PDF of this chart so you can print it, I recommend using 11″x 17″ paper
Grandma Spiked Ripple Blanket PDF
VIDEO TUTORIAL
Dear reader, for those who are more visual, here we have a very didactic version of a video tutorial made by the YouTube channel Crochet and Knit with Feride Erbaşar and you can watch it below.
Following this step-by-step guide, my dear reader, your blanket will be ready and so beautiful. I hope you will be pleased with the results! Remember, the more colors you choose, the more beautiful your pattern will be, with different and highlighted shades.
The Grandma Spiked Ripple Blanket is much more than just a blanket; it’s a symbol of comfort, tradition, and love. Creating and sharing this piece of craft is a wonderful way to connect with the past while warming the present. So, grab your crochet hook, choose your favorite colors, and start weaving your own memories of warmth and coziness.
It’s lovely to have you here, my dear reader. I recommend checking out our other articles; we have plenty of content here on our blog Handmade Learning Here, including various free patterns. Grab your crochet hooks and yarn and have fun! Have a beautiful day, dear reader… See you soon! XoXo 😘
So beautiful!
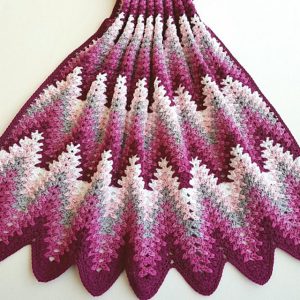
This is gorgeous! Can you please tell me the brand of yarn and names of colors used on the cover picture of the blanket? White, light pink, gray and then darker pinks and wine. I love this color combo and would like to duplicate it if possible. Thank you.
I would like the colors for the one in greens.