Granny Square Christmas Tree
Hello, my dear crocheter! Welcome to our lovely blog Handmade Learning Here.
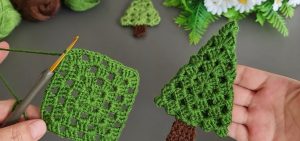
Today we’re going to make the cutest little Christmas tree using one of the most classic crochet shapes, the granny square! This project is simple, quick, and just perfect for beginners who want to practice basic stitches while creating something festive and adorable.

What You’ll Need
To make this project easier and more enjoyable, choose soft yarn that’s easy to handle and see:
Yarn: Medium weight acrylic yarn (category 4 – worsted). You’ll need green, brown, and a little yellow or gold for the star.
Hook: 4 mm (G-6). If you tend to crochet tightly, use a 4.5 mm hook to keep your stitches soft and relaxed.
Scissors
Yarn needle for weaving in ends
Ribbon or thread for hanging your ornament
Step 1: Make the Granny Square
We’ll start with a classic granny square — the base for our tree.
Magic ring (or chain 4 and join with a slip stitch).
Round 1: Chain 3 (counts as 1 dc), make 2 dc, ch 2, 3 dc — repeat until you have 4 sets of 3 dc clusters, separated by ch 2 spaces. Join with a slip stitch in the top of the starting ch 3.
Round 2: Slip stitch to the next corner, ch 3, 2 dc, ch 2, 3 dc in the same space. In each corner, repeat 3 dc, ch 2, 3 dc. Join with a slip stitch.
For this ornament, 2 or 3 rounds are enough.
Tip: A thinner yarn will make a delicate tree, and thicker yarn will make it fuller and faster to finish!
Step 2: Folding the Square into a Tree
Here comes the fun part!
Take your granny square and fold it diagonally — one corner over the opposite corner — so it forms a triangle.
Now it already looks like a Christmas tree!
This fold naturally creates three layers, just like the branches of a pine tree.
You can sew a few small stitches with your green yarn to secure the layers so they stay in place.
If you’d like, add some sparkle by sewing a few beads or using a metallic yarn for a twinkling effect.
Step 3: Making the Tree Trunk
For the trunk, use brown yarn and crochet a small rectangle:
Chain 5,
Work 1 dc in each chain (4 dc total),
Ch 2, turn, and make another row of 4 dc.
Cut the yarn and sew the trunk to the bottom of your green tree.
Easy option: Instead of crocheting the trunk, just use a yarn needle to stitch a small brown line directly at the base of your tree.
Step 4: The Star and the Hanging Loop
To finish off your ornament:
Crochet a small star or sew a button on top of your tree.
Add a loop of ribbon, metallic thread, or a small crochet chain so you can hang it on your Christmas tree.
Final Tips
Don’t worry about making it perfect — handmade is beautiful just as it is!
Try different shades of green to give your tree some lovely depth.
Make a bunch of little trees and turn them into a Christmas garland or gift tags for your loved ones!
VIDEO TUTORIAL
And there you go, my dear! You’ve just turned a simple granny square into a charming little crochet Christmas tree.
It’s such a joyful project for beginners: quick, easy, and full of Christmas cheer.


