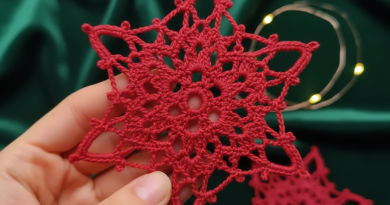
Granny’s Rectangular Blanket
Hello, dear reader! I hope you’re doing well. Today, we’re excited to share with you a delightful pattern that will help you create beautiful crochet pieces. It’s the charming Granny’s Rectangular Blanket pattern.
Granny square blankets have long been a favorite in the crochet community, but if you’re seeking a fresh twist while retaining that timeless, nostalgic appeal, the Granny’s Rectangular Blanket is a perfect choice. This beautiful variation on the traditional square design brings added versatility and charm to your crochet projects.
A rectangular blanket offers distinct advantages over its square counterpart. It’s ideal for bedspreads, draping over couches, or wrapping yourself up on cool nights. The elongated shape makes it easier to style over furniture, adding a touch of elegance to your home decor.
Similar to the classic granny square, the rectangular version showcases clusters of double crochet stitches separated by chain spaces, maintaining that signature open, airy look. This stitch pattern strikes a perfect balance between warmth and breathability, making it a wonderful choice for any season.
ABBREVIATIONS (US TERMS)
Chain – Ch
Stitch – St
Slip stitch – SS
Single crochet – sc
Double crochet – Dc
Granny’s Rectangular Blanket – PATTERN
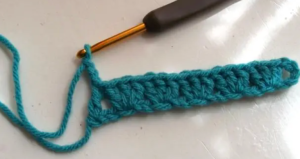
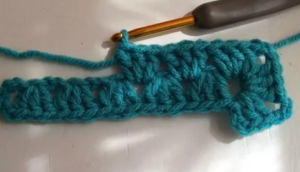
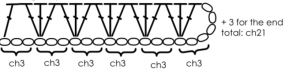
Start by Ch 21 (this is the foundation for your work).
Next, count 6 chains from your hook and make 3 double crochets (dc) in that 6th chain.
Skip the next 2 chains, then make 3 double crochets in the same stitch of the next chain.
Continue this pattern: skip 2 chains, then make 3 double crochets in the same stitch.
When you reach the last chain, make 1 double crochet.
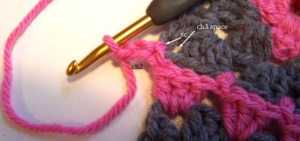
Finally, chain 3 (this counts as your first double crochet in the next row).
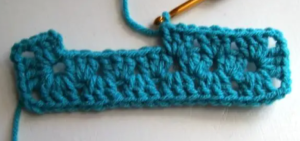
In the space created at the end by the double crochet (dc) and foundation chain stitch (pc), work the following: Make 2 double crochets. Chain 3. Make 3 double crochets. Chain 3 again. Make 3 more double crochets.
You will have created 2 corners at the end.
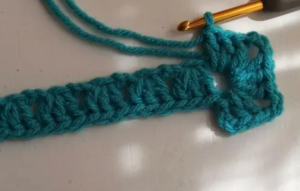
Make 3 double crochet stitches in each gap between the stitches.
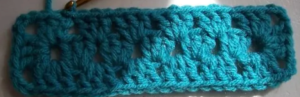
At the end, in the chain-5 space, make 3 double crochet stitches, then chain 3, make 3 double crochet stitches again, chain 3, and make 3 more double crochet stitches to form the corners on the other side. Next, move to the opposite side and make 3 double crochet stitches in each gap between the stitches.
Slip stitch into the top of the starting chain-3, and you’re done!
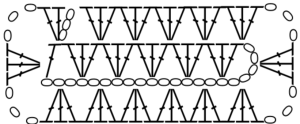
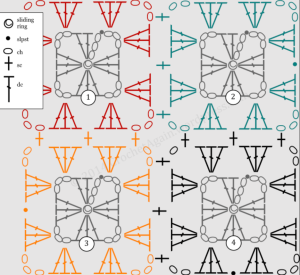
Granny’s Rectangular Blanket Diagram:
..and another to assist with adjusting the calculations for different sizes, if needed.
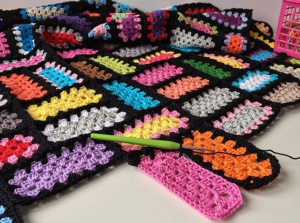
Connecting Motifs
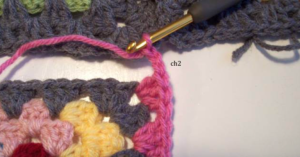
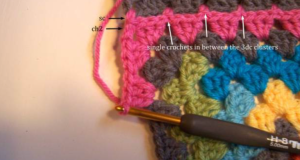
To connect your motifs, begin at a corner. Work your last round until you reach the corner chain-3 space. Make 3 double crochets (dc) into this chain-3 space, just like you normally would. Then, instead of chaining 3 as you usually do for the corner, only chain 2. The next step will count as your third chain to complete the corner.
Now, single crochet (sc) into the chain-3 (ch3) corner space of the square you are joining. Ensure that the wrong sides of both squares are facing each other (meaning the right sides are facing outwards). Once you’ve secured the other square with the single crochet, continue by making 3 double crochets (3dc) in the corner of the square where you are working on the border.
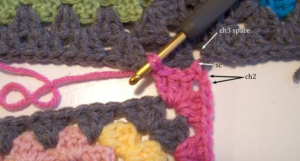
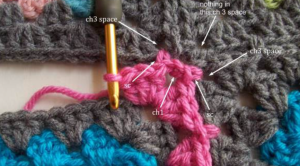
When you complete the corner, make a single crochet (sc) between the next set of 3 double crochets (dc) in the square you are joining.
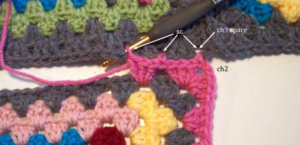
The 3dc clusters should align with each other, with single crochet stitches positioned between the clusters. Proceed along the edge by completing the final round and attaching to the adjacent square with a single crochet stitch after each 3dc cluster. Be attentive, as it’s easy to accidentally skip one.
When you reach the opposite corner, the process will differ slightly from the first corner. In this case, crochet the attached single crochet stitch and then chain 2.
Complete the corner by working the remaining 3 double crochets (3dc), then proceed with finishing the final round of your square as you normally would.
Attach additional squares in a row following the same method as before, then connect the first square of the second row. At this point, you’ll need to attach squares on both sides. Begin by securing the first side as previously described. The corner where all the squares converge will require a slightly different approach.
When you reach the corner where all the squares meet, work 3 double crochets (dc) into the corner as usual. Next, single crochet (sc) into the 3-chain corner space of the square you’re joining to, without chaining first. Then, single crochet in the next square you’re attaching to.
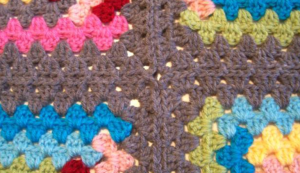
You can disregard the diagonal square that is already connected to two other squares—it doesn’t require any additional work.
In the next image, the diagonal square is shown in grey. If you examine it closely, you’ll notice the positions of the single crochet stitches and the neat central junction. I prefer using single crochet stitches over slip stitches because my slip stitches tend to be a bit tighter, and the single crochet seems to work better for me.
VIDEO TUTORIAL
Granny’s rectangular blanket is a charming project that marries the ease of the granny stitch with the versatility of a rectangular design. Perfect for both beginners and seasoned crocheters, this pattern offers a relaxing and satisfying experience while crafting a piece that is both stunning and practical. Delight in creating your own Granny’s rectangular blanket and enjoy watching it become a beloved addition to your home.