Harlequin Stitch
Hello, my dear friends, and welcome back to our blog Handmade Learning Here. Today, I’m so delighted to share a beautiful stitch that brings charm, color, and a touch of vintage elegance to any Project, the lovely Harlequin Stitch.
If you enjoy textured stitches that look much harder than they really are, oh sweetheart, you’re in for a treat. This stitch creates soft diamond-shaped motifs, almost like tiny painted tiles, and once you learn the rhythm of the rows, it becomes wonderfully relaxing.
What Makes the Harlequin Stitch So Special?
The Harlequin Stitch belongs to the same family of textured stitches as the Catherine’s Wheel and Starburst patterns, but it’s one of the more manageable ones, which makes it perfect for beginners who want something impressive but not overwhelming.
Its charm comes from the alternating rows: one creates the “diamonds,” and the next gently compresses them into shape with cluster stitches. Watching the pattern grow feels a little magical, like seeing a quilt bloom under your hands.
This stitch works beautifully in:
- Baby blankets
- Decorative pillows
- Dishcloths and hot pads
- Cozy throws
- Colorful scarves
And of course, it shines especially bright when you play with contrasting colors.
Materials You’ll Need
You can use any yarn you love, but cotton or soft acrylic gives amazing stitch definition. A medium-weight yarn (like a category 4) is beginner-friendly and easy to see.
As for the hook, just choose the size recommended on your yarn label, or size up one hook if you want a softer drape.
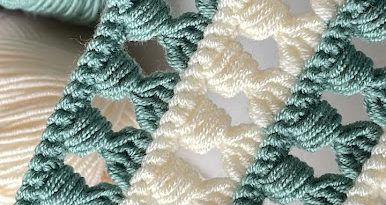
This beautiful Harlequin Stitch is a classic crochet texture, a close relative of stitches like the Catherine’s Wheel and the Starburst. The designer considers it one of the simpler versions in that family, even though it still creates such a charming and eye-catching look.
For the sample, she used “I Love This Cotton” yarn with a G hook, which helps the stitches show up nicely and makes the pattern easy to follow.
How It Works
Starting Chain
You begin with a foundation chain that’s a multiple of 8 plus 1 so the little diamond motifs line up just right.
First Row – Forming the Diamonds
Go into the 5th chain from your hook. There you’ll make 3 double crochets (DC), chain 1, and another 3 DC to form a little diamond cluster.
Skip 3 chains and place 1 single crochet (SC).
Repeat this “diamond + skip + SC” sequence across the row.
Cluster Row (the “compression” row)
Chain 1 and turn your work.
Work DC3TOG over the three DC from the diamond below.
Then chain 7, skip one stitch, and work DC6TOG over the next six DC stitches.
Repeat this until the end. You’ll finish the row with another DC3TOG and one regular DC to keep the edge even.
Bringing Back the Diamonds
In the next row, make 3 DC in the space formed between the previous clusters.
Then work [3 DC, chain 1, 3 DC] inside the big space created by the DC6TOG group — this recreates the diamond shape.
Repeat this across the row.
Another Cluster Row (now inverted)
Chain 4 (counts as DC + chain 1), turn your work.
Skip a stitch, then work DC6TOG across six DC stitches, skipping the SC.
Make your long chain (usually 7), skip one chain, and repeat this “6-together + long chain” sequence.
Finish with a special ending so the stitch pattern stays symmetrical.
Flattening Row (optional for hot pads or a clean edge)
Work a row of SC and HDC to level the dips and peaks and create a nice straight border.
If you’re making multiple pieces (like for a blanket), this row helps everything join neatly.
VIDEO TUTORIAL
Sweet Tips for a Smooth Experience
- If it’s your first time, try a small sample to get familiar with the rhythm.
- Use stitch markers if you want help spotting where each diamond and cluster begins.
- Changing colors at the end of a row makes the shapes stand out beautifully.
- When joining pieces, line up the motifs so the edges stay clean and even.
Why You’ll Love This Stitch
Once you learn the sequence, it becomes wonderfully calming. The Harlequin Stitch has that perfect blend of beauty and simplicity, a soft, vintage feel with modern charm. Whether you’re making a baby gift or a colorful throw for your sofa, this stitch adds a little bit of magic to your work.
Thank you, my dear, for joining me today at Handmade Learning Here. I hope this sweet little guide inspires you to try the Harlequin Stitch and bring its colorful diamonds to life. As always, I’m cheering for you, and I can’t wait to see what you create.
Happy crocheting, sweetheart! 🧶✨