Interwoven Basket Bag
If you’re looking for a project that combines style and functionality, the Interwoven Basket Bag is a perfect choice! This pattern is not only visually appealing but also practical for everyday use. Let’s dive deeper into this beautiful crochet bag!
The Interwoven Basket Bag is a type of crochet bag that stands out for its intricate design and use of interwoven stitches. This pattern creates a unique texture, providing a modern and stylish look. Additionally, the sturdy structure of the bag makes it ideal for carrying your essentials, whether you’re heading to the park, going grocery shopping, or planning a weekend getaway.
One of the best parts about creating your own Basket Bag is the freedom to choose your materials and colors! You can opt for cotton yarn, which is lightweight and durable, or acrylic yarn, which offers a wide range of colors and textures. Don’t be afraid to mix and match different shades! A vibrant color palette can make your bag pop, while neutral colors can provide a classic and sophisticated look.
The Interwoven Basket Bag is incredibly versatile. It can be used for various occasions, from casual outings to more formal events. Add crochet or fabric handles for a special touch, and consider personalizing it with small details like pom-poms or floral appliqués to make it even more unique.
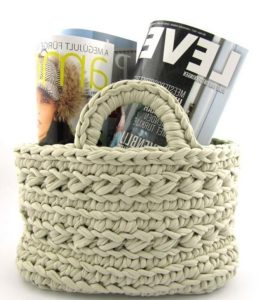
The Interwoven Basket Bag crochet pattern is perfect for those who want style and practicality in one piece. With its unique woven design, this bag is not only visually striking but also highly functional.
Its spacious shape allows you to carry daily essentials like your wallet, phone, and even small groceries, while the interwoven crochet structure provides durability and strength. Plus, the pattern is versatile, as you can easily adjust the size and style by choosing different colors and yarns.
Another great benefit of this pattern is the customization it offers. From choosing the handles to adding details like clasps or buttons, the Interwoven Basket Bag can be tailored to meet your specific needs. Whether you’re looking for a casual everyday bag or a more elegant piece for special occasions, this pattern adapts seamlessly to any style.
This makes it not only a practical accessory but also a creative and rewarding project for crocheters of all skill levels.
Additionally, the Interwoven Basket Bag serves as an eco-friendly alternative to single-use bags. By creating your own crochet bag, you contribute to reducing plastic waste while enjoying a stylish and sustainable option for shopping or outings. Its reusable nature makes it an ideal choice for environmentally conscious individuals.
The crafting process of this bag can also be a relaxing and enjoyable experience. Crocheting provides a wonderful way to unwind and express creativity, allowing you to experiment with different yarns and stitches. Whether you’re a beginner or an experienced crocheter, making the Interwoven Basket Bag can be a fulfilling journey that results in a beautiful, functional accessory.
Interwoven Basket Bag – US TERMS
ABBREVIATIONS (US TERMS)
Ch – Chain
Ss – slip stitch
Sc – single crochet
Dc – Double crochet
PDF PATTERN:
Dear reader, if you prefer a PDF version so you can print it, here is the PDF of this adorable Basket Bag developed by Hoooked. It is a very didactic written tutorial and you can access it below:
INTERWOVEN BASKET BAG PDF PATTERN
WRITTEN DIRECTIONS
Step 1: Creating the Bottom of the Basket
Make a Slip Knot: Start by making a slip knot. This is the first step to getting your yarn ready for crocheting. To do this, take your yarn, make a loop, and pull a strand of yarn through the loop. Pull tight to secure it on your hook.
Chain 10 Stitches: Next, you’ll need to chain 10 stitches. To do this, yarn over (wrap the yarn around your hook) and pull through the slip knot on your hook. Repeat this step until you have a total of 10 chains.
Work the First Row of Double Crochets:
Now, let’s create the first row of your basket. You will work double crochets (dc) into the chains you just made:
- Yarn over.
- Insert your hook into the second chain from the hook (this is important—do not work into the first chain).
- Yarn over again and pull up a loop (you will have three loops on your hook).
- Yarn over and pull through the first two loops on your hook (now you have two loops remaining).
- Yarn over once more and pull through the last two loops. You’ve just completed your first double crochet!
Continue Double Crocheting: Keep making double crochets in each of the remaining chains. When you reach the last chain, make 3 double crochets in that same stitch. This will help turn your work around and form a nice base.
Complete the Other Side: Now, continue making double crochets along the other side of the chain, just like you did before.
Making Rounds: You will need to complete a total of 4 rounds:
- For each round, at the beginning of each side, increase by 2 stitches. This means that every time you reach the end of a side, you should add 2 extra double crochets in that stitch.
- Keep repeating this until the bottom of your basket measures about 28 cm (11 inches) in length and 15 cm (5.9 inches) in width.

Step 2: Two Rows Up
Now, let’s crochet 2 rows without making any increases. This will help raise the edge of your work.
Yarn Over: Begin by wrapping the yarn around your hook (this is called “yarn over”).
Insert Hook: Instead of inserting your hook through both loops of the stitch, insert it only into the back loop of the stitch below. The back loop is the loop that is farthest from you when you look at your work. This technique creates a nice texture along the edge.
Yarn Over Again: After inserting your hook into the back loop, yarn over again.
Pull Through: Pull the yarn through the back loop. You should now have 2 loops on your hook.
Finish the Stitch: Yarn over one more time and pull through both loops on your hook. You’ve now completed one single crochet stitch in the back loop!
Continue Crocheting: Repeat steps 2-5 for each stitch across the row. When you reach the end of the row, chain 1 and turn your work to start the next row.
Second Row: For the second row, repeat the same process: insert your hook into the back loop only, yarn over, pull through, and finish the stitch.
Step 3: Skipping and Replacing Stitches
In the third row, start by making a double crochet (dc) in the first stitch. Then, skip the next stitch. Make a double crochet in the third stitch. Now, go back to the second stitch that you just skipped and make another double crochet there.
Next, make a double crochet in the fifth stitch (skipping the fourth stitch). After that, go back to the fourth stitch (the one you just skipped) and make a double crochet.
Continue this pattern: skip one stitch, make a double crochet in the next stitch, and then go back to the skipped stitch to make another double crochet.
Keep doing this for the entire row. This technique will create a nice decorative edge for your bask
Step 4: Continue Upward
Make 2 Rows of Double Crochets: Start by crocheting 2 rows using double crochet stitches (dc).
Create a Row with Skipped Stitches: Next, make 1 row where you skip certain stitches and then go back to work into the skipped stitch. This creates a nice texture.
Add 2 More Rows of Double Crochets: Finally, crochet 2 more rows of double crochets.
At this point, your work should measure about 18 cm (7.1 inches) in height.
Step 5: Adding the Handles
In this last round, we’ll make a row of single crochets. In the middle of this row, we’ll leave a gap for the handle.
Here’s how to do it:
Skip 6 stitches: After making a few single crochets, count six stitches and skip them.
Make a chain: Now, chain 16 (this means pull the yarn through a loop 16 times).
Create a gap: To attach the chain, make a single crochet in the 7th stitch from where you started counting (the stitch right after the 6 you skipped).
Repeat: Do the same thing on the other side of the basket—skip 6 stitches, chain 16, and make a single crochet in the 7th stitch.
Final row:
For the last row, do single crochets all around the basket. But for the chain part (the handles), use double crochets instead. This will make your handles nice and strong.
Finish up: When you’re done, cut the yarn, pull it through the last loop, and pull tight. Don’t forget to tuck in any loose ends inside the basket.
And that’s it! You’re all done!
Interwoven Basket Bag pattern – UK TERMS
ABBREVIATIONS (UK TERMS):
ch – chain
ss – slip stitch
dc – double crochet
tr – trebles
Step 1: Making the Bottom of the Basket
Start with a Slip Knot:
Take your yarn and make a slip knot. This will be the starting point of your basket.
Crochet a Chain:
Crochet 10 chain stitches. To do this, wrap the yarn around your hook and pull it through the loop on your hook. Repeat until you have 10 chains.
First Row of Double Crochets:
Insert Hook for Double Crochet (dc):
- In the first chain stitch, yarn over (wrap the yarn around your hook) and insert your hook through that stitch.
- Yarn over again and pull through (you should have 3 loops on your hook).
- Yarn over and pull through the first 2 loops, then yarn over again and pull through the last 2 loops. This completes one double crochet.
Continue Across the Chain:
Continue making double crochets in each of the next 8 chain stitches.
Creating a Corner:
In the last chain stitch, do 3 double crochets. This will help you turn the corner and work on the other side of the chain.
Double Crochets on the Other Side:
After making 3 double crochets in the last stitch, continue to crochet double crochets into each of the remaining chain stitches on the other side of the chain.
Complete Rounds:
You should now have a rectangle shape.
Crochet 4 Rounds Total:
Each round, continue to increase by adding 2 stitches at both ends. To do this, in the first and last stitches of each round, add an extra double crochet.
Measure Your Work:
Stop when the bottom of your basket is approximately 28 cm (11 inches) long and 15 cm (5.9 inches) wide.
Step 2: Building Up the Sides
Crochet 2 Rows Without Increasing:
Now, make 2 rows of double crochets without adding any new stitches. This will help raise the edge of the basket.
Use Back Loops Only:
For these rows, insert your hook only in the back loop of each stitch. This gives your basket a nice texture.
Step 3: Adding a Decorative Edge
Create the First Stitch:
In the first stitch of this row, make a double crochet.
Skip Stitches:
Skip the next stitch (this means you won’t crochet in it).
In the third stitch, make another double crochet.
Back to the Skipped Stitch:
Now, go back to the second stitch (the one you just skipped) and make a double crochet in that stitch.
Continue Skipping:
For the next part of the row:
- Make a double crochet in the fifth stitch (skip the fourth), then go back and do a double crochet in the fourth stitch.
- Skip the sixth stitch and make a double crochet in the seventh stitch. Then go back to the sixth stitch and crochet there.
Repeat This Pattern: Continue this pattern of skipping one stitch and going back to the skipped stitch all the way across the row. This will create a nice decorative edge for your basket.
Step 4: Keep Building Up
Repeat the Process:
- Now, crochet 2 more rows of double crochets (again, using only back loops).
- Follow this with one row with the skipping technique (like you did before).
- Finish with 2 more rows of double crochets.
Measure Your Work:
Your basket should now be about 18 cm (7.1 inches) tall.
Step 5: Adding Handles
Single Crochet Row:
In the last round, do a row of single crochets (sc) around the top edge of the basket. To make a single crochet, insert your hook into the stitch, yarn over, pull through, yarn over again, and pull through both loops on your hook.
Make Holes for Handles:
- In the middle of this row, skip 6 stitches to create a gap for the handle.
- Chain 16 Stitches: After skipping, crochet 16 chain stitches.
- Attach the Chain: Go back to the basket and make a single crochet in the 7th stitch from where you started counting the chain.
- Repeat on the Other Side: Do the same process to create another handle on the opposite side of the basket.
Final Row:
For the last row, do a final round of single crochets around the top.
Use Double Crochets on the Chains: On the chain stitches where the handles are, crochet double crochets instead of single crochets.
Finish Up:
Once you’ve completed the final round, cut the yarn, pull it through the last stitch to secure it, and weave in any loose ends inside the basket.
The Interwoven Basket Bag is a charming project that combines creativity and utility. With its beauty and versatility, it’s a fabulous addition to your bag collection. So grab your favorite yarn, choose the colors you love, and start creating your own version of this wonderful bag.