
Handy Basket
Handy Basket
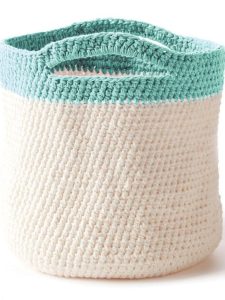
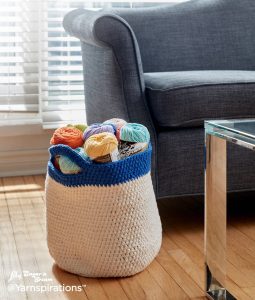
Hello, my dear reader! We’re here for another lovely crochet pattern for you. We want to talk about the Handy Basket pattern. You know that wonderful idea of a basket bag that you can use to store your dog’s toys, your spare yarn stash, or any items you like? Well, finally, you can put it into practice with our pattern available here.
One of the most popular trends in the crochet world right now is creating bags, and one of the most beloved is the Basket Bag. In this article, we’ll explore how you can create your own Basket Bag in crochet, adding a unique and handmade touch to your wardrobe.
Materials Needed:
You’ll be using three different colors of yarn; here are some suggestions for you:
• Bernat Maker Home Dec (8.8 oz/250 g; 317 yds/290 m)
- Contrast A: Steel Blue (11006), 1 ball or 220 yds/200 m
- Contrast B: Clay (11008), 1 ball or 115 yds/105 m
- Contrast C: Cream (11009), 1 ball or 148 yds/135 m
Size U.S. G/6 (4 mm) crochet hook or size required to achieve gauge
1 stitch marker
MEASUREMENTS
About 10 inches (25.5 cm) in diameter and 10 inches (25.5 cm) in height.
GAUGE
A gauge of 17 stitches and 19 rows measures approximately 4 inches [10 cm].
ABBREVIATIONS
Approx – Approximate(ly)
Ch – Chain(s)
Cont – Continue
Inc(s) – Increase(s)
PM – Place marker
Rep – Repeat
Rnd(s) – Round(s)
Sc – Single crochet
Sl st – Slip Stitch
Sp – Space
Note: Join all rnds with sl st to first sc.
INSTRUCTIONS
Round 1: Make a slip knot and chain 2. Then, work 8 single crochets (sc) into the second chain from the hook. Join with a slip stitch to the first sc. You’ll have 8 sc.
Round 2: Chain 1 and then make 2 sc in each sc around. Join with a slip stitch. Now you’ll have 16 sc.
Round 3: Chain 1. Make 2 sc in the next sc, then 1 sc in the next sc. Repeat this pattern all the way around. Join with a slip stitch. You’ll now have 24 sc.
Round 4: Chain 1. Make 2 sc in the next sc, then 1 sc in each of the next 2 sc. Repeat this pattern around. Join with a slip stitch. You’ll have 32 sc.
Round 5: Chain 1. Make 2 sc in the next sc, then 1 sc in each of the next 3 sc. Repeat this pattern around. Join with a slip stitch. Now you’ll have 40 sc.
Round 6: Chain 1. Make 2 sc in the next sc, then 1 sc in each of the next 4 sc. Repeat this pattern around. Join with a slip stitch. You’ll have 48 sc.
Keep going in this pattern, increasing by 8 stitches each round until you have 144 sc (about 18 rounds total).
Now we’ll start shaping it differently:
Next Round: Chain 1. Work 1 sc in each sc, but only in the back loops. Join with a slip stitch. Place a marker at the end of this round.
Following Round: Chain 1. Work 1 sc in each sc, but in both loops this time. Join with a slip stitch. Repeat this round until your work measures 3 inches (7.5 cm) from the marked round. Then, switch to a new yarn color (let’s call it B) at the end of this round and break off yarn A.
With yarn B, continue working in the same pattern until your work measures 6 inches (15 cm) from the marked round. Then, switch to a new yarn color (let’s call it C) at the end of this round and break off yarn B.
With yarn C, keep going in the same pattern until your work measures 9.5 inches (24 cm) from the marked round.
Now we’ll shape the opening for the arms:
Next Round: Chain 1. Make 1 sc in each of the next 29 sc. Chain 14. Skip the next 14 sc. Work 1 sc in each of the next 58 sc. Chain 14. Skip the next 14 sc. Work 1 sc in each of the next 29 sc. Join with a slip stitch to the first sc.
In the next round: Begin by crocheting 1 single crochet (sc) in each of the next 29 sc. Then, crochet 17 sc into the next chain-14 space. Continue by crocheting 1 sc in each of the next 58 sc, followed by 17 sc into the subsequent chain-14 space. Crochet 1 sc in each of the next 29 sc. Finally, join the round with a slip stitch.
Next 2 Rounds: Chain 1. Work 1 sc in each sc around. Join. Fasten off at the end of the second round. And there you have it, your crocheted circle is complete!
Dear reader, we want to make this beautiful pattern available to you in PDF format. With the PDF in hand, you’ll be able to follow along with the incredible tutorial provided by Yarnspirations. You can access it below:
VIDEO TUTORIAL
We also want to make available for you an amazing and informative video tutorial made by the YouTube channel Treasures Made From Yarn, and you can watch it below.
This is the moment to add your personal touch to your bag. You can add fringes, pompoms, or even embroideries to make it uniquely yours.
Conclusion
Creating your own crochet bag, especially in the Basket Bag pattern, is a rewarding way to express your creativity and personal style. With some simple materials and a little practice, you can craft a handmade bag that will be the highlight of your wardrobe. So, grab your crochet hook and start creating!

How important would you say the yarn fiber is for this? Most of the yarn I have laying around is either cotton or acrylic.
I think I’ll make this for a shower present to hold baby items. If you’ve made this, approximately how long did it take you and what expertise level are you?
Very cute
Wonderful can’t wait to try it out
Love the patterns!
I need the PDF.
I am going to use double strand 4 ply for added stability. May drop down on hook size depending on how gauge looks for size…
Beautiful
This yarn appears to be discontinued as I can not locate it anywhere in the USA, and only a small selection on Amazon. What would make a good substitute for this project?
I have the correct yarn and hook but the basket collapses. Is there some secret that I don’t know? I bought enough yarn for several baskets for a bazaar at church. I have to make this work.
This is a very easy project and you can probably finish it in 1-2 days. Use a self striping yarn for interest without having to change yarn! I use 3 strands of worsted weight together so it works up fast!
Are you changing your hook size to a larger one if you are using three strands?
I have the same issue. I love the look of these baskets (and their functionality), but my sides fold in rather than stand up straight. I’d love to learn the secret 🙂
I’m not expert but I’ve made them from using more than one strand at a time, up to 4. If it’s still unstable, you can use plastic canvas to form a tube inside the basket. The walls of the basket will stand up then.
Use starch to hold the basket stiff, which I think you can get in supermarkets
You can crochet over some jute rope for more stability
I am making a large basket. How do I keep it standing up?
I generally use 2 strands of aran wool to get it quite firm to stand up. I use them also for plant pot covers.
I get confused when it looks like you work with the hook upside down.
Use tshirt yarn. It is harder to work with but more stable
I would love to try to crochet the basket.
Watching your tutorial made it look easy for me to even make and I haven’t crocheted since high school. Might have to give it a try
Im a beginner crocheter but ur video makes it look so easy im giing to try it thankyou for the free instructions
Its really kind for those of us on pensions with limited funds.
So greatful..thankyou.
🩷🩷🩷🌷
Is she making a “yarn under” instead of a “yarn over” when she is doing her SC’s? I’m left handed but usually do not have any problem following a right handed person.