
Mini Bean Stitch
Hello, reader! Welcome to the Handmade Learning Here blog. Today we want to bring you a very special pattern, an incredible crochet stitch that will allow you to make the most beautiful and different types of pieces with it. It is the Mini Bean Stitch.
The Crochet Mini Bean Stitch, also known as the Elizabeth Stitch, is quick and easy to learn, making it perfect for beginners. If you’re new to crochet and eager to expand your skills, this tutorial will guide you through the process of creating the mini bean stitch with step-by-step photos and a video tutorial.
This stitch is a popular choice among crocheters looking for a pattern that combines simplicity with an attractive visual effect. In this article, we’ll explore the characteristics of the Crochet Mini Bean Stitch and how it can be incorporated into a range of projects.
Mini Bean Stitch: Amazing Choice…
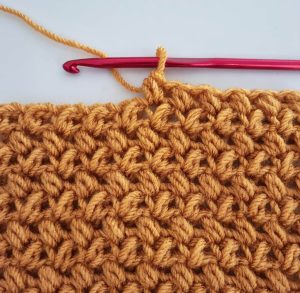
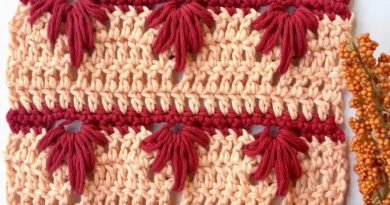
The Crochet Mini Bean Stitch is known for its soft appearance and subtle three-dimensional structure. Formed by a combination of single crochet stitches, this stitch creates a texture that is both pleasant to the touch and visually interesting. The stitch consists of a group of single crochets worked into a single space, resulting in a slightly raised finish. This feature makes the Mini Bean Stitch ideal for projects requiring a touch of sophistication without complicating the pattern.
One of the great advantages of the Crochet Mini Bean Stitch is its versatility. It can be used in a variety of projects, from garments to accessories and home décor items. In sweaters and vests, the stitch adds a subtle texture that enhances the design without being overly bulky. For home décor items like pillows and blankets, the Mini Bean Stitch offers a pattern that is both elegant and cozy. Additionally, its repetitive nature makes it easy to create custom patterns and designs.
For those beginning to explore the Crochet Mini Bean Stitch, it’s important to note that practice is key to mastering the technique. Consistency in stitch size and yarn tension is essential to achieving the desired effect. As you gain more experience with this stitch, you’ll discover creative ways to incorporate it into your projects, experimenting with different color combinations and textures to achieve unique results.
Whether you’re aiming to elevate your projects or simply want to try something new, the crochet mini bean stitch is an excellent choice. Its unique texture can be used to create a wide range of patterns, making it ideal for scarves, washcloths, blankets, and more.
What You’ll Need:
Any type of yarn you like. Just make sure to choose a crochet hook that matches the thickness of your yarn.
You can use one solid color or mix different colors—it’s up to you!
Essential materials and tools
- Yarn needle
- Hook (US 1-9, 5.5mm crochet hook)
- Scissors
- Stitch markers
- Measuring tape and
- Yarn needle for weaving ends.
How to Crochet the Mini Bean Stitch
Row 1:
Start by making a chain. The number of chains should be a multiple of 2, plus 1 extra chain at the end.
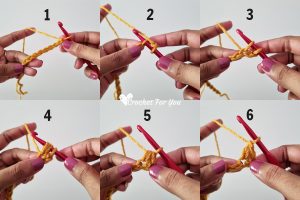
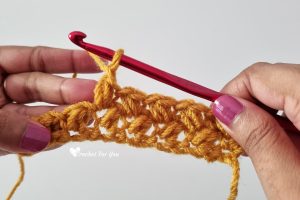
Insert your hook into the 3rd chain from the hook.
Yarn over (wrap the yarn around the hook) and pull up a loop. You should now have 2 loops on your hook.
Yarn over again, then insert the hook back into the same chain stitch you just worked into. Yarn over and pull up another loop. Now, you should have 4 loops on your hook.
Yarn over one more time and pull through all 4 loops on your hook.
To finish the Mini Bean Stitch, chain 1.
That’s it! You’ve completed one Mini Bean Stitch.
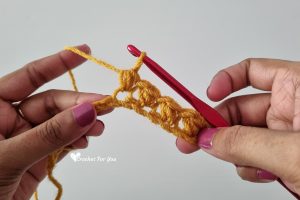
*Skip the next chain and put your hook into the following chain. Yarn over (wrap the yarn around the hook) and pull up a loop (see image 3). Yarn over again, put the hook back into the same chain, yarn over once more, and pull up another loop (you should now have 4 loops on the hook, see image 4). Yarn over and pull through all the loops on the hook (see image 5). To finish the stitch, chain 1 (see image 6). Repeat this process until you reach the end of the row.
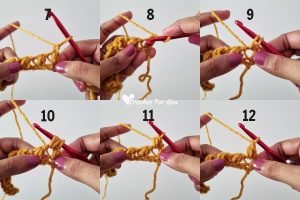
Row 2
Chain 1 and turn your work to start the next row. (Note: You’ll have two chains—one for the turning chain and another to close the stitch.)
*Insert your hook into the side of the next stitch. (This is the small space next to the stitch you worked in the previous row.)
Yarn over (wrap the yarn around the hook) and pull up a loop.
Yarn over again, insert the hook into the same space, yarn over, and pull up another loop. (You should now have 4 loops on your hook.)
Yarn over and pull through all the loops on the hook.
Chain 1 to close the stitch.*
Repeat from * to the end of the row.
Repeat row 2 until you have your desired length.
Mini Bean Stitch – VIDEO TUTORIAL
We have put together an incredible, very educational video tutorial for you from the YouTube channel Crochet For You, you can watch it below.
In conclusion, the Crochet Mini Bean Stitch is a valuable technique in any crocheter’s toolkit. Its attractive texture and versatility make it an excellent choice for a wide range of projects. Whether adding a special touch to a garment or creating a unique home décor item, the Mini Bean Stitch offers a way to elevate your crochet projects with elegance and simplicity. If you haven’t tried this stitch yet, it’s worth including in your next creation.
It’s great to have you here, my dear reader! I hope you enjoyed our article on the Mini Bean Stitch. Now grab everything you’ve learned, along with your crochet hooks and threads, and get to work! Let’s put all this knowledge into practice.
Remember that we have several different types of crochet stitches and patterns here that you might love, it’s worth checking out our categories. In addition, we are always bringing you new content, along with news from the world of crochet. It’s a great pleasure to have you with us, thank you for being here and I hope to see you again. XoXo
Perfect tutorial
I loved using this stitch for a throw blanket.
Thank you. I been crocheting since I was 9 years old. I made a lot of things sold some. But I also make and give prayer shawls and baby afghan to my church. Always looking for new patterns to make them. Thanks you so much for these patterns.
It’s amazing I love it
Thank you so much. I do not know how to crochet except for the change stitch and I really want to learn all the stitches. I appreciate what you do. I do have one suggestion when you make the videos it would be helpful if there was somebody talking through what the crochet person is doing.