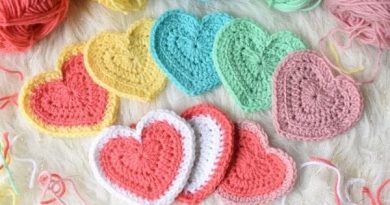
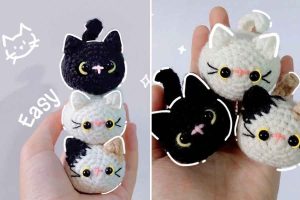
Tiny Cat Amigurumi
Hello, friends! Welcome to our lovely blog Handmade Learning Here. There’s something so magical about turning a tiny ball of yarn into a little character full of charm, isn’t there? Today on Handmade Learning Here, we’re diving into a super simple and oh-so-adorable tiny cat amigurumi pattern that’s absolutely perfect for beginners. Whether you’ve been crocheting for years or you’re just getting comfy holding your hook, this tiny cat will make you smile every step of the way.
This project works up quickly, uses just a little bit of yarn, and is great for practicing basic amigurumi shaping—without any stress. Plus, it’s small enough to fit in the palm of your hand, which means it’s perfect as a desk buddy, a tiny cat keychain charm, or a cute gift. Let’s get stitching, sweet friend!
Getting Started: Simple Stitches, Adorable Results
One of my favorite things about this pattern is how beginner-friendly it is. You’ll only need a few basic stitches: single crochet, increases, decreases, slip stitches, and chains. Nothing fancy—just the classic amigurumi basics.
The head and body of your tiny cat are made in one continuous piece, which helps eliminate extra sewing (yay!). The shape begins as a little oval and gently tapers as you decrease. If you’re new to working in the round, this tiny cat gives you the perfect chance to practice stitching evenly while watching your project come to life.
Safety eyes are added partway through, giving your little cat its sweet expression. And honestly? The face is my favorite part. With just a couple stitches of dark yarn, you can create a tiny smile, a kitten nose, or a subtle expression that completely changes the personality. It’s amazing how expressive such a tiny cat can be!
Little Details That Make a Big Difference
This pattern includes the cutest miniature features , all super beginner-friendly. The tiny cat ears are just a chain with one little single crochet, but once sewn on, they instantly bring your character to life! The four tiny legs are made with slip stitches, so they work up in seconds. And the tiny tail ties the whole look together, making your cat truly purr-fect. 🐱💛
Each little part is a fun confidence booster, fast, simple, and rewarding. And because this project uses very little yarn, it’s a wonderful way to use up scraps. You can make a whole basket of tiny cats in different colors: gray kitties, ginger kitties, black-and-white kitties — your imagination is the limit!
They also make adorable pocket companions, lucky charms, or small gifts for cat lovers. Trust me, once you make one tiny cat, you’ll want to make a whole litter!
Perfect for Beginners, Fun for Everyone
What really makes this tiny cat pattern special is its simplicity. There’s no complicated shaping, no advanced stitches — just a soft, relaxing project you can work on while sipping a warm drink or watching your favorite show.
If you’re an experienced crocheter, this tiny cat is a joyful, low-stress project between bigger ones. If you’re a beginner, it’s the perfect introduction to amigurumi, helping you build confidence stitch by stitch.
Abbreviations (US Terms)
MR – Magic Ring
Ch – Chain
Sc – Single Crochet
Inc – Increase (2 sc in the same stitch)
Dec – Invisible Decrease (recommended for amigurumi!)
Sl St – Slip Stitch
St – Stitch
Rep – Repeat
STEP BY STEP
HEAD & BODY (Worked in the Round)
Round 1: 6 sc into a Magic Ring (6)
Go ahead and pull that ring tight!
Round 2: 6 inc — work 2 sc into each stitch around (12)
Round 3: Inc in next 4 sts, sc in next 2 sts, inc in next 4 sts, sc in next 2 sts (20)
This creates a slightly oval shape — totally normal!
Round 4:
- [Sc, inc] — rep 4 times
- Sc in next 2 sts
- [Sc, inc] — rep 4 times
- Sc in next 2 sts (28)
Round 5: Sc around (28)
Round 6: Sc around again (28)
Round 7:
- [Sc, dec] — rep 4 times
- Sc in next 2 sts
- [Sc, dec] — rep 4 times
- Sc in next 2 sts (20)
Round 8:
4 dec, sc in next 2 sts, 4 dec, sc in next 2 sts (12)
Pause here and add the safety eyes!
Place them wherever looks cutest, usually between Rounds 5–6.
Round 9:
2 dec, sc in next 2 sts, 2 dec, sc in next 2 sts (8)
Stuff firmly, but don’t overstuff — just nice and squishy!
Fasten off and weave the opening closed.
TAIL
Row 1: Ch 5
Row 2: Sl st in each ch across (4 sl st)
Fasten off, leaving a little tail for sewing.
LEGS (Make 4)
These are tiny and quick — hang in there!
Round 1: Ch 3, then sl st back into the first chain to form a tiny loop
Round 2: Work 3 sl st around that little circle
Fasten off, leaving a tail for sewing.
EARS (Make 2)
Ch 3, work 1 sc into the first chain you made.
Fasten off, leaving a tail for sewing.
These are teeny-tiny, don’t worry if they look simple, once sewn on, they’re adorable!
ASSEMBLY TIME!
Okay, sweetheart, grab your tapestry needle — we’re almost done!
Sew the ears onto the top of the head.
Attach the four little legs to the bottom.
Add the tiny tail on the back.
Embroider a cute nose or mouth if you’d like.
Tip: Use dark cotton yarn for facial embroidery, it really stands out nicely!
ANOTHER VERSION
Cat Head (using white yarn)
Using your C (2.5 mm) hook, chain 8.
We will crochet around both sides of this chain to form an oval—don’t worry, this is easier than it sounds!
Round 1
Start in the second chain from the hook:
Work 6 SC,
In the last chain, work 3 SC in the same stitch,
Now rotate and work on the back side of the chain: 5 SC,
Finish with INC in the last stitch.
You should have a nice, soft oval shape now.
Round 2
INC
5 SC
3 INC
5 SC
2 INC
(You should have 22 stitches)
Round 3
We’ll continue shaping the oval:
SC, INC
5 SC
Repeat (SC, INC) three times
5 SC
Repeat (SC, INC) two times
(Total: 28 stitches)
Round 4
Follow this sequence:
SC, INC
6 SC
Repeat (SC, INC, SC) three times
5 SC
Repeat (SC, INC, SC) two times
(Ends with 34 stitches)
Round 5
Work 34 SC evenly around.
Rounds 6 & 7 — Color Change Section
The original pattern switches between white and brown yarn here for markings.
To make this beginner-friendly, here’s a simple version:
Round 6: SC in each stitch (34)
Round 7: SC in each stitch (34)
(If you want markings, simply switch colors where you want patches—have fun with it!)
Round 8 – Start Shaping the Face
This round includes several decreases:
Begin with SC, DEC
Work 9 SC
DEC
4 SC
DEC
2 SC
4 SC
3 SC
DEC
3 SC
(You end with 30 stitches)
Round 9
DEC
9 SC
3 DEC
9 SC
2 DEC
(24 stitches)
Round 10
SC evenly around (24)
Round 11
Repeat: 2 SC, DEC — six times (18)
Round 12
Repeat: SC, DEC — six times (12)
Round 13
Repeat SC, DEC four times (8)
Stuff the head firmly and stitch the opening closed with a yarn needle.
Cat Ears (Make 2)
Using white yarn and the 2.0 mm hook:
-
Round 1: 6 SC into a Magic Ring
-
Round 2: (2 SC, INC) x2 → 8 sts
-
Round 3: (3 SC, INC) x2 → 10 sts
Leave a long tail for sewing.
Assembly
Safety Eyes:
Place the eyes on Round 7, leaving 2 stitches between them.
(Adjust spacing to your liking — closer for a “kawaii” cat!)
Nose:
Using dark brown yarn, embroider a tiny “V” shape right between the eyes.
Whiskers:
Add 2–3 short stitches on each side of the face.
Keep them even and gentle.
Ears:
Sew both ears on top of the head, slightly angled outward.
And your sweet little crochet kitty is ready! 🐱
Below we have included a PDF for you to follow along and create your beautiful tiny cat. The pattern and PDF were developed by the lovely Kathy Leung, and you can access it below.
VIDEO TUTORIAL
Here we have included a very didactic video tutorial developed by the YouTube channel Crafter Frog, where you can learn how to crochet your little cat in a clear and easy way and achieve a beautiful result.
Thank you so much for stopping by Handmade Learning Here, sweetheart! 🧶💛 I hope this tiny cat amigurumi brings as much joy to your hooks as it did to mine. If you make one, I’d love to see your little kitty, every version has its own personality, and it’s always such a delight to see your creations.
Before you go, feel free to explore the other crochet patterns on the blog. There’s a whole world of beginner-friendly tutorials, cozy projects, and creative ideas waiting for you. Come back anytime, grab a cup of something warm, and let’s keep stitching beautiful things together. 💕
Happy crocheting, and see you soon! 🧶✨🐱