Granny Square Christmas Stocking
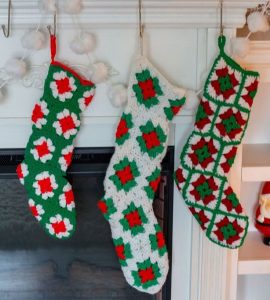
Hello, my dear reader, welcome to our lovely blog Handmade Learning Here. Today we’ve something special for you, yeah… It’s another Christmas pattern, but, this in special is sooo easy and quick to do. Oh, my dear, isn’t this just the perfect time to cozy up with a granny square project? 🌟 Granny squares have such a sweet charm, don’t they? They’re like little building blocks of creativity, and the possibilities are endless! If you’ve been thinking about adding a bit of handmade magic to your holiday decor, I’ve got the most delightful pattern to share with you: a Granny Square Christmas Stocking! 🎄✨
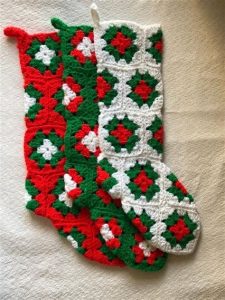
This stocking is crafted from 18 granny squares, all joined together to create a festive, heartwarming design. And here’s the best part—it’s a breeze to make, whether you’re just starting your crochet journey or you’ve been hooking for years. Imagine the joy of hanging up this stocking you made yourself, ready to be filled with holiday cheer. It’s sure to become a cherished part of your decorations for many years to come.

What You’ll Need
For a small stocking, you’ll need just a little yarn of each color (if using multiple) or about 2 balls totaling 330 yards.
For a large stocking, grab 1 ball of each contrasting color and 2 balls of your main color (MC), or about 575 yards total.
Hook: A US I/9 (5.5mm) or whatever size you need to match the gauge.
Extras: Don’t forget a yarn needle, scissors, measuring tape, wooden beads (20mm), twine, and stocking tags for that extra festive touch.
How to Bring It All Together
You’ll start by crocheting granny square motifs in the round. For the small stocking, crochet 3 rounds per square. For the large one, work 4 rounds. Once you’ve made 18 squares, seam them up following the diagram. Add a beautiful ribbed cuff that folds over and embellish to your heart’s content.
Gauge:
- Small Granny Square: 3 rounds should measure 3.25″ x 3.25″ (blocked).
- Large Granny Square: 4 rounds should measure 4″ x 4″ (blocked).

Tutorial
If you don’t know how do to the granny square, access the tutorial we have here on our blog.
Oh, sweetheart, let’s dive into this charming Granny Square stocking pattern together, shall we? I’ll guide you through it step by step, just like we’re sitting down with a cup of tea. This is such a lovely project, and I just know it’ll bring a smile to your face as you work on it. Let’s begin!
Granny Square: Make 18 Squares per Stocking
Small Stocking
You can use one color or switch colors with each round for a playful touch.
Round 1:
-
Start with a Magic Ring.
- Chain 3 (this counts as your first double crochet), then work 2 double crochets, chain 1.
- Repeat (3 double crochets, chain 1) three more times.
- Pull the ring tight and slip stitch in the next 2 double crochets. Slip stitch into the chain-1 space, changing colors on the last slip stitch if desired.
Round 2:
- Chain 3, then work 2 double crochets, chain 1, and 3 double crochets all into the chain-1 space.
- Repeat (3 double crochets, chain 1, 3 double crochets) in every chain-1 space around.
- Slip stitch in the next 2 double crochets and into the chain-1 space.
Round 3:
- Chain 3, then work 2 double crochets, chain 1, and 3 double crochets into the chain-1 space.
- Work 3 double crochets in the space between clusters. Repeat (3 double crochets, chain 1, 3 double crochets) in the chain-1 space, 3 double crochets between clusters.
- Fasten off, finish with a seamless join, knot, and trim the tails.
Large Stocking
Follow Rounds 1 and 2 from the small stocking, then proceed:
Round 3:
- Same as Round 3 for the small stocking, but don’t fasten off yet.
Round 4:
- Chain 3, work 2 double crochets, chain 1, and 3 double crochets in the chain-1 space.
- Work 3 double crochets in each space between clusters.
- Repeat (3 double crochets, chain 1, 3 double crochets) in chain-1 space, 3 double crochets in each space between clusters.
- Fasten off, finish with a seamless join, knot, and trim the tails.
Blocking
Blocking is like giving your squares a little spa day—it helps them look polished and professional.
- Fill a basin or sink with lukewarm water and a touch of soak wash (or spritz the squares with water using a spray bottle).
- Let the squares soak for 25–30 minutes.
- Gently squeeze out the excess water—no wringing, my dear!
- Pin the squares onto a blocking board or mat to the correct size (3.25″ for small squares, 4″ for large).
- Allow them to dry completely, which usually takes 2–4 hours, depending on your home’s humidity.
CHRISTMAS GRANNY SQUARE STOCKING TUTORIAL
Seaming
Now it’s time to stitch those beauties together! Use the single crochet join method for a sturdy, tidy finish.
If you’re unsure about the seaming process, don’t fret! There’s a video tutorial that will walk you through every step. Just take your time, and remember, each stitch is part of the love you’re weaving into your project.
Let me help you with that! Here’s how to join those lovely crochet squares together—nice and easy, just like chatting with an old friend over tea:
- First, take two of your squares and lay them together, sweetie, with the pretty sides—the right sides—facing each other.
- Pop a little slip knot on your hook; it’s like preparing your hook to give the squares a warm hug.
- Now, gently poke your hook through the chain-1 space in the corner of both squares, and work a single crochet stitch to bring them together. Isn’t that just delightful?
- As you move along, work through the front loop of the first square and the back loop of the second square. This little trick makes your join nice and tidy—like sewing a perfect seam!
- Keep going with those single crochet stitches across the edge, and when you reach the next corner chain-1 space, finish with a snug little single crochet there too.
- Here’s the best part: Don’t fasten off! Just keep adding more squares, one after the other, like building a cozy little quilt.
- Keep on stitching until all your squares are joined, and then step back to admire your handiwork. What a beautiful creation you’ve made!
VIDEO TUTORIAL
So, darling, why not make this holiday season a little more special with a handmade stocking? It’s not just a decoration—it’s a piece of your heart, made with love and care. And trust me, every stitch will bring a smile to your face. Happy crocheting, sweet friend! 💕


