Rainbow Waves Pattern
Hello, my dear friend, how are you today? Welcome to our blog Handmade Learning Here. Today I have something special to you, we will learn one new stitch… If you’re looking for a crochet project that feels relaxing, rhythmic, and wonderfully colorful, let me introduce you to the charming Rainbow Waves Pattern. Oh, sweetheart, this stitch is like watching waves of color gently rolling across your hook. It’s simple once you get the hang of it, but goodness… the final result looks like something straight out of an art gallery.
This technique takes inspiration from traditional bargello embroidery, known for its flame-like movement, but here in crochet form, it becomes softer, cozier, and delightfully modern.
So grab a cup of coffee, pick your favorite colors, and let’s talk about this lovely stitch, dear.
What Makes the Rainbow Waves Pattern Special?
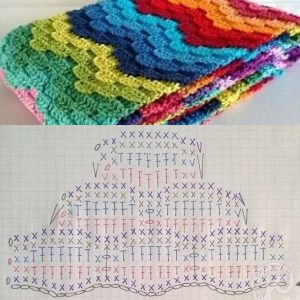
The beauty of the Rainbow Waves Pattern lies in its smooth vertical waves. Instead of shaping the fabric with increases and decreases (like in ripple or chevron designs), Bargello uses simple double crochets and clever color placement to create movement.
Every row builds on the one before it, slowly but surely forming those elegant “flames” and arrows that Bargello is famous for. The texture is soft, the rhythm is calming, and the color possibilities? Endless, my dear!
Even beginners can master this pattern, truly!
Once you understand how the rows shift, everything comes together like magic.
Choosing the Right Yarn (And Having Fun With Color!)
Bargello crochet thrives on color play.
Here are a few combinations that always look beautiful:
-
Shades of one color (like blues from light to navy)
-
Sunset tones (pink, coral, gold, plum… oh, darling!)
-
Cool beachy colors (aqua, mint, sand, white)
-
Rainbow brights (for the bold and joyful heart )
Cotton, acrylic, wool, anything works!
Just stick to a yarn weight that gives you nice stitch definition so the waves are clear and crisp.
Abbreviations (US terms)
ch = chain
dc = double crochet
sl st = slip stitch
BLO = back loop only
st(s) = stitch(es)
beg = beginning
Materials
Foundation: chain 54 (this makes 9 repeating clusters in the original). You can change the number of repeats to make a wider or narrower piece, see note at the end.
The pattern uses double crochet (dc, US) and slip stitch (sl st) and works most following stitches in the back loop only (BLO) for texture.
If you plan to change color, I’ll show a neat way to do that in the row notes.
INSTRUCTIONS
Row 0 – Foundation chain
Make a slip knot, then ch 54. Count carefully. This is your starting chain.
Turn your work.
Row 1 (Right side)
Purpose: establish first row of double crochets and the start of the bargello repeat.
- Ch 3 (counts as first dc) — or follow the original instruction that starts with dc in the 3rd chain from hook: insert hook in 3rd ch from hook and make a dc (this is equivalent to ch 3 + dc in the next).
- For beginners, I recommend: ch 3 (this counts as first dc), then work dc in the next 2 chains so you have 3 dc worked for the first group.
- You will now work a repeating pair of stitch groups that the original named A and B. I’ll spell them out plainly:
Definition:
A (pattern unit A): Skip 2 chains, sl st in next chain, ch 2, dc in each of the next 3 chains.
Step-by-step: skip 2 ch, insert hook in next ch and make a sl st; ch 2; then dc in next ch, dc in next ch, dc in next ch (3 dc in a row).
B (pattern unit B): Ch 2, sl st in next chain, skip 2 chains, dc in each of the next 3 chains.
Step-by-step: ch 2; insert hook in next ch and make a sl st; skip next 2 ch; then dc in next ch, dc in next ch, dc in next ch (3 dc).
According to the original, you work: A two times, then B two times, then finish the row with 2×A and 2×B (effectively the sequence across the foundation). Practically, repeat the A/B sequence across the row until you reach the last chain. End by working a dc in the final chain so the row finishes neatly. (If you set up with 54 chains this sequence aligns to the pattern units.)
Important: after finishing Row 1, the pattern instructs that all following stitches are worked in the back loop only (BLO). From Row 2 onward, insert your hook into the back loop of each stitch unless I say otherwise. This creates the textured ridges that make the bargello effect.
Turn your work.
Row 2 (and all subsequent pattern rows that form the repeat) — the working repeat row
Purpose: create the staggered clusters and the characteristic wave. After Row 1 you will repeat Row 2 for a set number of rows per color block.
Start of Row 2:
- Ch 2. (The Dutch original says “2 lossen” — 2 chains.) This ch-2 acts as a short turning chain; it does not count as a dc.
- Skip the first dc from the previous row (that is, do not work into it).
Now follow the repeated units across the row — I’ll define two units A & B for Row 2 (these differ from Row 1’s A and B):
Row-2 A:
In BLO: dc in the next 3 dc (that is, make 3 dc, each into the back loop of the next three stitches).
Skip the slip-stitch from the previous row (this is the sl st you made the row below).
You now encounter a small 2-chain space from the row below (the “ch 2” placed in Row 1 or B). Skip the first of those two chains, then make a sl st into the second chain, working the sl st into the back loop of that chain (the original instructions emphasize doing it in the back side).
Ch 2 (this creates the little bridge to the next cluster).
In plain sequence: dc 3 (BLO), skip the sl st, sl st into the 2nd chain of the 2-ch space (into the back side), ch 2.
Row-2 B:
In BLO: dc in the next 3 dc
Ch 2
Sl st into the next chain (the single chain after the ch-2 of the previous row)
Skip the next two chains / spaces (these are the two you skip so the clustering shifts)
In plain sequence: dc 3 (BLO), ch 2, sl st into next chain, skip next 2 chain positions.
Repeat pattern: Do Row-2 A twice, then Row-2 B twice, and continue that sequence across the row until you reach the end. Finish the row by working dc in the final 3 dc and then dc in the second of the final ch-2 if needed—follow the flow of the pattern units so the row ends neatly (the original says finish with dc in next 3 dc and dc in the second chain of the 2-ch).
Important technical tips for beginners (Row 2):
Work all dc into the back loop only. This means, when you insert the hook for each dc, slip the hook behind the front loop and only catch the loop furthest from you — it produces a little ridge on the right side.
When the pattern tells you to “sl st in the 2nd chain of the 2-chain space,” that means count the two chains from the previous row, skip the first and insert into the second — then do a slip stitch. This slip stitch is anchoring the staggered cluster.
Keep your chains (ch-2 bridges) loose enough to let you insert the hook comfortably on the next row.
Turn your work.
Repeat instructions (how to get the bargello strip)
Repeat Row 2 for the number of times required to build one color block. The original pattern repeats Row 2 for five rows in the same color (i.e., work Row 2 five times total before changing color). After those five rows, the designer changed color and repeated the same process in the new color. This creates the striped bargello effect.
When you finish a block of 5 rows in one color, finish the final stitch but leave two loops on your hook when you make the last dc of that row—this makes a neat color join as the original pattern suggests. Then join the new color by pulling the new yarn through those two loops and continue with the next row in the new color. (The site explicitly suggests leaving two loops on the hook for a neat color change.)
Continue repeating Row 2 (5 rows per color block) until the shawl reaches the length you want.
Finishing the shawl
When you reach your desired length, fasten off and weave in ends with a yarn needle.
Optional edging: You can work a round of even dc (BLO or both loops — your choice) around the whole piece, placing 3 dc in each corner or turning point to keep corners neat. Then finish with a round of sc (single crochet) or sl st for a tidy border.
Light blocking will help the waves lay flat and show the bargello texture.
Tips
If a repeat doesn’t line up at the end: re-check that you started with 54 chains (the sample) — that number divides into the 9 clusters used. If you want wider/narrower, add or remove full cluster units (each cluster unit is based on groups of 6 stitches as the pattern explains). The designer confirms 54 is for 9 clusters.
Counting: Use stitch markers to mark the 3-dc clusters as you make them the first time — this makes it a lot easier to recognize where to skip, where to sl st, etc.
Tension on ch-2 bridges: If your ch-2 ends up too tight, the sl st on the next row will be hard to make. Keep those ch-2s relaxed.
Working BLO: If you’re unsure how to work in the back loop only, practice a short swatch: ch 10, work a row of dc, then on the next row make every dc into the BLO and watch the ridge form on one side — that’s exactly what you’ll do for the shawl rows.
VIDEO TUTORIAL
The Rainbow Waves Pattern is one of those delightful stitches that looks far more complex than it really is. It’s a perfect balance of ease and artistry, making it an excellent choice for beginners ready to explore texture and color, or for experienced crocheters craving a soothing project with beautiful results.
If you try this pattern, prepare yourself for compliments, truly! People adore the flowing movement and vibrant design.
And sweetheart, I’d be more than happy to help you. See you soon! XoXo