Lisbon Tile Quilt Block
Welcome to Handmade Learning Here, dear friend! We are so happy to have you visiting our little quilting corner today. In this tutorial, we’ll be exploring a beautiful Lisbon tile quilt block filled with elegant geometric shapes, striking star points, and timeless charm. This project is perfect for quilters who love the precision of Foundation Paper Piecing and want to create something that feels both modern and classic at the same time.
Whether you are completely new to paper piecing or already experienced with quilting, this pattern offers a relaxing and rewarding sewing experience, one careful stitch at a time. So gather your favorite fabrics, settle into your sewing space, and let’s create something truly beautiful together.
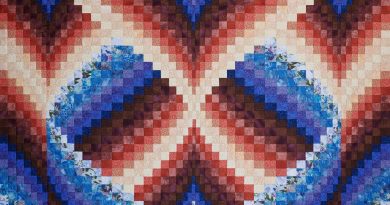
There is something so lovely about geometric quilt blocks inspired by old ceramic tiles. The sharp points, the graceful symmetry, and the balance between bold and delicate shapes create a design that feels both modern and timeless.
This tutorial presents an original beginner-friendly interpretation inspired by Portuguese-style tile aesthetics and traditional Foundation Paper Piecing methods. It is written as an educational quilting guide and does not reproduce or redistribute the original pattern templates or copyrighted layout artwork from the referenced design.
So pour yourself a warm cup of tea, gather your fabrics, and let’s sew together slowly and carefully, just like quilters have done for generations.
What Is Foundation Paper Piecing?
Foundation Paper Piecing (often called FPP) is a quilting technique where fabric pieces are sewn directly onto a printed paper foundation.
Instead of stitching fabric shapes together first, the paper acts like a roadmap:
- each section is numbered
- pieces are added in order
- the printed lines guide your seams
This method is wonderful for:
- crisp points
- sharp angles
- complex geometric designs
- highly accurate piecing
It may look intimidating at first, but once you understand the rhythm of it, it becomes surprisingly relaxing.
About This Style of Block
This tile-inspired block uses:
- strong contrast
- angular star-like shapes
- repeating geometric movement
The design is assembled from:
- four matching sections
- sewn separately
- then joined together into one larger block
That makes it much more approachable for beginners.
Supplies You Will Need
Fabrics
Choose:
- a dark fabric (black, charcoal, deep navy)
- a light fabric (white or cream)
- an accent fabric (turquoise, teal, or another vibrant color)
Fat quarters or small fabric cuts work beautifully for this project.
Tools
You will also need:
- printed FPP templates
- sewing machine
- neutral thread
- iron
- rotary cutter or scissors
- quilting ruler
- pins or fabric clips
Before You Begin
Press Your Fabrics
Always begin with pressed fabric.
Wrinkles can distort measurements and make precise piecing more difficult.
Reduce Your Stitch Length
For Foundation Paper Piecing:
- use a shorter stitch length
- around 1.5–1.8 is ideal
This creates:
- cleaner seams
- easier paper removal later
Check Template Scale Carefully
Before cutting fabric:
- measure the printed test square on your template
Printing at the wrong scale can completely change the final block size.
Always print at:
- “Actual Size”
or - “100% Scale”
Never “Fit to Page.”
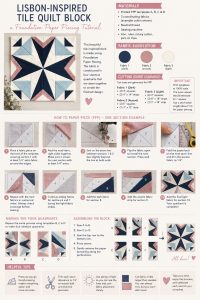
Understanding the FPP Process
Before sewing, let’s talk through the basic rhythm of Foundation Paper Piecing.
Each section follows the same sequence:
- Place fabric
- Sew on the printed line
- Flip fabric open
- Press
- Trim seam allowance
Then repeat.
That’s the entire method.
Once your hands learn the rhythm, the process becomes wonderfully satisfying.
STEP BY STEP PATTERN
Step 1 — Begin with Section 1
Start with your first fabric piece.
Place it:
- on the unprinted side of the paper
- wrong side of fabric against the paper
Make sure the fabric fully covers:
- section 1
- plus at least ¼” around the edges
That extra fabric is important for seam allowance.
A helpful beginner trick:
hold the paper up to a light source to check coverage.
Step 2 — Add the Next Fabric
Take your second fabric piece and place it:
- right sides together with the first fabric
Before sewing:
fold the fabric over the next section to make sure it will fully cover the shape after stitching.
This is one of the biggest beginner lessons in FPP:
always check coverage before sewing.
Step 3 — Sew on the Line
Turn the paper printed-side-up.
Now stitch directly on the printed seam line between sections.
A few gentle tips:
- sew slightly beyond the seam line at both ends
- keep your stitches slow and steady
- accuracy matters more than speed
Step 4 — Flip and Press
Open the newly sewn fabric piece.
Finger press first if needed, then press with an iron.
This is the magical moment:
the shape suddenly appears clean and sharp.
Good pressing makes an enormous difference in quilting.
Many experienced quilters say:
“Pressing is half the project.”
And honestly, they are right.
Step 5 — Trim the Seam Allowance
Fold the paper back along the stitched line.
Using a ruler:
trim the seam allowance to ¼”.
This step:
- reduces bulk
- improves accuracy
- helps the block lie flat
Do not skip trimming.
It truly improves the final result.
Continue Adding Sections
Repeat the same process section by section:
- place fabric
- sew
- flip
- press
- trim
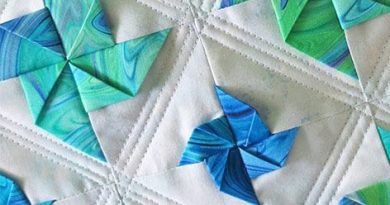
As the pieces grow, you will start seeing:
- long pointed shapes
- dramatic star forms
- tile-like geometry
And that is when the block becomes exciting.
Building the Four Quadrants
Most tile-inspired FPP blocks are constructed in quarters.
Complete:
- one full quadrant first
Then repeat the same process for:
- the second
- third
- and fourth sections
The wonderful thing about repetition is that every quadrant becomes easier.
By the final section, beginners usually feel far more confident than when they began.
Trimming the Finished Sections
Once a quadrant is complete:
- trim carefully along the outer cutting line
- keep your ruler steady
- cut slowly for precision
Accurate trimming helps everything fit together beautifully during assembly.
Joining the Quadrants
Now the design finally comes together.
Sew:
- top sections together
- bottom sections together
Then join those two larger halves.
Press the seams carefully.
Suddenly the full starburst or tile motif appears right in the center.
It is one of the most satisfying moments in quilting.
Removing the Paper
Once the block is fully assembled:
carefully tear away the foundation paper.
A short stitch length helps perforate the paper and makes removal easier.
Work slowly:
- support the stitches with your fingers
- pull gently near the seam lines
There is no need to rush.
Beginner Tips for Success
Cut Fabric Slightly Larger
Especially when learning FPP:
extra fabric is safer than fabric that is too small.
Use Plenty of Steam
Pressing frequently keeps the block accurate and flat.
Work in Good Lighting
FPP is much easier when you can clearly see:
- seam lines
- fabric placement
- edge coverage
Trust the Process
At first, Foundation Paper Piecing can feel backwards.
Because honestly…
it is backwards.
But after a few sections, your brain adjusts beautifully.
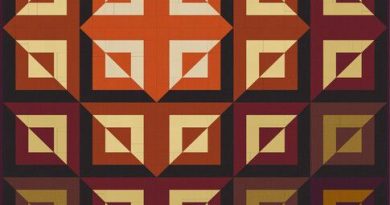
Why Quilters Love Tile Blocks
These geometric blocks have a very special charm.
They combine:
- architectural structure
- delicate movement
- dramatic contrast
- old-world inspiration
The result feels elegant and artistic without being overly complicated.
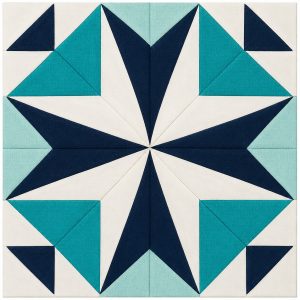
LISBON TILE QUILT BLOCK PDF TUTORIAL
One of the most captivating things about this Lisbon-inspired quilt block is the way the sharp geometric angles blend beautifully with soft, balanced symmetry. The bold central star creates a striking focal point, while the surrounding shapes add movement and elegance reminiscent of traditional ceramic tile art. This style of block looks especially stunning when made with high-contrast fabrics, allowing the dramatic points and intricate piecing to truly stand out. It is a wonderful project for quilters who enjoy precise patchwork and timeless designs that feel both artistic and sophisticated, whether used in a full quilt, a decorative pillow, or a wall hanging.
Thank you so much for spending part of your day with us here at Handmade Learning Here! We truly hope this tutorial inspired you to try something creative and enjoy the wonderful process of quilting. Don’t forget to explore our other articles filled with unique quilt patterns, beginner-friendly tutorials, and beautiful handmade inspirations designed especially for passionate makers like you.
We’ll be sharing brand-new quilting projects and creative ideas every single week, so we would absolutely love for you to come back and visit us again soon. Until next time, dear friend, have a beautiful day, enjoy every stitch, and happy quilting!