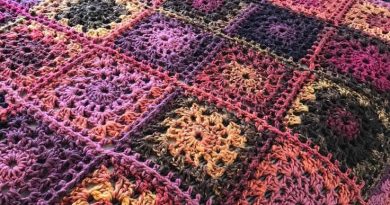
Willow Granny Square
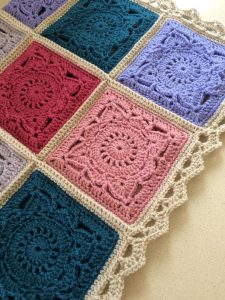
Hello, dear crochet friends! Welcome back to Handmade Learning Here. There is something truly magical about granny squares, don’t you think? These little handmade treasures have a special way of bringing warmth, memories, and creativity together. Each square carries the beauty of slow crafting, one stitch at a time, one moment of joy at a time. Today, I’m so happy to share a lovely design that has completely captured my heart: the Willow Granny Square.
Here at Handmade Learning Here, I always enjoy finding crochet projects that combine the charm of traditional designs with a fresh and beautiful touch. The Willow Granny Square does exactly that. It keeps the cozy feeling we all love about classic granny squares while adding elegant details and a wonderful textured appearance.
This square has a soft, delicate look that reminds me of flowers blooming in a peaceful garden. It would be a beautiful choice for blankets, cushions, bags, scarves, and many other handmade creations.
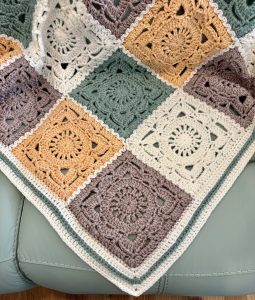
The Willow Granny Square is a beautiful crochet project that shows how simple stitches can create something truly special. With familiar techniques and a lovely arrangement of colors and textures, this pattern is enjoyable for both experienced crocheters and those who are still building confidence with their hooks.
One of my favorite things about granny squares is how comforting they are to make. There is something peaceful about sitting in your favorite chair, holding your yarn, and watching a small piece of fabric grow with every round.
This pattern is also a wonderful opportunity to explore colors. Using three different shades allows you to create endless combinations and make each square feel completely unique. Gentle neutral tones can create a classic vintage style, while vibrant colors can bring a cheerful and modern feeling.
Why You’ll Love Creating This Pattern
There are so many reasons why the Willow Granny Square is such a delightful project:
A versatile design: Once you have several squares completed, you can join them together to create beautiful blankets, throws, pillows, and handmade accessories.
Perfect for using your yarn stash: This is a lovely way to use those special leftover yarns you have been saving and turn them into something meaningful.
A relaxing crochet experience: The repeated rounds make this project perfect for quiet evenings, relaxing afternoons, or cozy crafting moments.
A timeless handmade piece: Granny squares have a beauty that never fades. They remind us of handmade traditions, family memories, and the love that goes into every creation.
Materials
Before you begin, gather everything you’ll need for your Willow Granny Square:
- Yarn in three colors, labeled Color A, Color B, and Color C
- 5.5 mm crochet hook
- Stitch marker
- Scissors
- Tapestry needle
Crochet Abbreviations
- ch – Chain
- st(s) – Stitch(es)
- sl st – Slip Stitch
- sc – Single Crochet
- dc – Double Crochet
- sk – Skip
- sp(s) – Space(s)
- pm – Place Marker
- rep – Repeat
Pattern Instructions
Round 1 – Color A
Start your project by creating a magic ring. If you prefer another method, make a ring by chaining 4 stitches and joining the first chain with a slip stitch.
Step 1: Make 3 chains. These chains will count as your first double crochet (dc).
If you like using stitch markers, place one in the third chain to easily recognize the beginning of the round.
Step 2: Crochet 15 double crochets (dc) into the center of the ring.
At this point, your round should contain:
- The beginning chain-3, which counts as 1 dc
- 15 additional double crochet stitches
Step 3: Close the round by making a slip stitch into the top of the starting chain-3.
Total: 16 dc stitches
Round 2 – Color A
This round adds the chain spaces that will create the foundation for the next section of the design.
Step 1: Chain 4. This counts as 1 double crochet and 1 chain space.
You may place a marker in the third chain to keep track of your starting point.
Step 2: Continue around the circle by repeating:
[1 dc, ch 1] in each stitch around
In other words:
Make 1 double crochet into the next stitch.
Make 1 chain.
Repeat these steps all the way around.
Step 3: Join the round with a slip stitch into the third chain of the beginning chain-4.
Cut the yarn and secure Color A.
Total: 16 dc stitches and 16 chain-1 spaces
Round 3 – Color B
Join Color B into any double crochet stitch from the previous round.
Step 1: Chain 3. This will count as your first double crochet.
Place a marker in the third chain if needed.
Step 2: Work around the square using this repeat:
- Make 2 dc into the next chain-1 space.
- Make 1 dc into the following dc stitch.
- Make 2 dc into the next chain-1 space.
Continue repeating:
[1 dc in stitch, 2 dc in chain-1 space]
until the entire round is completed.
Step 3: Join with a slip stitch.
Total: 48 dc stitches
Round 4 – Color B
Step 1: Chain 1.
Make 1 single crochet (sc) into the same stitch where you began. Add a stitch marker here if you wish.
Now create the decorative chain sections by following this sequence:
Chain 5.
Make a slip stitch into the 5th chain from your hook to form a small loop.
Skip the next 2 stitches.
Make 1 sc into the next stitch.
Chain 2.
Skip the next 2 stitches.
Make 1 sc into the next stitch.
Chain 3.
Skip the next 2 stitches.
Make 1 sc into the next stitch.
Chain 2.
Skip the next 2 stitches.
Make 1 sc into the next stitch.
Repeat this pattern around the square.
Complete the round after finishing the chain-3 section, then join with a slip stitch.
Round 5 – Color B
Slip stitch across until you reach the next chain-5 space.
Step 1: Chain 3. This counts as your first double crochet.
Place a marker in the third chain if desired.
Inside the same chain-5 space, work:
4 dc
Chain 3
5 dc
This forms the corner of your square.
Continue working around:
1 sc into the next chain-2 space.
5 dc into the next chain-3 space.
1 sc into the following chain-2 space.
Repeat this sequence around the square.
Join with a slip stitch and fasten off Color B.
Round 6 – Color C
Attach Color C into any corner chain-3 space.
In that same corner space, crochet:
- Chain 1
- 1 sc
- Chain 3
- 1 sc
This creates the corner detail.
Continue around the square:
- Chain 5.
- 1 dc into the next sc stitch.
- Chain 3.
- Skip the next 2 dc stitches.
- 1 sc into the next dc stitch.
- Chain 3.
- Skip the next 2 dc stitches.
- 1 dc into the next sc stitch.
- Chain 5.
Repeat this sequence around the square.
Join with a slip stitch.
Round 7 – Color C
Slip stitch into the next corner chain-3 space.
Step 1: Chain 3, which counts as your first double crochet.
In the same corner space, make:
2 dc
Chain 2
2 dc
Your corner is now complete.
Continue around:
5 dc into the next chain-5 space.
3 dc into each of the next two chain-3 spaces.
5 dc into the next chain-5 space.
Repeat around the square.
Join with a slip stitch.
Round 8 – Color C
Chain 1.
Work 1 single crochet into each stitch around the square.
For every corner chain-2 space, crochet:
2 sc
Chain 2
2 sc
These corner stitches help maintain the square shape.
Join with a slip stitch.
Round 9 – Color C
Chain 1.
Make 1 single crochet into every stitch around the square.
In each corner chain-2 space, work:
3 sc
Join with a slip stitch.
Finishing
Cut the yarn and secure your work.
Using a tapestry needle, carefully weave in all loose yarn tails on the back of your granny square.
Your Willow Granny Square is finished and ready to become part of your next beautiful crochet project!
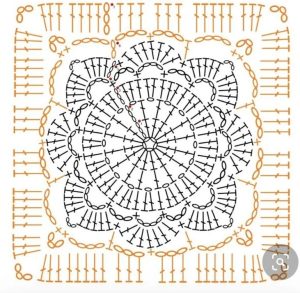
WILLOW SQUARE – GRAPH
Playing With Colors
Choosing yarn colors is always one of the most exciting parts of crochet! The Willow Granny Square gives you the perfect chance to be creative and let your personality shine.
Imagine a soft combination of cream, sage green, and blush pink for a charming cottage-inspired style. A mix of blues and whites can create a peaceful, fresh feeling, while warm shades like caramel, mustard, and terracotta can bring a cozy autumn atmosphere.
The most important thing is to choose colors that make your heart happy. Every handmade project tells a story, and the colors you select become a little reflection of your own creativity.
A Handmade Gift Full of Love
There is something incredibly special about giving a handmade gift. A crochet blanket made with beautiful granny squares is not just a useful item — it is a collection of time, patience, and love.
The Willow Granny Square would be a wonderful choice for a baby blanket, a thoughtful housewarming present, or a treasured keepsake for someone special. Handmade gifts have a unique way of creating memories that last for years.
VIDEO TUTORIAL
Let’s Crochet Something Beautiful!
If you enjoy classic crochet designs with a touch of elegance, I believe you will absolutely love creating the Willow Granny Square.
So grab your favorite yarn, pick up your crochet hook, and enjoy the simple happiness of making something beautiful with your own hands. Watching a small strand of yarn transform into a lovely piece of art is one of the most rewarding feelings in crochet.
Thank you so much for spending time here at Handmade Learning Here. I hope this project inspires you and brings you many happy crochet moments.
I would love to see the beautiful color combinations you create, so don’t forget to share your work and inspire other crochet friends too!
Come back soon for more crochet patterns, handmade ideas, and cozy projects made with love.
Happy crocheting, my friends! XoXo