Easy Hidden Star Quilt Block Tutorial
There is something so satisfying about a quilt block that looks more complicated than it really is.
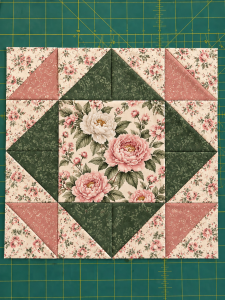
The Hidden Star Quilt Block is one of those designs. At first glance, you see a beautiful geometric arrangement of diamonds and triangles, but once the fabrics are placed together, a star begins to appear almost quietly in the background.
And the construction is surprisingly straightforward.
This traditional 12-inch finished quilt block is made with just three basic components: Half Square Triangles, Square-in-a-Square units, and one simple center square.
It is a lovely project for practicing accurate piecing, and it gives you plenty of room to play with color and contrast.
Use soft florals for a traditional look, bold solids for something modern, or pull three coordinating prints from your stash and see what happens.
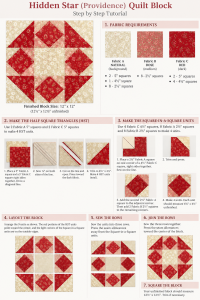
Finished Block Size
12″ x 12″ finished
12½” x 12½” unfinished
Use a ¼-inch seam allowance throughout unless otherwise noted.
Free Hidden Star Quilt Block PDF
If you prefer having the instructions beside you while you sew, this block is also available as a printable PDF under the name Providence Quilt Block. It uses the same construction shown in this tutorial, with Half Square Triangles, Square-in-a-Square units, and a center square arranged into the finished star block.
DOWNLOAD HIDDEN STAR QUILT BLOCK PDF
Skill Level
Confident Beginner
If you are comfortable sewing straight seams and have made a basic Half Square Triangle before, you should be able to put this block together without too much trouble.
Fabric Requirements
You will need three fabrics:
- Fabric A: Light or background fabric
- Fabric B: Medium fabric
- Fabric C: Dark or feature fabric
The original construction uses the following pieces for one 12-inch finished block.
From Fabric A, Light
Cut:
- 2 squares, 5″ x 5″
- 1 square, 4½” x 4½”
- 8 squares, 2½” x 2½”
From Fabric B, Medium
Cut:
- 8 squares, 2½” x 2½”
From Fabric C, Dark
Cut:
- 2 squares, 5″ x 5″
- 4 squares, 4½” x 4½”
Before You Start
The Hidden Star depends quite a bit on color placement.
For the star to really show, try to choose fabrics with enough contrast between the light, medium, and dark values.
They do not necessarily need to be white, tan, and dark.
You could try:
- Cream, dusty blue, and navy
- White, pink, and burgundy
- Beige, sage, and forest green
- Pale gray, gold, and charcoal
- Light blue, coral, and deep teal
If you are unsure, take a quick black-and-white photo of your fabrics. It makes it much easier to see whether there is enough contrast between them.
Step 1: Make the Half Square Triangles
You will need:
- 2 Fabric A 5″ squares
- 2 Fabric C 5″ squares
These will make four Half Square Triangle units.
Place one Fabric A square and one Fabric C square right sides together.
Using a ruler, draw a diagonal line from one corner to the opposite corner on the wrong side of the lighter square.
Sew a line ¼ inch away from each side of the marked diagonal.
Cut directly along the drawn line.
You will now have two triangle units.
Open each unit and press the seam toward the darker fabric.
Repeat with the second pair of 5-inch squares.
You should now have:
4 Half Square Triangle units
Trim each unit carefully to:
4½” x 4½”
Taking a moment to square these units accurately will make assembling the finished block much easier.
Step 2: Make the Square-in-a-Square Units
Now we will make four units for the top, bottom, and sides of the block.
For each unit you will need:
- 1 Fabric C 4½” square
- 2 Fabric A 2½” squares
- 2 Fabric B 2½” squares
You will make four identical units, but rotate them later when arranging the block.
Take one Fabric C 4½-inch square.
On the wrong side of each 2½-inch square, draw a diagonal line from corner to corner.
Place one Fabric A square on one corner of the large square, right sides together.
The small square should line up perfectly with the two outer edges.
Sew directly along the marked diagonal line.
Trim the excess fabric approximately ¼ inch beyond the seam.
Flip the triangle outward and press.
Repeat with the second Fabric A square on the adjacent corner.
Now add the two Fabric B squares to the remaining two corners using the same method.
Sew.
Trim.
Flip.
Press.
When finished, the dark Fabric C remains in the center while Fabrics A and B create contrasting triangles around it.
Repeat the process to make four Square-in-a-Square units. The original block places the two light corners beside each other and the two medium corners beside each other.
Check Your Units
Before assembling the block, you should have:
- 4 Half Square Triangle units, 4½”
- 4 Square-in-a-Square units, 4½”
- 1 Fabric A center square, 4½”
That gives us nine units altogether.
Which means the final construction is essentially a Nine Patch layout.
Step 3: Arrange the Hidden Star
Lay all nine pieces on your work surface before sewing anything together.
Arrange them in three rows.
Top Row
Half Square Triangle
Square-in-a-Square
Half Square Triangle
Middle Row
Square-in-a-Square
Fabric A center square
Square-in-a-Square
Bottom Row
Half Square Triangle
Square-in-a-Square
Half Square Triangle
The four dark triangles in the corner HST units should point toward the center of the block.
For the Square-in-a-Square units, rotate each piece so that the light corners face the outside edge of the block and the medium corners face inward toward the center.
This color placement is what creates the Hidden Star effect. You can see the same 3 × 3 arrangement in the original tutorial.
Before sewing, stand back and look at the entire layout.
This is the best moment to catch a rotated unit.
And trust me, it is much easier to rotate a square now than after it has been sewn into the block!
Step 4: Sew the Rows
Starting with the top row, sew the three units together using a ¼-inch seam allowance.
Repeat with the middle row.
Then sew the bottom row.
You will now have three long pieced rows.
Press the seam allowances away from the Square-in-a-Square units. This pressing direction also helps the seams nest more cleanly when the rows are joined.
Step 5: Join the Rows
Place the top and middle rows right sides together.
Carefully match the vertical seams.
Pin or clip if needed.
Sew using a ¼-inch seam allowance.
Now add the bottom row in the same way.
Take your time matching those intersections because clean points make a big difference in a geometric block like this.
Press the final horizontal seam allowances toward the center of the block, following the construction used for the original Hidden Star.
Step 6: Square the Block
Your unfinished block should measure approximately:
12½” x 12½”
Place it on your cutting mat and check all four sides.
Trim only if necessary.
Be careful not to cut away the ¼-inch seam allowance around the points.
Once sewn into a quilt, the block will finish at approximately:
12″ x 12″
And your Hidden Star is complete.
VIDEO TUTORIAL
Why Is It Called a Hidden Star?
This is what makes the block so much fun.
The star is not created from one obvious set of star points.
Instead, your eye begins connecting the contrasting triangles and diamonds across the nine separate units.
The result is a star that almost appears behind the individual pieces.
Change the color placement and suddenly a completely different shape may become the first thing you notice.
That makes this an especially fun block for experimenting with fabrics.
Try Different Color Placements
Do not feel locked into three traditional colors.
Try keeping the background consistent while making each dark Square-in-a-Square center from a different scrap.
Or reverse the light and medium fabrics.
You could even make the center square the same fabric as your star points. The Fabric406 examples show how changing colors, sashing, alternating blocks, or setting the blocks on point can dramatically change the finished quilt.
A scrappy Hidden Star would also be beautiful.
Just keep enough contrast between the sections so that the star does not completely disappear.
What Can You Make With a Hidden Star Block?
One block is already large enough to become the center of a small project.
Try using it for:
- A quilted pillow
- Table topper
- Tote bag panel
- Wall hanging
- Placemat
- Mini quilt
- Large quilt made from repeated blocks
For a full quilt, simply make several blocks and arrange them side by side.
Adding sashing between the blocks will separate each individual star.
Joining the blocks without sashing allows the shapes to interact and creates interesting secondary designs.
A Good Block for Practicing Precision
The Hidden Star is especially useful if you are learning quilting because it lets you practice several important skills in one manageable project.
You will work on Half Square Triangles, folded-corner piecing, color placement, trimming units, matching seams, and assembling a Nine Patch-style block.
And after all that practice, you end up with a block that looks much more intricate than the construction actually is.
That is always a win in my sewing room.
The Hidden Star Quilt Block is proof that simple units can create something surprisingly interesting.
Once the individual squares are laid out together, those triangles begin connecting and the star suddenly appears.
Make one to practice the block, then try another with completely different fabrics.
You may be surprised by how much the design changes just by moving the colors around.
Happy quilting!