Crochet Crown
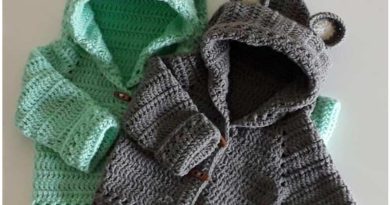
Welcome to our delightful blog Handmade Learning Here! Today, we’re excited to share a charming pattern that’s perfect for both children and adults alike. Who hasn’t dreamed of joining royalty and sporting their very own crown? Today, we’re fulfilling that wish with this beautiful crochet crown pattern.
The art of crochet is renowned for its ability to transform simple yarn into truly enchanting and sophisticated creations. Among the many patterns that crochet enthusiasts love to explore, the princess crown stands out as a project that combines beauty and imagination.
With its elegant shape and delicate details, this pattern is a popular choice for adding a touch of royalty and charm to your crochet projects. In this article, we’ll delve into the allure of the crochet princess crown, highlighting its features and the impact it can have on creative endeavors.
The crochet princess crown captivates not only with its appearance but also with its versatility. Typically, it consists of a series of stitches and techniques that create a solid yet adorned structure. The base of the crown can be made with simple or double stitches, forming a circle that serves as the main structure. From this base, details such as ruffles, floral motifs, or even small crochet diamonds are added, giving the piece a majestic and festive flair.
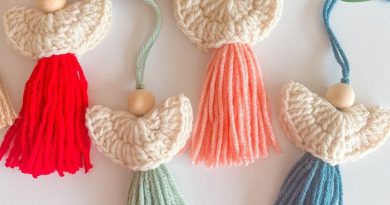
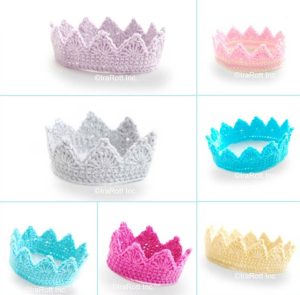
One of the most enchanting aspects of this pattern is the possibility for customization. Depending on the desired style, you can choose different types of yarn and colors to create a crown that matches your project’s theme. Metallic or sparkling yarns can add a glamorous touch, while pastel tones bring a soft and romantic charm. Additionally, the crown can be embellished with crochet pearls or small decorations for an even more sophisticated finish.
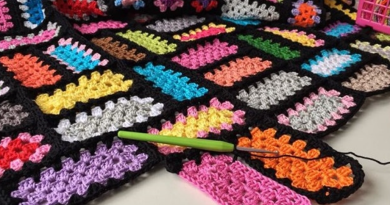
Another interesting point is the versatility of the crochet princess crown. It can be used in a variety of projects, from party decorations and photo sessions to fashion accessories and children’s decor. The piece can be adjusted in size to fit different ages and purposes, making it an excellent choice for various events and special occasions.
| SIZE | HEAD CIRCUMFERENCE | *CROWN WIDTH |
| Doll | 11.5” – 12.5”
(29.2 – 31.75 cm) |
5.25”
(13.4cm) |
| 0 – 3 mos | 12.5” – 13.5”
(31.75cm – 34.3cm) |
6”
(15.2 cm) |
| 3 – 6 mos | 14” – 15.5” Continua após a publicidade..
(35.5 – 39.4cm) |
6.75”
(17.1 cm) |
| 6 – 12 mos | 15.5” – 17.5”
(39.4 – 44.5cm) |
7.5”
(19cm) |
| 1 – 3 yrs | 17.5” – 19”
(44.5 – 48.3 cm) |
8.25”
(21cm) |
| 3 – 5 yrs | 19” – 20.5”
(48.3 – 52cm) |
9”
(22.9cm) |
| 5yrs – Preteens | 20.5” – 23”
(52 – 54.6cm) |
9.75”
(24.8cm) |
| Adults Medium | 21.5” – 23”
(54.6 – 58.4 cm) |
10.5”
(27.3”) |
| Adults Large | 23” – 25”
(58.4 – 63.5 cm) |
11.25”
(28.6 cm) |
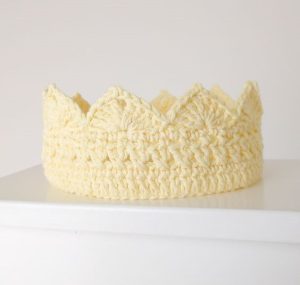
CROWN WIDTH – ½ of the crown circumference.
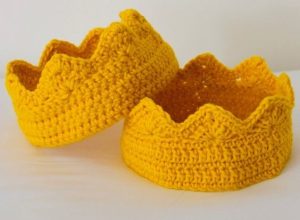
NOTES: Measure the crown as shown in the image below (Photo 1). The crown will stretch to fit the specified head sizes. If you plan to wear the crown over a crochet hat, make it 1-2 sizes larger than the hat for a comfortable fit.

MATERIALS
Red Heart Super Saver Yarn: Material: 100% acrylic; Weight: 7 oz (198 g); Length: 364 yd (333 m); Weight category: 4 (Worsted); Quantity: Small amount needed.
Beads or other embellishments
Sewing needle or hot glue gun
HOOK
3.75 (F)
GAUGE
Gauge: 8 single crochet stitches by 8 rows = 2” x 2” (5 x 5 cm).
Note: Be sure to check your tension before beginning (see photo 2). Adjust your hook size as needed to match the gauge.
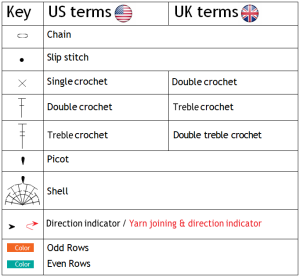
ABBREVIATIONS (using US terms)
| *US crochet terms
|
|
| Approx | Approximately |
| Beg | Beginning |
| Cont | Continue |
| Ch | Chain |
| Dc | Double crochet |
| Ea | Each |
| Lp(s) | Loop(s) |
| Rnd(s) | Round(s) |
| RS | Right Side |
| Sc | Single crochet |
| Sl st | Slip stitch |
| St(s) | Stitch(es) |
| Tr | Treble crochet |
| WS | Wrong Side |
| Yo | Yarn over |
| ( ) | Parentheses are used in explanation or multiple size (row) instructions, it also indicates a group of sts |
Special Stitches:
Shell: Work (2 double crochets, 2 treble crochets, picot, 2 treble crochets, 2 double crochets) all in the same stitch.
Picot: Chain 3; insert the hook between the front and back loops of the previous stitch, yarn over, and pull through all loops on the hook.
PATTERN
Doll:
To begin: Chain 42 loosely. Join the chain into a circle with a slip stitch, making sure not to twist the chain.
Round 1: Chain 1. Single crochet (sc) into each chain around. Join with a slip stitch in the top of the first single crochet (you should have 42 stitches).
Round 2: Chain 1. Single crochet into each stitch around. Join with a slip stitch in the top of the first single crochet (you should still have 42 stitches).
Round 3: Chain 1. Single crochet in the next stitch, skip 2 stitches, make a shell in the next stitch (a shell is 5 single crochets in the same stitch), skip 2 stitches. Repeat from * to * 7 times. Join with a slip stitch in the top of the first single crochet. Fasten off.
Round 4 (Edging): Chain 1 (ch 1). Single crochet (sc) in each stitch around the edge. Slip stitch (sl st) into the top of the first stitch to join the round. You should have 42 stitches in total.
Finishing:
Cut the yarn and fasten it off. Weave in all the loose ends on the wrong side of the work.
For 0-3 mos:
Start: Chain 48 stitches loosely. Make sure not to twist the chain, then join the last chain to the first chain with a slip stitch to form a circle.
Round 1: Chain 1, then make 1 single crochet stitch in each chain around. Join with a slip stitch in the first single crochet to close the round. (You should have 48 stitches in total.)
Round 2: Chain 1, make 1 single crochet in each stitch around. Join with a slip stitch in the first stitch to close the round. (48 stitches)
Round 3: Chain 1, then repeat the following 8 times: make 1 single crochet in the next stitch, skip the next 2 stitches, make a shell (5 double crochets in the same stitch) in the next stitch, and skip the next 2 stitches. Join with a slip stitch in the first stitch and fasten off. (This will create 8 crown spikes.)
Edging Round: With the right side of your work facing you, join the yarn at the bottom edge of the crown (where you started in Round 1). Chain 1, make 1 single crochet in each stitch around the edge, and join with a slip stitch in the first stitch. (48 stitches)
Finishing: Fasten off and weave in all the loose ends on the wrong side of your work.
For Size 3-6 Months:
To begin: Chain 54 loosely, then join the chain with a slip stitch to form a circle (make sure not to twist the chain).
Round 1: Chain 1, then single crochet in each chain around. Join with a slip stitch in the top of the first stitch. You should have 54 stitches.
Rounds 2-3: Chain 1, then single crochet in each stitch around. Join with a slip stitch in the top of the first stitch. You should still have 54 stitches.
Round 4 (creating the spikes): Chain 1, [single crochet in the next stitch, skip 2 stitches, make a shell (5 double crochets) in the next stitch, skip 2 stitches]—repeat this 9 times. Join with a slip stitch in the top of the first stitch, then fasten off. You will have 9 crown spikes.
Edging Round (at the base of the crown): With the right side of the crown facing you, join the yarn at the bottom edge (where you started Round 1). Chain 1, then single crochet in each stitch around. Join with a slip stitch in the top of the first stitch. You should have 54 stitches.
Finishing: Fasten off and weave in all the loose ends on the wrong side of the crown.
For 6-12 Months:
Start: Make a loose chain of 60 stitches. Connect the chain into a circle with a slip stitch. Be careful not to twist the chain!
Round 1: Chain 1. Single crochet (sc) into each stitch around. Close the round with a slip stitch in the top of the first stitch. You should have 60 stitches.
Rounds 2-3: Chain 1. Single crochet in each stitch around. Close the round with a slip stitch in the top of the first stitch. You’ll still have 60 stitches.
Round 4: Chain 1. [Single crochet in the next stitch, skip 2 stitches, make a shell (5 single crochets) in the next stitch, skip 2 stitches] repeat 10 times. Close the round with a slip stitch in the top of the first stitch. Fasten off. This creates 10 crown spikes.
Edging: With the right side of the crown facing you, attach your yarn at the bottom edge of the crown (where you started Round 1).
Round 5 (Edging): Chain 1. Single crochet around the edge of the crown. Close the round with a slip stitch in the top of the first stitch. You’ll have 60 stitches around the edge.
Finish: Fasten off the yarn and weave in any loose ends on the inside of the crown.
For 1- 3 yrs:
Start with a Foundation Chain: Chain (ch) 66 stitches loosely.
Join the ends of the chain with a slip stitch (sl st) to form a circle, ensuring the chain is not twisted.
Round 1: Chain 1. Single crochet (sc) in each chain around the circle. Join with a slip stitch in the first stitch. You should have 66 stitches in total.
Rounds 2-3: Chain 1. Single crochet in each stitch around the circle. Join with a slip stitch in the first stitch. You will still have 66 stitches.
Round 4 (Creating Crown Spikes): Chain 1.[Single crochet in the next stitch, skip the next 2 stitches, make a shell stitch (5 double crochets in the same stitch) in the next stitch, skip the next 2 stitches] – repeat this sequence 11 times around.
Join with a slip stitch in the first stitch and fasten off. You will have 11 crown spikes.
Adding the Edging: With the right side of your crown facing you, join yarn at the bottom edge of the crown (where Round 1 began). Chain 1 and single crochet around the entire edge of the crown. Join with a slip stitch in the first stitch. You should have 66 stitches.
Finishing Up: Fasten off your yarn and weave in all loose ends on the wrong side of your work.
For ages 3-5 years:
Start: Chain (ch) 72 loosely, then join the chain into a circle with a slip stitch (sl st), making sure the chain is not twisted.
Round 1: Chain 1, then single crochet (sc) in each chain around. Join with a slip stitch in the first stitch. (You should have 72 stitches.)
Rounds 2-3: Chain 1, then single crochet in each stitch around. Join with a slip stitch in the first stitch. (72 stitches in each round.)
Round 4: Chain 1, then repeat this pattern all the way around: single crochet in the next stitch, skip 2 stitches, work a shell stitch (5 double crochets) in the next stitch, skip 2 stitches. Repeat this pattern 12 times in total. Join with a slip stitch in the first stitch. Fasten off. (You should have 12 crown spikes.)
Edging (Round 5): With the right side (RS) of the crown facing you, join the yarn at the bottom edge of the crown (where you started Round 1). Chain 1, single crochet in each stitch around the edge. Join with a slip stitch in the first stitch. (72 stitches.)
Finishing: Fasten off and weave in all the loose ends on the wrong side (WS).
For 5 Years – Preteens
Start: Chain (ch) 78 stitches loosely. Make sure not to twist the chain and join the ends together with a slip stitch (sl st) to form a circle.
Round 1: Chain 1, then make a single crochet (sc) stitch in each chain around. Join the round with a slip stitch at the top of the first stitch you made. You should have 78 stitches in total.
Rounds 2-3: Chain 1, then make a single crochet in each stitch around. Join with a slip stitch at the top of the first stitch. You should still have 78 stitches.
Round 4 (Creating Crown Spikes): Chain 1, single crochet in the next stitch, skip 2 stitches, make a shell stitch (5 double crochets) in the next stitch, skip 2 stitches. Repeat this pattern 13 times around. Join with a slip stitch at the top of the first stitch and fasten off. You should have 13 crown spikes.
Adding the Edging: With the right side (RS) of the crown facing you, join the yarn at the bottom edge of the crown (where you started Round 1).
Round 5 (Edging): Chain 1, single crochet in each stitch around the edge. Join with a slip stitch at the top of the first stitch. You should have 78 stitches.
Finishing: Fasten off and weave in all the yarn ends on the wrong side (WS) of your work.
Adults Medium:
Starting: Make a loose chain of 84 stitches. Join the chain into a circle with a slip stitch. Be careful not to twist the chain!
Round 1: Chain 1. Single crochet into each chain around. Join with a slip stitch at the top of the starting chain. You should have 84 stitches.
Rounds 2-3: Chain 1. Single crochet into each stitch around. Join with a slip stitch at the top of the starting chain. You should still have 84 stitches.
Round 4: Chain 1. Repeat the following pattern 14 times: single crochet in the next stitch, skip 2 stitches, make a shell in the next stitch (a shell is usually 5 single crochets in the same stitch), skip 2 stitches. Join with a slip stitch at the top of the starting chain. Fasten off. This creates 14 crown spikes.
Adding Edging: With the right side of the crown facing you, join the yarn at the bottom edge (where you started Round 1).
Round 5 (Edging): Chain 1. Single crochet into each stitch around the edge. Join with a slip stitch at the top of the starting chain. You should have 84 stitches.
Finishing: Fasten off the yarn and weave in all loose ends on the wrong side of the work.
Adults Larger Size
Start: Chain 90 loosely. Join the chain into a circle with a slip stitch, making sure not to twist it.
Round 1: Chain 1. Single crochet in each chain around. Join with a slip stitch at the top of the first stitch. (You should have 90 stitches.)
Rounds 2-3: Chain 1. Single crochet in each stitch around. Join with a slip stitch at the top of the first stitch. (You should still have 90 stitches.)
Round 4: Chain 1. Single crochet in the next stitch, skip 2 stitches, make a shell in the next stitch (a shell is usually 5 single crochets in the same stitch), skip 2 stitches. Repeat from * to * 15 times. Join with a slip stitch at the top of the first stitch. Fasten off. (You should have 15 crown spikes.)
Edging: With the right side of the crown facing you, attach yarn at the bottom edge (where you started Round 1).
For the edging round: Chain 1. Single crochet around the edge of the crown. Join with a slip stitch at the top of the first stitch. (You should have 90 stitches.)
Finishing: Fasten off the yarn and weave in any loose ends.
CROWN CHART
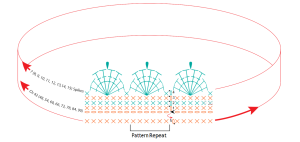
DIAGRAM KEY
Finishing Your Crown:
Once you’ve finished crocheting, your crown might look a bit wrinkled. Simply smooth it out with your hands to make it look nice before wearing it. If you want it to look extra neat, you can gently wet it and let it dry flat.
You can also add some sparkle by sewing beads (or jewels) around the crown or using a hot glue gun to stick them onto the points. This step is optional, so you can skip it if you prefer.
And that’s it! I hope you had fun making your Princess Crown!
CROCHET CROWN PDF
Access the PDF made by Ira Rott below to get your hands on the crochet crown pattern. It’s a very educational step-by-step guide and you can print it out!
👑 CROCHET CROWN FREE TUTORIAL 👑
VIDEO TUTORIAL
Dear reader, we would like to make available here two more crochet crown pattern options in video format. They are very easy to follow tutorials and you can watch them below:
The crochet princess crown is a testament to the power of crochet to transform simplicity into something extraordinary. With its blend of elegance and imagination, this pattern offers a wide range of possibilities for creating unique and enchanting pieces. Whether for a themed party, a special gift, or just to add a touch of royalty to everyday life, the crochet princess crown is a project that brings not only beauty but also a sense of magic and fun. By exploring this pattern, you’ll discover not just the satisfaction of creating something beautiful but also the joy of seeing your imagination come to life through crochet.
What do you think of this lovely pattern, dear reader? I suggest you make your own beautiful crown for your little ones and enjoy the process. We at Handmade Learning Here are so delighted to have you with us and hope you’ll come back again soon. Thank you! See you soon. XoXo