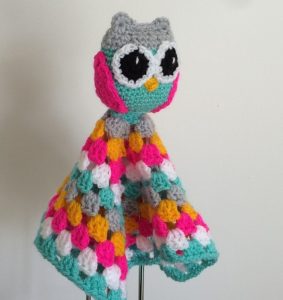
Owl Baby Blanket
Hello my dear reader! I hope you are well. The pattern I want to share with you here today is the amazing owl baby blanket pattern, a very charismatic project that will leave both kids and moms delighted with so much cuteness. Your baby will definitely not want to let go of this blanket because it has a beautiful little owl in its structure, which will be fun for the children.
This pattern is perfect for kids of any gender, boy or girl, it will look great and your baby will love it. You can adapt it to the colors of your child’s trousseau and leave everything matching, or better, you can make several in different colors or just one very colorful one that will attract the children’s attention because it is such a cheerful piece and with an explosion of colors like a rainbow.
This owl baby blanket will become your child’s favorite, this beautiful throw with this wonderful little owl is absolutely perfect. Truth be told, this adorable bird known for its immense wisdom will take care of your little one while he’s rocking. It is an easy project that you will enjoy doing and you will have a lot of fun while doing this beautiful project.
It is also the perfect option to gift a special little child, this blanket is the perfect gift for future mothers, children’s christenings, birthdays or even other special dates. You’ll love the child’s reaction when he sees that he loved the gift you chose to give him. I want you to be aware that this lovely piece is the perfect project for you and an impressive gift, what’s more, it’s much better than buying any object in an impersonal way, by making it with your own hands, you are transmitting love and affection for the work you are doing.
Here are the instructions with a clearer format
Note: Always ensure that you use the recommended hook size mentioned on the yarn label when working with any stitch pattern for optimal results.
Use hooksize E
STITCH ABBREVIATIONS:
SC – Single Chain
HDC – Half Double Crochet
DC – Double Crochet
TC – Treble Crochet
SL – Slip Stitch
Ch – Chain
STEP BY STEP INSTRUCTIONS
Body
Begin with the yarn color of your choice. Here we use bright pink yarn.
Create a magic ring, chain 1, and work 6 single crochet stitches (SC) in the ring.
Round 2: Double the number of SC in each stitch (12 in total).
Round 3: Work 2 SC in one stitch, followed by 1 SC in the next, repeating this pattern around (18 in total).
Round 4: Work 2 SC in one stitch, followed by 1 SC in the next 2 stitches (24 in total). Make sure to use only the back loops for this round.
Round 5: Work 2 SC in one stitch, followed by 1 SC in the next 3 stitches (30 in total).
Round 6: Work 2 SC in one stitch, followed by 1 SC in the next 4 stitches, repeating this pattern around (36 in total).
Rounds 7-16: Continue with single crochet stitches around (36 in each round). Change the yarn color to light pink after Round 16.
Change color to other of your choice. (Our suggest: light pink)
Round 17: Work single crochet stitches around (36 in total).
Round 18: Begin with a single crochet decrease, followed by 1 SC in the next 4 stitches (30 in total).
Round 19: Start with a single crochet decrease, followed by 1 SC in the next 3 stitches (24 in total).
Round 20: Begin with a single crochet decrease, followed by 1 SC in the next 2 stitches, and finish with a slip stitch to join (18 in total).
Stuff the piece firmly and fold the two sides together. Now, crochet 5 SC in the same stitch, 1 SC in the next 6 stitches, and 5 SC in the same stitch once more.
Creating Eyes (Make 2):
Begin with black yarn.
Create a magic ring and chain 1. Work 6 single crochet (SC) stitches into the ring.
Round 2: Make 2 SC in each stitch, resulting in a total of 12 stitches.
Change the yarn color to white.
Round 3: Work 2 SC, followed by a single SC in the next stitch. Slip stitch to join, and you’ll have 18 stitches.
Embroider a pupil in the center of each eye.
Wings (Make 2)
Use light pink yarn. (Or another one of your choice)
Create a magic ring and chain 1. Work 6 SC into the ring.
Round 2: Make 2 SC in each stitch, totaling 12 stitches.
Round 3: Work 2 SC, followed by a single SC in the next stitch, resulting in 18 stitches.
Round 4: Continue by working 2 SC, followed by single SC in the next 2 stitches, for a total of 24 stitches.
Round 5: Work a single SC in the next 4 stitches, then half-double crochet (HDC) in the next, double crochet (DC) in the next, 2 treble crochets (TR) in the next, DC in the next, HDC in the next, and complete the round with a single SC in the next 15 stitches. Slip stitch to join, creating 25 stitches.
Assembly
- Attach the eyes between round 10 and round 16 on the body.
- Sew the wings to the sides of the body, ensuring that the pointy part points slightly forward.
Attach the wings to the sides of the body, ensuring that the pointed ends are slightly oriented towards the front. Create a nose by embroidering it with orange yarn (or another of your preference).
I recommend using pins to secure any loose parts in place. This will help you visualize the final result and prevent them from shifting while you’re sewing.
Granny Square
To create a 10-round granny square with a 10mm (G-sized) hook, followed by 1 round of single crochet (SC) with 3 SC in the corners, and then 1 round of scalloped edges, you can follow these instructions. I’ll provide a basic pattern for each round, but feel free to adjust the colors as you like:
Materials:
- G-sized (10mm) crochet hook
- Worsted weight yarn in the colors of your choice
- Yarn needle for weaving in ends
Directions:
Round 1: Start with a magic ring. Chain 3 (counts as your first double crochet), make 2 double crochets into the ring. Chain 2, 3 double crochets into the ring, chain 2 – repeat this three more times. Slip stitch to the top of the initial chain 3 to close the round.
Round 2: Slip stitch into the next 2 stitches, slip stitch into the corner space. Chain 3 (counts as your first double crochet), make 2 double crochets into the same corner space. Chain 2, 3 double crochets into the same corner space. Chain 1, 3 double crochets into the next corner space, chain 2, 3 double crochets into the same corner space – repeat this three more times. Chain 1, and slip stitch to the top of the initial chain 3 to close the round.
Rounds 3-10: Repeat Round 2, working 3 double crochets, chain 1, 3 double crochets in each corner space, and chain 1 between clusters. Continue for a total of 10 rounds. Fasten off and weave in ends.
Round 11 (Single Crochet Round): Join a new color yarn in any corner space. Chain 1, and work 3 single crochets in the same corner space. Single crochet across each side of the square, working 3 single crochets in each corner space – repeat this for all four corners. Slip stitch to the first single crochet to close the round. Fasten off and weave in ends.
Scalloped Edges: To create a scalloped edge, you can use a picot stitch. In each stitch around the square, work the following pattern:
Slip stitch in the first stitch.
Chain 3.
Slip stitch in the third chain from the hook (this creates a picot).
Slip stitch in the next stitch.
Repeat steps 2-4 in each stitch around the square, working picot stitches evenly.
Continue this pattern for the entire round. Once you’ve completed the scalloped edge, slip stitch to the beginning of the round to close it. Fasten off and weave in any remaining ends.
Your granny square with a single crochet round and scalloped edges is now complete! You can use various colors and combinations to make it unique and beautiful.
Security Blanket
To complete your security blanket, sew the owl into the center of the granny square, utilizing the front loops that remain from round 4. Afterward, make sure to weave in all the loose ends, and your blanket will be complete.
Owl Baby Blanket is a beautiful pattern, is perfect and you can access the PDF through the link we provide here below. Let your creativity guide you in choosing the best combination for the project, choose your suitable lines for the project and do it in the best way. As it is a project for babies, we recommend that you use hypoallergenic lines, they are available in physical and virtual stores, if you have difficulties finding them in some stores close to your house in your city, ask for help from an attendant who will surely help you. will indicate a wonderful and ideal line for the project, or if you prefer, look on the internet and I guarantee you will find several options for lines.
Access the PDF/ Owl Baby Blanket
Dear reader friend, what do you think of this pattern? Look, if you’re still having doubts about your next crochet project and which pattern you’re going to choose, here are some more model options that you can take a look at to inspire you. Check out some of our crochet models below that we have separated exclusively for you. We think you’ll like:
What do you think of this beautiful blanket? Share it right now with moms-to-be or your friends who will love this beautiful project, I believe they will like it as much as we do. Do you have any questions or want to suggest a pattern for us to put on our lovely craft blog? Tell us everything in the comments, we love to read what you have to say and always leave the blog better and better for the best readers anyone could have. I hope to see you here more often, check out the other articles, we have a lot of cool stuff here that you’re sure to love. See you soon and have a lovely day! Happy crochet!