Crochet Tea Cups
How about a cup of tea? Or coffee, whichever you prefer! We know that nothing goes as well with an afternoon of crochet as these two, right? The important thing, my dear reader, is that we are going to learn a magnificent new pattern here today. How are you? I hope you are well and that you are ready for another day of learning to crochet here with us on our lovely blog. Today’s pattern that we decided to bring here is beautiful crochet tea cups, an ideal project for decoration and to give as gifts to loved ones.
The daughter of a friend of mine saw these little crochet cups at her grandmother’s house and immediately insisted that her mother make them for her to use in her dollhouse, her mother didn’t know what to do because she didn’t have the pattern and her grandmother said which was a gift from a very dear friend a long time ago. So, she came to me, and in my research I found a beautiful pattern that you can follow and I decided to share it with you too.
They are very beautiful, aren’t they? One of the cutest crochet projects you will ever see. Look at these details, how precious they are! In addition to being able to use them for decoration, there are people who put disposable cups in them and use them as holders, of course they are not very firm, but as a coaster it is a real charm. The firmness of the piece will depend on the type of yarn you are going to use to make it.
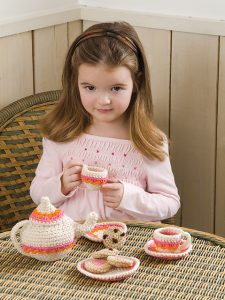
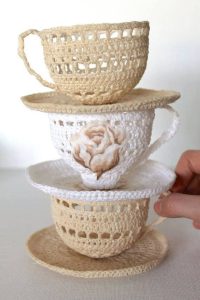
The delicacy and beauty of this project make it stunning. The colors you can use is just a detail, you can do as you like and even use different color combinations according to the purpose and that matches your decor. The idea is to leave the project with your face, you can even make some applications and leave it with a separate charm, don’t you think?
Make your adorable crochet tea cups set now, afternoon tea will never be the same after this lovely pattern in your collection of crochet items. You can also earn extra income, these pieces are so charming that I believe many people would be interested in buying them, even mothers would buy them for their daughters to play afternoon tea with the dolls, as my friend did for her daughter her.
Let’s do this…
TEACUP CROCHET PATTERN
Materials Required:
To craft this crocheted teacup, you will need a 1.75 mm crochet hook and lace weight yarn of your choice.
Abbreviations:
- Chain(s) – Ch
- Double crochet – Dc
- Half double crochet -Hdc
- Single crochet – Sc
- Slip stitch – Sl st
Teacup Base:
Round 1: Begin by creating a magic ring. Chain 3 (ch3) and crochet 18 double crochets (dc) into the magic ring. Join with a slip stitch to the first dc. [18 dc]
Round 2: Chain 3 (ch3), then dc in the next stitch. Chain 3 (ch3). Continue by *dc in the next 2 stitches, then chain 3 (ch3)* – repeat *across. Join with a slip stitch to the 3rd chain of the initial ch3.
Round 3: Single crochet (sc) in between 2 dc from the previous round, then chain 7 (ch7). Follow with an *sc in between the next 2 dc from the previous round, then chain 7 (ch7)* – repeat from * to *across. Join with a slip stitch to the first sc in the round.
Round 4: Chain 3 (ch3), then work 2 dc in the first ch-7 space. Chain 2 (ch2), and add 3 dc in the same space. Continue with *3 dc in the next ch-7 space, then chain 2 (ch2), and 3 dc in the same space* – repeat from * to *across. Join with a slip stitch to the 3rd chain of the initial ch3.
Round 5: Work 10 dc in the first ch-2 space, then sc in the next space. Continue with *10 dc in the next ch-2 space, followed by sc in the next space* – repeat from * to * across. Join with a slip stitch to the 1st dc in the round.
Round 6: Change to a different color yarn, insert it at any sc stitch from the previous round, and sc in the same stitch. Continue sc in each stitch around the round. Join with a slip stitch to the 1st sc in the round.
Teacup Base Completed:
Now that the teacup base is finished, let’s move on to the teacup body.
Round 3: Switch back to the first color, insert the hook into any ch-3 space from Round 2, ch3, then work 2 dc in the same space. Chain 1 (ch1). Follow with *3 dc in the next ch-3 space, then chain 1 (ch1)* – repeat *around. Join with a slip stitch to the 3rd chain of the initial ch3.
Round 4: Chain 3 (ch3), dc in the next 2 stitches, and chain 1 (ch1). Continue with *dc in the next 3 stitches, then chain 1 (ch1)* – repeat *around. Join with a slip stitch to the 3rd chain of the initial ch3.
Round 5: Chain 3 (ch3), dc in the next 2 stitches, and chain 2 (ch2). Continue with *dc in the next 3 stitches, then chain 2 (ch2)* – repeat from * to *around. Join with a slip stitch to the 3rd chain of the initial ch3.
Round 6: Chain 3 (ch3), dc in the next 2 stitches, and work 2 dc in the next ch-2 space. Continue with *dc in the next 3 stitches, and work 2 dc in the next ch-2 space* – repeat from * to * around. Join with a slip stitch to the 3rd chain of the initial ch3 and fasten off.
Round 7: Using a different color, insert the yarn at any sc stitch from the previous round, sc in the same stitch. Continue to sc around the round. Join with a slip stitch to the first sc in the round, chain 15 (ch15), and slip stitch into the corresponding stitch in the base. Turn, work 13 half double crochets (hdc) in the ch-15 space, and join with a slip stitch.
Finally, fasten off and weave in all loose ends.
VIDEO TUTORIAL
For those who prefer video tutorials, we have the solution for you. We recommend that you watch this adorable tutorial created by the channel
Silva Arts Crochet. The audio is in another language, but you can activate the subtitles, this way you will be able to perfectly follow the written tutorial with the step-by-step instructions that we make available here. We just want you to familiarize yourself with the movements required for each step of this lovely pattern. Watch the step-by-step video below.
I hope you like this amazing pattern, it’s always good to bring new and diverse things here for you. Tell us in the comments what you think and if you’re interested in seeing something different here that you haven’t seen yet, we’re always ready to help and we love to read what you have to say.
We at the Handmade Learning Here team always provide you with many amazing patterns, we love to offer the best free patterns for you so that you can put into practice lovely projects. In case you are still in doubt about the pattern you are going to use and what you are going to do, we leave here another model option available that can inspire you:
Thank you so much for being here again, so let’s have some tea with our crochet cups? Be prepared with your hook and your favorite lines and get to work! Come back often, we are updating our blog with new articles every day for you. See you soon! XoXo.

Omg! I loved it so much! thanks for the amazing article and the pattern
Awesome!