Kid’s crochet beanie
Hello, reader! Great to have you here on our lovely Handmade Learning Here blog. Today we want to bring you a very cute pattern. Perfect for the season, the crochet hat for children is a really cute piece. This soft and cuddly piece will keep your little baby warm and charming at the same time.
A Charming Accessory for Children
The Kid’s crochet beanie is much more than just an accessory to protect you from the cold. For children, it becomes a charming piece that adds style and personality to their look, as well as providing comfort and warmth during freezing days. Handmade with soft, colorful yarns, the crochet hat is a manifestation of affection and craftsmanship, which makes it even more special for little ones.
Personalized Style for Little Ones
One of the wonders of crochet hats for children is their versatility in terms of style. From classic models to the most creative and fun, there are a multitude of options available to reflect each child’s unique personality. Furthermore, the possibility of customization allows parents and caregivers to create exclusive hats, adding details such as pompoms, flowers, or even children’s favorite cartoon characters.
Comfort and Coziness on Cold Days
In the coldest months of the year, keeping children warm is a constant concern for parents. The crochet hat proves to be an ideal solution, as it not only protects the ears and head from the cold, but is also soft to the touch, preventing irritation on the sensitive skin of little ones. Made with natural materials such as wool or cotton, it allows the skin to breathe, keeping the body temperature stable and providing comfort throughout the day.
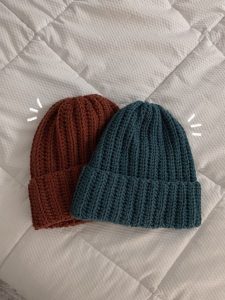
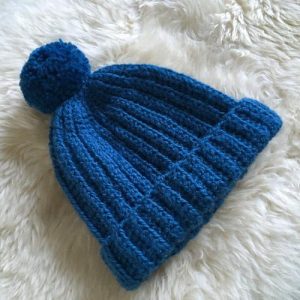
An Affective Bond Through Crafts
When a crochet hat is handmade, it carries with it not only threads and needles, but also love, care and dedication. For many families, the tradition of passing on crochet knowledge, teaching children how to create their own accessories, strengthens family bonds and provides meaningful moments of connection. Thus, the crochet hat is not just a piece of clothing, but also a way of transmitting values and traditions from generation to generation.
Difficulty Level: Beginner
Gauge: 21 stitches x 22 rows of pattern = 4 inches.
Finished Size (Note: The hat can stretch, and the length includes the brim, which can be turned up when worn):
- Premie: 5 inches long, 4.5 inches flat (fits head size 13 inches)
- 0-3 Months: 6 inches long, 5 inches flat (fits head size 14 inches)
- 3-6 Months: 7 inches long, 5.5 inches flat (fits head size 15 inches)
- 6-12 Months: 8 inches long, 6 inches flat (fits head size 17 inches)
- 12-24 Months: 9 inches long, 6.5 inches flat (fits head size 18 inches)
- Child: 10 inches long, 7 inches flat (fits head size 20 inches)
Hook: Size I/9 (5.5 mm). Adjust hook size if necessary to obtain correct gauge.
Notions: Yarn Needle
Abbreviations:
Blo – Back Loop Only
Ch – Chain
Rpt – Repeat
Sc – Single Crochet
Sk – Skip
Sl St – Slip Stitch
Yo – Yarn Over
Pattern Notes:
- This pattern uses American English terms.
- You’ll be working the pattern in rows lengthwise.
- The chain 1 at the beginning of each row does not count as a stitch.
- From row 2 onwards, work the pattern in the back loop only (BLO).
- After completing a row, slip stitch (sl st) into the center of the starting loop before turning, then chain 1.
- Remember to weave in any loose ends as you go.
- You can choose to add a pompom to the top of the beanie if you like.
- If you want to adjust the length of your beanie, simply make your starting chain the desired length, then add one additional chain.
- Note: The chain counts for different sizes are indicated in parentheses.
Kid’s crochet beanie Pattern:
This pattern provides instructions for crocheting a hat using a magic circle and then working rows in a specific sequence to create the desired shape and size. Here’s a breakdown of the steps:
Start with a Magic Circle: This is a method of beginning crochet projects in the round.
Ch 26, 31 (36, 41, 46, 51): Chain the specified number of stitches depending on the size you’re making.
Row 1: Single crochet (sc) in the second chain from the hook and in each chain across. When you reach the beginning loop, slip stitch (sl st) into the center of the loop. Turn your work.
Row 2: Chain 1, then single crochet in the back loop only (blo) of each single crochet across. Turn your work.
Row 3: Repeat Row 2.
Rows 4 onward: Continue repeating Rows 2 and 3 until your work measures approximately 10, 11 (12, 13, 14, 15) inches or until you reach the desired width for the hat.
Turn the hat inside out: This is to ensure the wrong side of the work is facing outward.
Slip stitch the two ends together: Working through both thicknesses and through the back loop only of both sides, slip stitch in each stitch across to close the hat. Fasten off, leaving a long tail.
Sew the top of the hat closed: Use the long tail to sew the top of the hat closed. Fasten off and weave in any remaining ends.
Optional pompom: Make a pompom using yarn and affix it to the top of the hat for decoration.
Make sure to adjust the number of initial chains and the number of rows according to the size of hat you’re making. Additionally, you may need to adjust the number of rows to achieve the desired length of the hat.
Kid’s crochet beanie PDF
Dear reader, if you prefer a PDF version to print, here we have the solution! A PDF version of the crochet hat pattern made by Sarah Thompson of Rich Textures Crochet is available below and you can access it below:
VIDEO TUTORIAL
We also like to make a learning version available in video tutorial format. With the videos you can follow the pattern and understand the techniques used and become familiar with them. It’s a very educational video made by the Rich Textures Crochet YouTube channel and you can watch it below.

Vertical easy to follow. Would like an easy mitten pattern.