
Front Post Granny Square
Front Post Granny Square
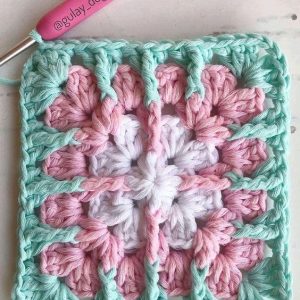
Hello, my dear reader! Today, we’re here to bring you a very special pattern. It’s a lovely pattern, quite unique, and you can create beautiful blankets with these adorable squares. Introducing the Front Post Granny Square, a very beautiful and charming pattern with a stunning design.
It brings immense joy to share with you a bit about the charm of the Front Post Granny Square crochet pattern! Please, dear ones, take a seat and let’s cozy up as we explore together this fascinating pattern that has captured hearts in the world of crochet.
Now, I know the Granny Square is already a favorite for many of us. After all, its simplicity and versatility make it a true gem in the realm of needles and yarn. But, oh, when you add those front post stitches… Ah, my dears, it’s like adding a pinch of magic to an already wonderful recipe!
For those who may not be familiar yet, front post stitches are like little lovingly woven secrets. While traditional stitches take us through the loops, front post stitches take us on a journey around the body of the previous stitch. It’s like giving each stitch a warm hug, bringing a delightful texture and a depth that is simply irresistible.
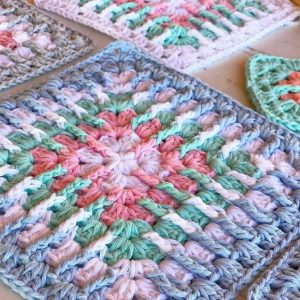
And the best part is that creativity knows no bounds! With each row, we can play with colors, textures, and yarn sizes, creating unique works of art full of charm and personality. How about a cozy blanket for chilly winter days, or perhaps a charming little bag for an afternoon stroll?
Dear ones, I could spend hours and hours talking about the charm of the Front Post Granny Square crochet pattern. But for now, I’ll leave you with an invitation: grab your needles, choose your favorite yarns, and allow yourself to dive into this world of creativity and care.
Abbreviations (US TERMS):
- Chain(s) – CH
- Extended Double crochet – EDC
- Double crochet – DC
- Slip stitch – SL ST
- Stitch – ST
Special stitch instruction:
- Extended double crochet: yarn over, insert hook in the desired st, yarn over, pull through first loop only, yarn over, pull through 2 loops, yarn over, pull through 2 loops.
Front Post Granny Square – PATTERN 1
Round 1: Start with a magic circle, chain 1, then chain 3 (this counts as the first double crochet). Work 2 double crochets into the circle, then chain 3. Next, work 3 double crochets into the circle, followed by another chain 3. Repeat this sequence twice more, then join with a slip stitch to the 3rd chain of the initial chain 3. Chain 4 to begin the next round.
Round 2: In each chain-3 space from the previous round, work (3 double crochets, chain 3, 3 double crochets). Between each corner, chain 1. In the last chain-3 space, work (3 double crochets, chain 3, 2 double crochets). Join with a slip stitch to the 3rd chain of the initial chain 4, then fasten off.
Round 3: Change to a new color and join the yarn at any corner. Chain 4, then work 2 double crochets in the same corner space. Chain 1, then work a double crochet in the next chain-1 space. Work an extended double crochet in the middle stitch (corresponding to the stitch in Round 1) of the 3 double crochets from Round 1. Work another double crochet in the same chain-1 space, then chain 1. Repeat from * to * twice more. Chain 1, then work a double crochet in the last chain-1 space. Work an extended double crochet in the middle stitch of the 3 double crochets from Round 1. Work another double crochet in the same chain-1 space, then work 3 double crochets in the last chain-3 space. Chain 3, then join with a slip stitch to the 3rd chain of the initial chain 4.
Round 4: Chain 4, then work 3 double crochets in the next chain-1 space. Chain 1, then work 3 double crochets in the next chain-1 space. Chain 1. Repeat from * to * twice more. In the last chain-3 space, work (3 double crochets, chain 3, 3 double crochets). Chain 1, then join with a slip stitch to the 3rd chain of the initial chain 4. Fasten off.
Round 5: Change to a new color and join the yarn at any corner. Chain 4, then work 2 double crochets in the same corner space. Chain 1, then work a double crochet in the next chain-1 space. Work an extended double crochet in the middle stitch (corresponding to the stitch in Round 3) of the 3 double crochets from Round 3. Work another double crochet in the same chain-1 space, then chain 1. Repeat from * to * twice more. Work (3 double crochets, chain 3, 3 double crochets) in the next chain-3 space. Repeat from ** to ** twice more. Chain 1, then repeat from * to * three times. Work 3 double crochets in the last chain-3 space. Chain 3, then join with a slip stitch to the 3rd chain of the initial chain 4.
Round 6: Chain 4, then (work 3 double crochets in the next chain-1 space, chain 1) four times. In the next chain-3 space, work (3 double crochets, chain 3, 3 double crochets, chain 1). Repeat from ** to ** twice more. Repeat from * to * four times. In the last chain-3 space, work (3 double crochets, chain 3, 2 double crochets). Join with a slip stitch to the 3rd chain of the initial chain 4, then fasten off.
Round 7: Change to a new color and join the yarn at any corner. Chain 4, then work 2 double crochets in the same corner space. Chain 1, then work a double crochet in the next chain-1 space. Work an extended double crochet in the middle stitch (corresponding to the stitch in Round 5) of the 3 double crochets from Round 5. Work another double crochet in the same chain-1 space, then chain 1. Repeat from * to * four more times. Work (3 double crochets, chain 3, 3 double crochets) in the next chain-3 space. Repeat from ** to ** twice more. Chain 1, then repeat from * to * five times. Work 3 double crochets in the last chain-3 space. Chain 3, then join with a slip stitch to the 3rd chain of the initial chain 4.
Round 8: Chain 4, then (work 3 double crochets in the next chain-1 space, chain 1) five times. In the next chain-3 space, work (3 double crochets, chain 3, 3 double crochets, chain 1). Repeat from ** to ** twice more. Repeat from * to * six times. In the last chain-3 space, work (3 double crochets, chain 3, 2 double crochets). Join with a slip stitch to the 3rd chain of the initial chain 4, then fasten off.
You can continue adding more rounds using the same sequence to make the motif larger.
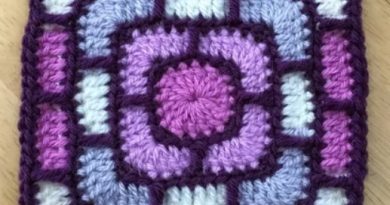
Front Post Granny Square – PATTERN 2
STEP BY STEP (WITH PICTURES)
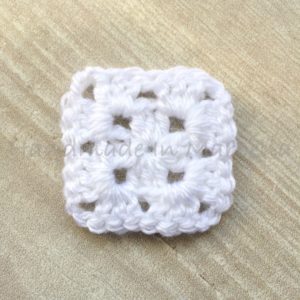
Using white yarn (or any color you want), let’s make the first 2 rows of a granny square. Begin with a magic circle, or alternatively, create a loop by chaining 4 or 5 stitches and slip stitching into the first chain.
Round 1: Chain 2 (counts as first double crochet), then work 2 double crochets, chain 2, then work 3 double crochets, chain 2, 3 double crochets, chain 2, 3 double crochets into the circle. Join to the top of the beginning chain-2 with a half double crochet. Always turn your work over after each round to prevent twisting.
Round 2: Chain 2 (counts as first double crochet), work 2 double crochets in the first corner, then work 3 double crochets, chain 2, 3 double crochets in each of the next 3 corners. Finally, work 3 double crochets in the first corner again, and join to the top of the beginning chain-2 with a half double crochet. Turn your work over.
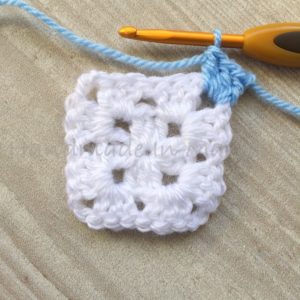
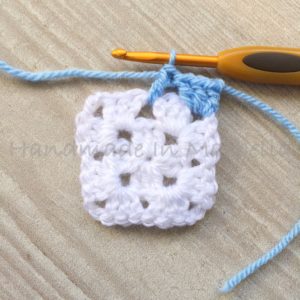
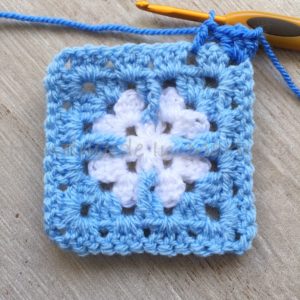
Round 3: Using cloud blue yarn, begin with a standing double crochet or two chains in any corner, followed by two double crochet stitches in the same corner.
1 treble in next space.
Here’s where you’ll put the next stitch (put your hook behind the middle tall stitch in the group below).
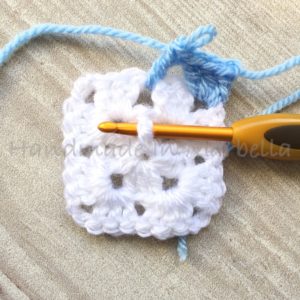
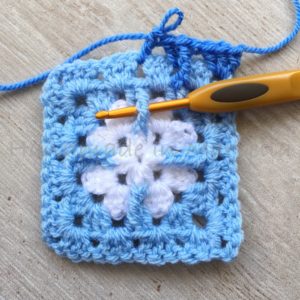
Front post stitch: Begin by yarning over the hook twice, then insert the hook behind the middle treble in the cluster below.
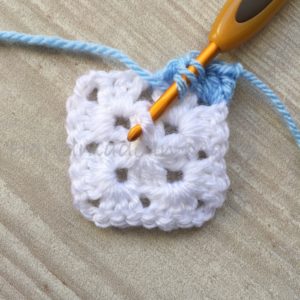
Wrap the yarn over the crochet hook and pull it back through (resulting in 4 loops on the hook). Then, yarn over the hook again and pull it through one loop (leaving 4 loops on the hook). Yarn over the hook once more, and pull it through 2 loops (repeat this step a total of 3 times).

Create an additional treble in the identical position as the initial one (the first treble).

3 trebles in the corner space.

Add 2 chains and 3 trebles in each corner. Continue around the square following the identical pattern, finishing with 3 trebles and a half treble stitch to join either with the first treble or the initial chains.
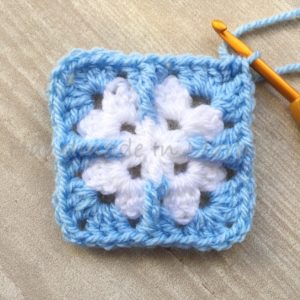
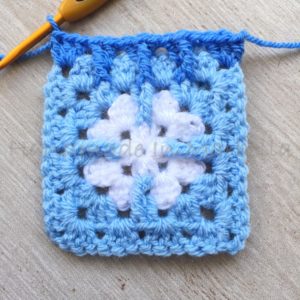
Turn the work over. For the Round 4: begin by making 2 chains and then 3 trebles in the first corner. Crochet 3 trebles in each space along the row. In each corner, work 3 trebles, 2 chains, and 3 trebles. Finish the round by crocheting 3 trebles in the first corner and then make a half treble to join. Turn the work over again.
Round 5: Using a new color (aster), start as you did in the 3rd round. Begin with a standing treble or make 2 chains to start, and then work 2 trebles in any corner. Crochet a treble in the next space along the row.
Work a front post stitch as instructed in the third round. Follow this by executing another treble crochet in the identical space as the initial one.

Perform a treble crochet in the next stitch. The “hook” indicates the spot for the front post stitch, worked behind the front post stitch from round 3.
Combine a front post stitch and a treble crochet into the same stitch. Then, work a treble crochet, followed by a front post stitch, and another treble crochet into the next stitch. Finally, work three treble crochets into each corner space.
Continue working in the round using the square pattern. Treble crochet, a front post stitch, and another treble crochet in each available space. In the corners, work 3 treble crochets, chain 2, then 3 treble crochets. Finish the round by working 3 treble crochets in the initial corner, then use a half treble crochet to join the round.

Turn work over. Round 6: Work 3 treble crochets in each space. In each corner space, work 3 treble crochets, 2 chain stitches, and 3 treble crochets.
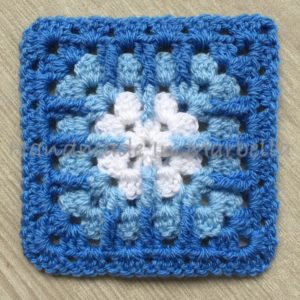
Continue for as many rounds as you need to make the size you want.
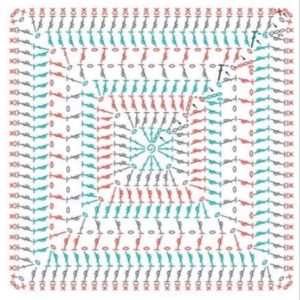
Front Post Granny Square – CHART
FRONT POST GRANNY SQUARE – VIDEO TUTORIAL
Dear reader, we at the Handmade Learning Here blog really like to always have more than one way of learning available. Therefore, we have put together for you a very educational video tutorial made by the Blossom Crochet YouTube channel and you can watch it below.
Amidst a world marked by perpetual flux and uncertainty, the steadfast square blanket stands as a reassuring emblem of both creativity and tradition’s enduring influence.
From its timeless design to its therapeutic qualities, this beloved pattern has traversed generations, imparting joy and solace to artisans across the globe.
So, why not take up your needle, select your preferred yarn, and embark upon your personal journey of comfort-crafting with the Solid Square Blanket? In a realm where possibility thrives with mere thread and needle, your imagination knows no bounds.
We’re delighted to welcome you to our charming blog, dear reader. Join us weekly as we unveil fresh crochet content and offer complimentary patterns. Feel free to explore our other articles as well.
Wishing you a splendid day ahead! See you soon. XoXo 😘💖
Hi these look amazing but I cannot work out the difference between pattern 1 & 2. Can you advise please?
Thank you