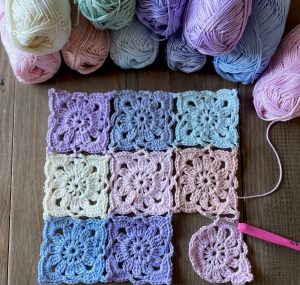
Little Sweet Blooming Square
Hello, my friend, welcome to our blog Handmade Learning Here. If you’re looking for a crochet motif that’s both delicate and delightfully floral, look no further than the Little Sweet Blooming Square by BautaWitch. This design is a perfect blend of simplicity and femininity, ideal for blankets, pillows, bags, or any project that could use a touch of blooming beauty.
Why This Pattern Is So Lovely
At first glance, the square feels both quaint and elegant. The center forms a little flower pistil, which gives way to gentle petals and a neat framing border. Even though it’s small, about 6.5 × 6.5 cm before blocking and roughly 7 × 7 cm after blocking, this motif carries a warm, handcrafted feel that’s surprisingly expressive for its size.
You can make a whole collection of these squares and join them to build a soft, floral patchwork. Or you can use just a few as accents: think coasters, appliqués, or decorative panels. Because of its structure, it’s also an excellent pattern to practice your stitch control and joining techniques.
Materials
- Yarn: Durable Coral
- Crochet hook: 3.5 mm
- Finished size (before blocking): ~6.5 × 6.5 cm
- After blocking: ~7 × 7 cm
Abbreviations (US Terms)
- ch = chain
- sl st = slip stitch
- st = stitch
- dc = double crochet
- tr = treble (if needed, but this pattern uses dc)
- sc = single crochet
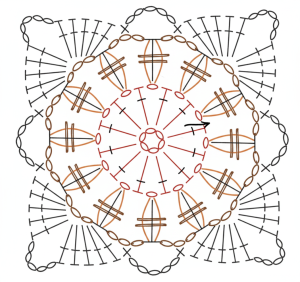
Instructions
Center (Pistil)
Chain 6, then join with a slip stitch to form a ring.
Chain 4 (this counts as 1 dc + 1 ch), then 1 double crochet into the ring, 1 ch. Repeat between the asterisks until you have 12 dc, with a ch between each.
Finish the round with a slip stitch into the 3rd chain of the beginning chain-4.
Petals (Flower Leaves)
In the nearest chain-space (the “lmb” from the Swedish pattern — lmb = “luftmaskbåge”, meaning a chain arc / space), make 4 ch.
Make a double treble (dst in Swedish) in that same chain-space, but do not finish the last yarn-over pull-through — hold the loops on the hook.
Make another dst in the same chain-space, again without finishing the last pull-through. Then, pull through all loops on hook (the two dsts + the original chain-4 chain count) — this completes your first petal.
Chain 3 (this is the space between petals).
In the next chain-space (lmb): make 3 dsts the same way — do not finish the last yarn-over in each dst until all three dsts are on the hook; then pull through all loops. Then chain 3.
Repeat this between the asterisks (“…”) all around until you complete the round.
At the end, join with a slip stitch into the top of the first petal (the first dst of the first petal).
Then slip stitch one more time into the next chain-space to position yourself for the border.
Border / Frame (Inramning)
Note: You only do all 4 sides on your first square. For joining more squares, the instructions change (explained below).
Corner 1 (first corner):
Chain 3 (this counts as the first dc),
make 4 more dc in the same chain-space,
chain 5,
make 5 dc in the same chain-space (so altogether: 5 dc, chain-5, 5 dc). These form your first corner.
Then, make 1 sc in the next chain-space, chain 5, then 1 sc in the next chain-space.
Next corner: 5 dc, chain 5, 5 dc in the same chain-space; then 1 sc in the next chain-space, chain 5, 1 sc in the following chain-space. Repeat between the asterisks for the remaining 2 corners.
To finish the round, join with a slip stitch into the first dc you made (the “chain 3 as first dc”).
Joining (if you make more than one square)
If you’re going to crochet multiple squares and join them:
The squares are joined at the spots where chain-5 arcs (lmb of 5 ch) were made.
For the sides / corners that will be joined to another square, do not chain 5. Instead:
Chain 2, then make 1 sc around (into) the corresponding chain-5 space on the neighboring square, then chain 2 again.
This way, you connect the squares on their corners and sides neatly. The blog has detailed photos that show how to do this.
GRAPH
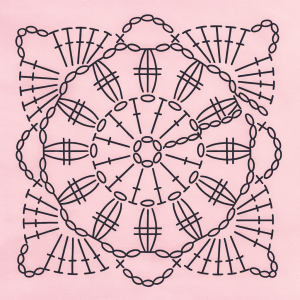
| Symbol | US Term | Meaning |
|---|---|---|
| ◯ | ch | chain |
| • | sl st | slip stitch |
| X | sc | single crochet |
| Short T | sc | single crochet |
| T with one bar | dc | double crochet |
| T with two bars | tr | treble crochet |
| T with three bars | dtr | double treble |
| Arches of ovals | ch-sps | chain spaces |
| Crossed tall stitches | dc2tog or dc3tog | clusters |
Tips for Beginners
- When you do the petals, holding loops from two double trebles (or “dst”) on the hook before pulling through all of them may feel a little strange at first, but that’s how you make a layered “petal” shape.
- Use stitch markers if you want to mark your chain-spaces (“lmbs”) so it’s easier to find where to work the petals and border.
- Block your square after finishing — it helps even out the shape, especially for such a delicate square, and makes it closer to the target size (~7 × 7 cm).
- When joining squares, go slowly: be careful not to twist chains, and look at the neighboring square’s chain-5 loop to know exactly where to insert your hook for the sc.
Tips for Making It Your Own
- Color play: Because the design is small and floral, it’s a wonderful candidate for color experiments. Use pastel shades for a soft, vintage feel, or go bold with bright contrasting hues for a modern twist.
- Blocking matters: Since the motif is delicate, blocking will really help the petals open up and the border stabilize. Don’t skip it!
- Joining with care: Take your time when joining squares. The method describes (using 2 chains + single crochet into the neighbor’s loop) gives a clean and stable seam — essential for a neater finished piece.
- Project ideas: Try making a baby blanket by repeating the squares, or make a decorative wall hanging by arranging them in a pattern of your choosing. You could also use a few as coasters or placemats.
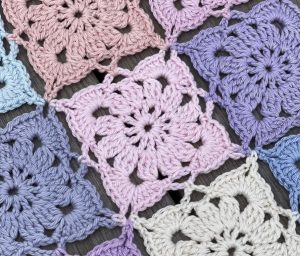
The Little Sweet Blooming Square is a perfect pattern for crocheters who love floral motifs but don’t want something overly complicated. It’s both charming and versatile, a truly delightful little square that brings a bit of springtime sweetness into any project.