
Mosaic Granny Square
Mosaic Granny Square
Hello, sweetie! Welcome to our blog Handmade Learning Here. Today we are here to bring you a lovely pattern that you can use to make beautiful pieces. This is Mosaic Granny Square, a very beautiful and unique pattern with a formidable design!
Oh, my dear, let’s talk about granny squares! They’re just such a beloved classic in the crochet world, aren’t they? So versatile and timeless, they truly add that special touch to any project, from cozy blankets to charming scarves. But have you heard about the mosaic granny square? It’s simply exquisite!
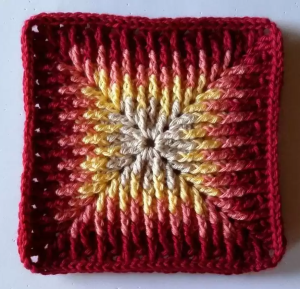
Now, the mosaic granny square is something truly special. It’s all about those intricate geometric patterns, created with clever stitch placement and beautiful color changes. And here’s the wonderful part – despite its intricate look, it’s surprisingly simple to crochet! Yes, even beginners can master this pattern with ease.
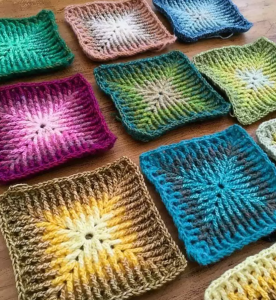
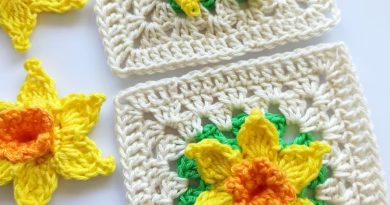
Picture this: alternating between solid colors and multicolored sections, creating a design that’s simply breathtaking, reminiscent of traditional mosaic art. It’s a true work of art, my dear!
Now, if you’re eager to give it a try, here’s a little tip: the pattern suggests using four colors, changing them every two rounds for the block shown. But you know what? You can use as many colors as your heart desires! Change colors whenever you fancy – there are no rules in creativity, after all.
And oh, one more thing – make sure to use the hook size recommended for the yarn you’re using, darling. It’s all there on the yarn label, ensuring the best results for your masterpiece.
Isn’t it just delightful, diving into the world of crochet? I do hope you’ll give the mosaic granny square a try – it’s a true delight for both beginners and experienced crocheters alike!
Materials Required:
- Yarn in four different colors: Color A, Color B, Color C, Color D
- Crochet hook suitable for the yarn weight
- Special stitch: Long Front Post Treble (Lfptr)
Skill Level: Intermediate
DIRECTIONS
Start with Color A:
Make a loose chain of 4 stitches.
Round 1: Make 2 double crochet stitches in the 4th chain from the hook. Then chain 2. *Next, make 3 double crochet stitches in the same chain as the last double crochet, then chain 2 again. Repeat from * 3 times. Finally, join with a slip stitch to the top of the beginning chain 3.
Round 2: Slip stitch across to the next corner chain-2 space. Chain 3 (this counts as the first double crochet). In the same corner space, make 2 double crochet stitches, then chain 2, then make 3 more double crochet stitches. Chain 1, then skip the next 3 stitches. In the next corner chain-2 space, make 3 double crochet stitches, chain 2, and then make 3 more double crochet stitches. Chain 1, skip the next 3 stitches, and repeat this pattern around. Fasten off Color A.
Switch to Color B:
Round 3: Join Color B in any corner chain-2 space. Chain 3 (counts as the first double crochet). In the same corner space, make 2 double crochet stitches, chain 2, and then make 3 more double crochet stitches. Chain 1, skip the next 3 stitches, then double crochet in the next chain-1 space. Next, work a long front post treble (LFPtr) around the corresponding stitch from 2 rounds below (Round 1) in the 3-stitch group. Double crochet in the same chain-1 space, then chain 1, and skip the next 3 stitches. Repeat this pattern around, then join with a slip stitch to the top of the beginning chain 3.
Round 4: Slip stitch across to the corner chain-2 space. Chain 3 (counts as the first double crochet). In the same corner space, make 2 double crochet stitches, chain 2, and then make 3 more double crochet stitches. Chain 1, skip the next stitch, then double crochet in the next stitch. Skip the next stitch, then repeat this pattern around, joining with a slip stitch to the top of the beginning chain 3. Fasten off Color B.
Continue following the pattern by repeating Rounds 5 to 8, changing colors as specified, until your mosaic granny square is the size you want.
Tips for Success:
Play with Colors: Try out various color combinations to craft designs that stand out and catch the eye.
Keep Consistent Tension: Maintain even tension as you work to ensure your finished piece looks neat and uniform.
Try Different Stitch Placements: Experiment with where you place your stitches to create beautiful and complex patterns.
Weave in Yarn Ends Along the Way: As you go, weave in the ends of your yarn to reduce the amount of finishing work needed once you’re done.”
VIDEO TUTORIAL
Here is a video tutorial from the YouTube channel Creative Grandma so you can learn how to make your perfect granny square mosaic quickly and easily. Watch below:
HOW TO JOIN MOSAIC GRANNY SQUARE/INVISIBLE JOIN/HOW TO TO SEW CROCHET SQUARES TOGETHER
The mosaic granny square pattern brings together sophistication and charm in a delightful way, making it a cherished addition to any crafter’s repertoire. Whether you’re looking for a new challenge or aiming to enhance your crochet projects, the mosaic granny square offers endless opportunities for creative expression. Embrace the artistry of crochet and embark on a journey of crafting elegance with the mosaic granny square!
The mosaic granny square you showed on facebook as blanket just wondered if you had pattern.