Little Crochet Bag
Little Crochet Bag
Hello, dear crochet friends! Welcome to our lovely blog, Handmade Learning Here. I hope your day is simply beautiful!
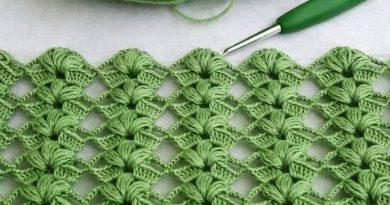
Today, I’m excited to share an awesome free crochet little bag pattern featuring the gorgeous star stitch! These bags are incredibly versatile, and the yarn you choose will give each one a unique flair, letting your creativity shine!
The Versatility of Little Crochet Bag
Little bags are true gems in the world of crochet. With their compact size and myriad of creative designs, these little purses are perfect for various occasions. From a casual afternoon with friends to a special evening out, little bags complement any outfit, adding a touch of handmade charm.
One of the greatest advantages of crochet little bags is their versatility. With the right skill and imagination, it’s possible to create a myriad of styles and patterns, from simple and minimalist to intricate and ornate. Additionally, crochet offers a wide range of yarn options and colors, allowing each bag to be truly unique and personalized.
Why We Fall in Love with Them
So, what makes crochet little bags so special? For many crochet enthusiasts, the answer lies in the unique combination of aesthetic beauty and practical functionality. These bags aren’t just stylish accessories; they’re also testaments to the talent and passion of their creators.
Furthermore, crochet little bags are a wonderful way to express individuality and personal style. Unlike mass-produced bags, each handmade little bag carries with it the care and exclusive attention of its creator. This not only adds an additional emotional appeal but also promotes sustainability and appreciation for handmade work in an increasingly mass-produced world.
So, what’s the best yarn for this pattern?
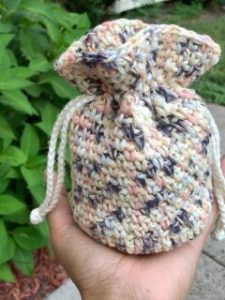
Well, it all depends on what you’re aiming for with your bag. The rainbow version you see was crafted using a softer, silkier sport weight (size 3) yarn. While it holds its shape with a spare ball of yarn inside, it might need a little extra support to stand tall on its own.
For the most functional option, I recommend using t-shirt-style yarn or a sturdier home decor yarn. This version holds its shape impressively, whether it’s loaded with items or not. Plus, I opted for macrame rope for the drawstring, adding an extra touch of functionality.
Then there’s the worsted weight version, which is also highly functional. It maintains its shape nicely and is a fantastic choice, especially if you already have this type of yarn in your stash. No need to rush out to the store — just grab what you have and get started right away! Plus, if you choose a self-striping yarn, you’ll achieve a vibrant look without the hassle of switching colors.
Have you tried your hand at the star stitch? If you need a refresher or want to experiment before diving into this project, I have a detailed guide on crocheting the star stitch. Check out our stitch pattern section for more information.
This pattern provides instructions for creating a drawstring crochet bag featuring the star stitch, using worsted weight yarn. For details on alternative yarn choices, refer to the notes section. The pattern is written in American crochet terminology.
ABBREVIATIONS (US TERMS)
HDC- half double crochet
SL ST – slip stitch
STs – stitches
DC – double crochet
CH – chain
MATERIALS
240 yards of worsted weight yarn
Optional: twine, cord, or ribbon for the tie. You can also crochet one if preferred.
Tools:
Crochet hook (matched to the yarn)
Tapestry needle or yarn needle
Small scissors
STEP BY STEP
Rnd 1: Create a “Magic Ring”: To start, form a magic ring by looping the yarn around your fingers and pulling through to make a ring.

Rnd 2: Make 10 Half Double Crochets (hdc): Inside the center of the ring, work 10 half double crochets. Then, slip stitch to the first stitch of the round and chain 1. This will give you a total of 10 stitches.
Rnd 3: Increase: 2 hdc in Each Stitch: Now, crochet 2 half double crochets into each stitch around the circle. After completing the round, slip stitch to the first stitch again and chain 1. You’ll have 20 stitches in total.

Rnd 4: Continue Increasing: In this round, crochet 2 hdc in the first stitch, then 1 hdc in the next stitch, and repeat this pattern all the way around. Slip stitch to the first stitch, chain 1. You should have 30 stitches now.
Rnd 5: Repeat the Increase Pattern:
Crochet 2 hdc in the first stitch, then 1 hdc in each of the next 2 stitches, and repeat this sequence until the end of the round. Slip stitch to the first stitch and chain 1. Now you’ll have 40 stitches.
Rnd 6: Keep Increasing: In this round, crochet 2 hdc in the first stitch, then 1 hdc in each of the next 3 stitches, and repeat. Slip stitch to the first stitch and chain 1. You’ll end up with 50 stitches.
Rnd 7: Further Increase: Crochet 2 hdc in the first stitch, then 1 hdc in each of the next 4 stitches, repeating this sequence around. Once done, slip stitch to the first stitch. You’ll now have 60 stitches in total.

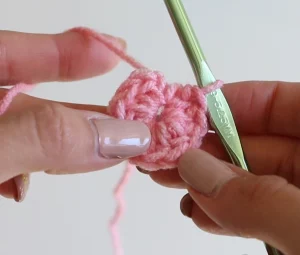
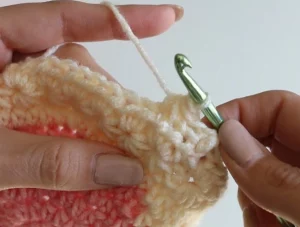
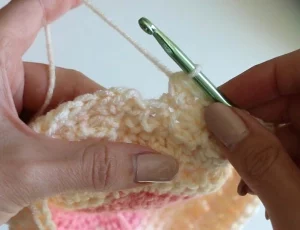
Rnd 8: Begin the Star Stitch: Chain 2 to start. Then, insert your hook into the first chain and pull up a loop (2 loops on hook). Continue by inserting your hook into the next chain and pull up another loop (3 loops). Now, insert your hook into the first stitch and pull up a loop (4 loops). Lastly, insert your hook into the second stitch and pull up a loop (5 loops). Yarn over and pull through all 5 loops, then chain 1.
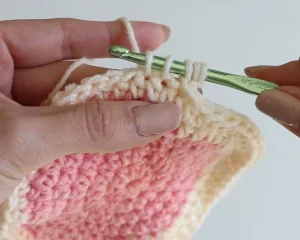
Rnd 9: Continue the Star Stitch: Insert your hook into the chain 1 space created by the previous star stitch (the center of the star), then insert your hook into the last stitch used by the previous star (3 loops). Next, insert your hook into the next stitch and pull up a loop (4 loops), and into the following stitch and pull up a loop (5 loops). Yarn over and pull through all 5 loops, then chain 1.

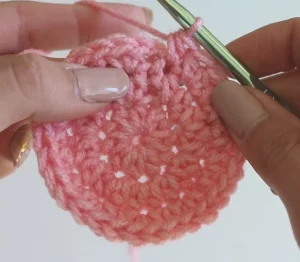
Rnd 10: Repeat Star Stitch: Keep repeating step 9 all the way around. When you reach the end, you should have used up all the stitches. Slip stitch to the first stitch from this round.

Rnd 11: Continue with the Star Stitch Pattern: Chain 2 and turn your work. Place 2 hdc stitches in each chain 1 space (the center of the star) all the way around. Finish with 1 hdc in the last stitch. Slip stitch to the first stitch from this round. This completes the first round of star stitches.

Rnd 12: Continue with the Star Stitch Pattern:
Turn your work, chain 2. Insert your hook into the first chain and pull up a loop (2 loops on hook). Then, insert your hook into the next chain and pull up another loop (3 loops). Continue by inserting your hook into the second stitch and pull up a loop (4 loops). Finally, insert your hook into the third stitch and pull up a loop (5 loops). Yarn over and pull through all 5 loops.
Ch1
Rnd 13: Chain 2, turn work and place 2 hdc in each ch 1 space (the center of the star) all the way around. 1 hdc in last stitch. slip stitch to the first stitch from the round.
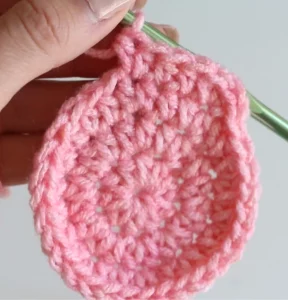
Round 14: Repeat steps 12 and 13 to create 9 total rounds of stars (18 total rounds).
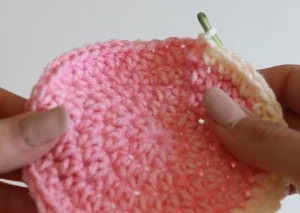
Rnd 15: After 9 rounds of stars, create 1 round of dc. dc in each stitch going all the way around. slip stitch and repeat another 2 rounds of stars.
Round 16: Fasten off and weave in tails.

Create crochet tie. Crochet a chain long enough to go around your bag 1.5 times. hdc in 2nd chain from hook all the way down the chain. fasten off and weave in tails.

Thread the tie along the dc round of the bag. Go over an under 2 dcs at time.

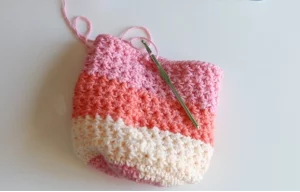
Your crochet bag is complete!

Notes
Each star round took about 10 minutes to complete. There are 11 rounds of stars and 1 round of double crochet. Additionally, you’ll need yarn for the tie and the base of the bag. For the t-shirt version, you’ll need 1 ball of Bernat Home Dec yarn, which comes in a 317-yard ball.
You can customize your little bag however you want. Add flowers! Add the faces of characters your kids like! Let your creativity guide you.
Little Crochet Bag -VIDEO TUTORIAL
Dear reader, we found a lovely video tutorial where we were inspired by this beautiful pattern. It’s a very educational and easy-to-understand video tutorial, it was made by Melanie Ham’s YouTube channel and you can watch it below. We recommend you watch it to make a beautiful Little Crochet Bag.
Enjoy!
Access the written tutorial for this pattern: Crochet Bag Tutorial
Crochet little bags are much more than simple fashion accessories; they’re true works of art that reflect the dedication, creativity, and skill of their creators. Whether you’re a crochet aficionado or someone in search of a unique touch to complete your look, crochet little bags are a charming choice that’s sure to delight. So, the next time you’re looking for an accessory that’s both beautiful and functional, don’t forget to consider one of these crochet wonders.