Santa Claus Ornament
Hi there, lovely reader! Welcome to our charming blog, Handmade Learning Here. Christmas is such a magical time of year, and there’s nothing more delightful than decorating your home with handmade pieces. Among the most popular decorations is the Santa Claus ornament, which adds a unique charm to Christmas trees and festive décor. Today, we’re going to talk about the crochet pattern for the Santa Claus Ornament—a project that beautifully blends tradition and creativity, making it perfect for both beginners and more experienced crocheters.
Making a crochet Santa Claus ornament involves working with basic shapes, like circles and small rectangles, to create the hat, face, and body. The magic really comes from the details: a fluffy white beard, the red hat with a pompom, and the simple facial features that bring the whole piece to life. By using a mix of basic stitches, like single crochet, half double crochet, and double crochet, you’ll see Santa Claus take shape easily. One great thing about this project is that you can use leftover yarn from other creations, especially in the classic Christmas colors—red, white, and black. Plus, since it’s a small item, the ornament is quick to make, making it a perfect gift for friends and family or even a great item to sell at craft fairs.
Personalizing Your Ornament
One of the best things about the Santa Claus crochet pattern is how easy it is to personalize. You can play with colors, add little details to make it uniquely yours, or even change up the beard and hat style. Using sparkly or textured yarns can give the ornament an extra special touch, making it stand out even more among your holiday decorations. And it’s not just for the Christmas tree! The ornament can be hung in so many places—turned into a keychain, a brooch, or even used as a decoration for doors and windows. The versatility of this pattern makes it even more fun to create.
Happy crocheting, and enjoy spreading some handmade Christmas cheer! 🎄🎅✨
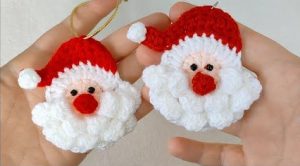
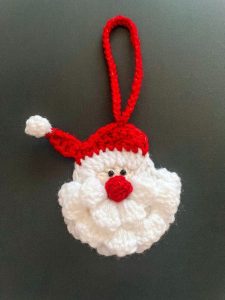
Materials and Tools for Crochet:
- Crochet hooks: 3.5 mm for the nose and pom-pom, and 4.5 mm for Santa’s head.
- Yarn: Bernat Handicrafter Holidays Sparkle (4) – 100% cotton, or any medium worsted weight yarn in red, beige, and white.
- Accessories: Plastic eyes and a yarn needle.
Common abbreviations of crochet stitches:
ch – chain
MR – magic ring
Beg – beginning
sc – single crochet
hdc – half double crochet
dc – double crochet
yo – yarn over
st– stitch
sl st – slip stitch
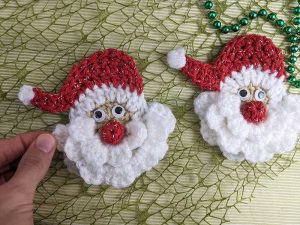
Crochet Santa Claus Ornament Pattern
Materials Needed:
- Beige yarn
- White yarn
Round 1: Start with a magic ring (MR) using beige yarn. Chain 2 (ch 2). Make 12 double crochets (dc) into the ring. Join to the first stitch (12 stitches). Cut the yarn and weave in the ends.
Round 2: Switch to white yarn. Chain 2 (ch 2). Make 1 double crochet (dc) in the same stitch. Make 2 dc in each stitch around. Join to the first stitch (24 stitches).
Round 3 (Beard): [Chain 3 (ch 3), skip 1 stitch, and slip stitch (sl st).] Repeat this pattern 6 times. Turn your work.
Round 4: Chain 1 (ch 1). In each ch-3 space from Round 3, make: *1 single crochet (sc), 3 double crochets (dc), and 1 sc. Repeat from * 6 times. Turn your work.
Round 5: Chain 1 (ch 1). Slip stitch (sl st) in the skipped stitch from Round 3. Chain 3 (ch 3), and slip stitch in the same skipped stitch. Repeat 5 times. Turn your work.
Round 6: Chain 1 (ch 1). In each ch-3 space from Round 5, make: *1 single crochet (sc), 3 double crochets (dc), and 1 sc.* Repeat this 5 times. Turn.
Round 7: Chain 1 (ch 1). Slip stitch around each double crochet from Round 2 (beige dc). [Chain 3 (ch 3), and slip stitch around the next double crochet.] Repeat this 4 times. Turn your work.
Round 8: Chain 1 (ch 1). In each ch-3 space from Round 7, make: 1 single crochet (sc), 3 double crochets (dc), and 1 sc. Repeat this 4 times. Turn your work.
Finish: Cut the yarn and weave in the ends.
Crochet Santa’s Hat:
Attaching the Red Yarn:
After finishing the beard, find the spot on the right side where you want to start the hat.
Skip one stitch after the beard and attach the red yarn.
Row 1: Ch 2 (this counts as the first stitch). 3 double crochet (dc) in the next 3 stitches. 3 half-double crochet (hdc) in the next 3 stitches. 2 single crochet (sc) in the next 2 stitches. Slip stitch (sl st) to the next stitch. Turn your work.
Row 2: Ch 1 to start the row. 3 single crochet (sc) in the next 3 stitches. 2 half-double crochet (hdc) in the next 2 stitches. 2 double crochet (dc) in the next 2 stitches. 1 half-double crochet (hdc) in the next stitch. Slip stitch (sl st) to the next stitch. Turn your work.
Row 3: Ch 1 and skip the first stitch. 5 single crochet (sc) in the next 5 stitches. 3 slip stitches (sl st) to the next 3 stitches. Ch 5, and now we will crochet into the back ridges of the chain. In the ridges of the chain, make: 1 single crochet (sc) in the first ridge. 4 double crochet (dc) in the next 4 ridges.
Cut the yarn, leaving a 10 cm tail.
Use a yarn needle to sew the tip of the hat to Santa’s head.
Adding the Pom Pom:
Attach the white yarn to the tip of the hat using the 3.5 mm crochet hook.
To make the puff stitch (which looks like a pom pom):
Ch 2. Yarn over (yo) and insert your hook into the same stitch, pulling up a loop. Repeat this 5 times. Yarn over (yo) and pull through all the loops on your hook to finish the puff stitch.
Fasten off and weave in any loose ends.
Nose (red yarn):
Round 1: Start with a magic ring (MR), make 6 single crochets (sc) into the ring, then join with a slip stitch (sl st).
Round 2: Chain 1, make 6 single crochets (sc), then join with a slip stitch (sl st).
Cut the yarn, leaving a 10 cm tail. Use a yarn needle to thread through the front loops of the stitches, then pull tight to close and shape the nose like a small button. Sew the nose in place, then glue on the eyes.
The crochet pattern for the Santa Claus Ornament is a wonderful way to celebrate the holiday spirit with a handmade touch. It’s simple to make, quick to finish, and totally customizable, making it the perfect choice for anyone wanting to add a little extra charm and coziness to their holiday festivities. If you’re looking for a festive and creative project, this crochet Santa Claus is the ideal option!
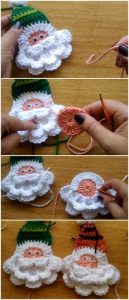
VIDEO TUTORIAL
We have selected for you, dear reader, some video tutorials with different Santa Claus Ornament models.
The first video is from the YouTube channel Crochet Bis and follows exactly the pattern written here. The other patterns are different models for you, but they are very educational videos and you can watch them below:
So, what do you think, lovely reader? I hope you loved this adorable pattern and that your crochet ornament turns out amazing. There are so many ways you can use it! Be sure to share it with your friends, too.
We’re so happy to have you here with us, and we hope you create the most beautiful ornaments. Now, let’s put everything we’ve learned into practice and grab our materials. I hope you have a wonderful day! Come back anytime. XoXo 😊🎄

Your designs are beautiful. Thank you for sharing.
Best regards.
I can’t wait to try this Santa.
Thank you so much for sharing now I need to figure out how to join your site ..I am 69 years old and have been crocheting since I was 25 and I still have loads to learn like following graph patterns I haven’t learned that yet I do much better with hand written patterns
Can’t wait to try this. Can I save the pattern?
GIAD TO SEE SANTA
Wonderful crochet ornament patterns! Thank you!
Wonderful Christmas ornaments. Not a great crochet but with your video I’m going to give it a try. Thanks for sharing.
Cute !! Thank you @
Just made one of these! I thought it would be way beyond my ability (I’m a beginner), but with the video tutorial, it was perfectly doable, and I’m thrilled! I shall definitely make more 🙂
Oh so cute!