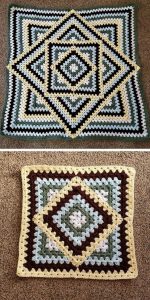
Squared Diamond Granny Throw
Hello, dear reader! Welcome to our lovely blog, Handmade Learning Here. Today, we are thrilled to bring you an incredibly spectacular pattern that we’re sure you will find just as enchanting as we do. It’s the Squared Diamond Granny Throw crochet pattern!
The Squared Diamond Granny Throw is a delightful expression of crochet artistry, offering a unique combination of simplicity and sophistication. This pattern stands out with its geometric shapes that form a beautiful diamond design across a series of squares. The harmony between the squares and diamonds creates a piece that is not only visually appealing but also incredibly versatile. Whether you’re making a cozy blanket or a decorative accent, the Squared Diamond Granny Throw is a popular choice among crochet enthusiasts.
What makes this pattern special is its clever use of colors and textures, allowing for a wide range of combinations and styles. Each square is meticulously crafted to ensure the diamonds really pop, creating a visual effect that is both elegant and intriguing. The choice of colors can significantly influence the final result, making this pattern ideal for personalized projects. From subtle, monochromatic tones to vibrant, bold combinations, the possibilities are nearly endless.
Beyond its aesthetics, the Squared Diamond Granny Throw offers a relatively simple approach to crochet, even for larger projects. The basic granny square technique is repeated and expanded to create a pattern that is both accessible and challenging. For many crocheters, this pattern provides an excellent way to practice and refine their skills while working on a project that can be completed in a relatively short amount of time.
Now, let’s talk about the materials you’ll need…
Yarn: For a project using five colors, you’ll need five skeins of yarn, each weighing 7 ounces. The outermost color will require almost the entire 7-ounce skein, while the innermost color will use about half of that. The remaining colors will fall somewhere in between these amounts.
Hook: I used an “I” hook, also known as a #9 or 5.50mm. However, you don’t have to stick to this size. For a larger bed, you could use a “G” hook and make four panels, or a single panel for a crib. A “K” hook with bulky yarn would work well for a big floor cover, or a “J” hook with rug yarn could create a sturdy floor covering. If you tend to crochet loosely, a size “H” hook may give you similar results to mine. The key is to be flexible; there’s no need to worry if you don’t have the “right” hook size.
Granny Style: For this granny throw, I suggest using the standard 3 double crochet (3DC) clusters with no chain stitches between them, and a chain of three at each corner.
To ensure a consistent look between the inner granny square and the outer corners, it’s essential to turn your work at the end of each row. If you don’t, the stitches will appear different, and the outer corners will not match. Working back and forth is necessary unless you prefer to cut and tie off the yarn after every row.
The only fixed aspect of this pattern is the total number of rows, which must be even. This means the squares should have 4, 6, 8, 10, 12 rows, and so on. The larger outer squares also need to end on an even-numbered row.
In my version, I used 10 rows with 5 different colors, 2 rows per color. However, you can customize it by using as many colors as you like and varying the number of rows per color, whether single, double, triple, etc.
Finishing a Square – Double-Sided and Single-Sided:
At the end of your last row, turn your work so the front side is facing you.
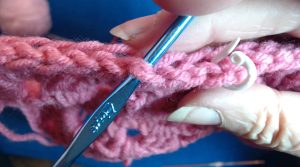
Slip stitch (sl st) into the front loop of every stitch around the square, including the chain 3 spaces (Ch3s). Make sure to slip stitch loosely over the chain spaces.
Chain 1 (Ch 1) in the center of each side of the square and mark this stitch with a stitch marker so you don’t lose it.
Counting Stitches:
How many stitches should you have on each side of your square?
You should have 3 stitches for each cluster and 2 extra stitches for the corners (not counting the middle of the chain 3 space).
For example, on the first side: If you have 10 clusters, that’s 3 stitches per cluster, so 3×10 = 30 stitches, plus 2 more for the corners, which gives you a total of 32 stitches.
Remember that extra stitch I had you add in the center of the slip stitch row? It doesn’t count as a separate stitch. It’s actually considered both the last and first stitch in the center clusters.
Starting the Sides:
Two-Sided:
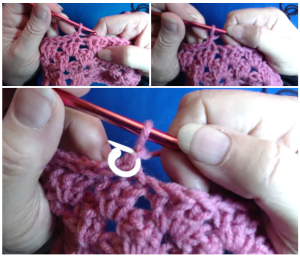
Look at the edge of your work where you did the slip stitch row. You’ll see two threads behind the front and back loops. One thread is slightly longer and the other is a bit shorter and closer to your hook hand.
Use these two threads for attaching the sides of your square. This will create a ridge on both the front and back of your piece.
For the corners, use the two threads at the center of each chain 1 space to help anchor the corners.

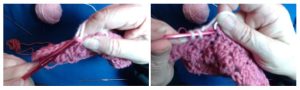
One sided:
On the edge, use one center thread and one back loop to attach each row. The two back threads from the center Ch1 will secure your corner group.
Note: When working SC’s at the beginning and end of rows, treat them as if they are Ch1 spaces. Work around the ‘post’ of the SC similarly to how you would around a Ch st.
Starting at the center marked Ch st, move backward toward the hand holding the hook. SC into the second stitch from the center (the edge of your ‘hook side center cluster’) using your center color. Ch1, then make a corner cluster set in the center marked stitch: (3DC, Ch3, 3DC). Ch1 and slip stitch to the second stitch on the other side of the center (the outer edge of the cluster on the opposite side).
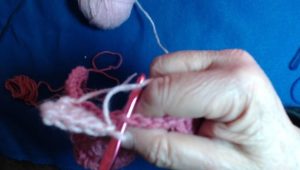
Ch 3. Count two stitches out from where you joined the slip stitch and make a single crochet (SC). (This will set up the next cluster.) Turn your work!
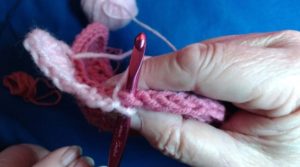
Row 2: In the space created by the chain 1 at the base of the ch 3, work 2 double crochets (DC) to form a 3 DC cluster.
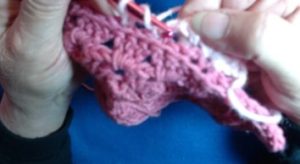
In the corner tip, work a standard corner cluster. Then, in the original single crochet (SC) from where you started the color, work another 3 DC cluster.

To finish the color, make a single crochet (SC) into the second stitch up and fasten off. Turn your work!
Why Use SC Stitches for Tying On and Off?
Using single crochet (SC) stitches to tie on and off helps conceal the ends on the inside of the color change, rather than at the edge. This makes it easier to hide the ends and achieve a cleaner finish.
Row 3 Instructions:
Position your work to add the next color. Slip stitch (sl st) to the second stitch from the last used on that side (the first stitch of the third cluster on the hook side).
Chain 1 (Ch 1), then create a 3-double crochet (3DC) cluster in the SC space at the end of the last color.
Continue working in granny style through the side and around the corner to the other side.
On the opposite side, chain 1 (Ch 1), slip stitch (sl st) to the second chain from the last attachment, chain 3 (Ch 3), and single crochet (SC) in the second stitch out from the last slip stitch (the first stitch of the third cluster on that side).
Turn your work.
Repeat these steps for each row and color set. Continue this pattern until you reach the corners.
AT THE CORNERS:
For the 8th row, start by chaining 3 after finishing the 7th row. Instead of attaching to the side, turn your work and use the space from the last row to continue down. Complete the cluster you began with the chain 3. At the end of the row, do not tie off or attach. Instead, pull out a long stitch, loosely tie it, leave a slightly long tail, and cut.
Turn your work so the front is facing you. Move to the next side and, at the end of the 8th row, chain 1 and slip stitch into the top of the chain 3 from the previous side. Tie off and turn your work to the front again. Move forward to the next side and repeat the process for each side.
Finally, use the long tail from the first section to chain 1 and slip stitch to the last side to complete the edge.
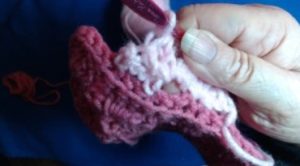
In the 9th row, position the center cluster over the corners and conceal the Ch1 space as you would when hiding a tail. Connect the cluster to the corner stitch in the lower color without stitching around it like you do with regular granny corners. Instead, work behind the front loop and use the two middle loops. This technique will leave the stitch ridges visible on the inner diamond, creating a layered effect with the inner square appearing to rest on the outer one. While you can choose any color to finish the outer square, matching it to the inner square often yields a more cohesive look.
For each subsequent layer of outer squares, follow the same process as the first. Make your slip stitch (sl st) row using only the front loops and attach side connections to the inner loops of this row.
As your squares expand, each side configuration will vary. You might use additional color bands or more rows of each color on subsequent layers. You can also add one or two extra rows to complete the throw, depending on your preference.
Embrace flexibility and enjoy the process. If needed, adjust a few stitches to ensure everything aligns properly. Crochet is quite forgiving, and minor tweaks will not be noticeable.
Line by Line:
Start: Create a magic circle.
Row 1: Chain 3 (this counts as your first double crochet). In the magic circle, work 2 double crochets. Chain 3, then work 3 double crochets in the circle – repeat this step 3 times. Chain 2. Close the magic circle by pulling the end tight. Single crochet (SC) into the top of the initial chain 3. Chain 3 and turn your work. (Remember to turn your work at the beginning of each row in this pattern!)
Row 2: Work 2 double crochets in the chain-2 space from the previous row. In the next chain-3 space, make 3 double crochets, then chain 3, and make 3 double crochets again. Repeat this step 2 times. Make 3 double crochets around the post of the single crochet from the previous row. Chain 3, then slip stitch into the top of the first chain-3 from this row. Cut the yarn and fasten off. Turn your work around.
Row 3: Change to a new color. Slip stitch into any side space. Chain 3 (this counts as your first double crochet) and make 2 more double crochets in the same space. In the next corner space, make 3 double crochets, chain 3, and make 3 double crochets. In the next gap, make 3 double crochets. In the next corner space, make 3 double crochets, chain 3, and make 3 double crochets. Repeat steps 4-6 all the way around until you get back to the first corner. Slip stitch into the top of the first chain-3 you made. Chain 3 and turn your work around.
Row 4: Work 2 double crochets (DC) in the same space, then 3 DC in each subsequent space. After that, work 3 DC, chain 3, and another 3 DC in each corner cluster’s chain 3 space. Slip stitch to the top of the first chain 3 to join. Fasten off.
Row 5: Change color. Slip stitch (Slp st) into any middle gap. Chain 3 (Ch 3), then work 2 double crochet (2DC) stitches into the same gap. Work 3DC into each gap around. In each corner space (where there is a Ch 3 from the previous row), work a corner cluster: [3DC, Ch 3, 3DC]. Slip stitch to the top of the first Ch 3 in the first cluster. Chain 3 (Ch 3) and turn.
Row 6: Work 2 double crochets (DC) into the same gap. In each subsequent gap, work 3 double crochets. In each chain-3 corner, make a corner cluster. Slip stitch to the top of the first chain-3, then fasten off and turn your work.
Row 7: Change color. Slip stitch into any middle gap, then chain 3 and work 2 double crochets (DC) into the same gap. Work 3 double crochets in each remaining gap, and create a corner cluster in each corner. Slip stitch to the top of the initial chain-3, chain 3, and turn your work.
Rows 8 to 10: Repeat Rows 6 and 7. Do not turn at the end of Row 10.
Outside of Square:
With the slip stitch (Slp St) on your hook and the front of the last row facing you, work a slip stitch in the front loop of each double crochet (DC) and loosely in each chain.
Chain 1 (Ch1) in the center of each side, and mark this Ch1.
Slip stitch to the first slip stitch and tie off.
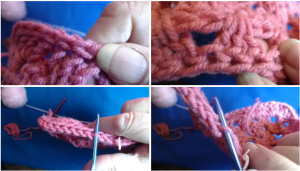
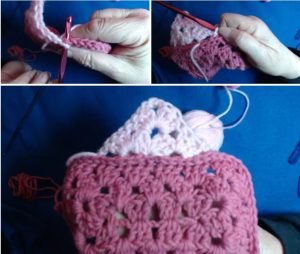
Refer to the pictures in the long notes above for visual guidance.
Notes:
Row Connections:
Two-Sided Connections: Connect along the center of two threads on the edge (refer to the detailed note above).
One-Sided Connections: Attach to the center thread behind the slip stitches and the back loop.
Outer Sections:
Even Rows: Begin and end with a single crochet (SC).
Odd Rows: Begin and end with a chain 1 (Ch1).
Row 8: This row does not connect to the inner square.
First side:
Row 1 – Looking at it from the center out.. Slp st in 3rd DC of first center cluster, and Ch1. In marked Ch1 sp, *3DC, Ch3, 3DC*(** Corner set) . Ch1, Slp st to 3rd, DC of cluster on other side of center.
Row 1 – Starting from the center: Slip stitch into the 3rd double crochet (DC) of the first cluster in the center. Chain 1. In the marked chain-1 space, work the following: 3 double crochets (DC). Chain 33 double crochets (DC) This makes one corner of the pattern. Chain 1. Slip stitch into the 3rd DC of the cluster on the other side of the center. Let me know if you need any more help!
Row 2 – Ch3, SC to middle DC of next cluster out. Turn work. 2DC in Ch1 sp. Corner set in corner Ch3 sp., 3DC in Ch1 sp. SC to middle of next cluster. Tie off. Turn work. See pictures above.
Row 2 – Chain 3. Single crochet (SC) into the middle double crochet (DC) of the next cluster. Turn your work around. In the chain-1 space from the previous row, make 2 double crochets (DC). In the corner chain-3 space, work the following:
3 double crochets (DC)
In the next chain-1 space, make 3 double crochets (DC).
Single crochet (SC) into the middle double crochet (DC) of the next cluster.
Tie off your yarn.
Turn your work around.
Refer to the pictures above if you need more visual guidance. Let me know if you need further clarification!
Row 3 – Change color. Slip stitch to the first double crochet (DC) of the next cluster. Chain 1, then work 3 double crochets (DC) into the single crochet (SC). Work 3 DC into the next gap. Set the corner with the appropriate stitch pattern, then work 3 DC into the following gap, 3 DC into the SC, chain 1, and slip stitch to the first DC of the next cluster.
Row 4 – Chain 3, then single crochet into the last double crochet (DC) of the same cluster. Turn the work. Work 2 DC into the chain-1 space. Next, work 3 DC into each of the following 2 gaps. Create the corner by following your pattern, then work the specified number of DC into the next 2 gaps. Work 3 DC into the chain-1 space. Single crochet into the last DC of the same cluster. Fasten off and turn the work.
Row 5 – Change color. Slip stitch to the middle double crochet (DC) of the next cluster. Chain 1, then work 3 DC into the single crochet (SC). Work 3 DC into each of the gaps. Create the corner as per your pattern, then work 3 DC into each of the remaining gaps, and 3 DC into the SC. Chain 1, and slip stitch to the middle DC of the next cluster.
Row 6 – Chain 3, then single crochet into the first double crochet (DC) of the next cluster. Turn the work. Work 2 DC into the chain-1 space. Next, work 3 DC into each of the next 2 gaps. Create the corner according to your pattern, then work the specified number of DC into the next 2 gaps. Work 3 DC into the chain-1 space. Single crochet into the first DC of the next cluster. Fasten off and turn the work.
Row 7 – Change color. Attach the new color to the last double crochet (DC) on the side. Chain 1, then work 3 DC into each single crochet (SC) and each gap around. In the corners, work the corner set, then continue with 3 DC in each gap and 3 DC in each SC. Chain 1, slip stitch to the last DC of the side. Chain 3 and TURN.
Row 8: Work 2 double crochet (DC) stitches into the chain 1 space. Then, make 3 DC stitches in each gap along the row. In the corner spaces, work the corner set. Continue by making 3 DC stitches in each gap, and finish with 3 DC stitches in the chain 1 space. Pull out a long loop or secure it with a marker, leaving a 4-5 inch tail. Cut the yarn and turn your work.
End of first side section
2nd – 4th sections:
Front Facing: Hold your work with the front facing you.
Move to the Side: Shift to the side behind your hook hand (right side if you’re right-handed, left side if you’re left-handed).
Repeat and Finish Row 8: Work as you did before. At the end of row 8, chain 1 and slip stitch into the 3rd chain of the last section you made.
Adjust and Slip Stitch: Undo the long loop from the first section of row 8. Chain 1 and slip stitch into the top of the chain 3 from the 4th section of row 8.
Turn Your Work: Turn your work so the back of row 8 is facing you.
Row 9: Attach your yarn to any gap near a corner of the inner square. Chain 3 stitches. Work 2 more double crochet stitches into the same gap. In the next gap, make 3 double crochet stitches over the chain-1 space from Row 8 and through the back loops of the chain-3 corner from the inner square. Continue making 3 double crochet stitches in each gap around. At each corner, make a cluster of double crochet stitches into the chain-3 space. Repeat until you reach the beginning of the row. Slip stitch into the 3rd chain of your first double crochet to join the row.
Row 10: Chain 3 and turn. Work 2 double crochets (DC) into the same space, then 3 DC in each space and corner set in each corner until the end. Slip stitch into the top of the initial chain 3. Do not turn.
Slip Stitch Row: Slip stitch into the front loops of each double crochet (DC) and chain stitch. Add an extra chain stitch in the center of each side and mark it. Slip stitch into the first slip stitch you made. Fasten off your yarn.End of second Square.
The next layer will not end with the same color at the tips of the square you just completed. However, you should treat the rows in this layer the same way as before.
The Third Square:
Rows 1-12: Repeat the same steps as rows 1-6 from the previous outer corner sets.
You will finish tying off at Row 12. This will be the end of the first color in your second round of color changes. Row 12 will start and end on the middle double crochet (DC) of the ‘second to last cluster’ on each side.
This is the end of separate sides.
Row 13: Start by working a few clusters back. Introduce the second color with a slip stitch and chain 3, then work up to the inner corner. Chain 1, then slip stitch into the last cluster at the inner corner.
Extra Step: Turn your work to see the back of the slip stitch. Slip stitch into the “leg” of the slip stitch, chain 2, chain 1, and slip stitch into the first double crochet of the last cluster at the inner corner. Perform the Extra Step again, chain 1, and work 3 double crochets into the single crochet gap.
Repeat: Repeat the process at each inner corner. Cluster in each cluster around and set clusters in each corner. Chain 1 and slip stitch into the top of the chain 3. Chain 3 and turn.
Row 14 – Work 3 double crochet stitches (DC) in each gap along the row. In each corner, make a corner set. In the chain-1 space before the inner corner, work 3 DC. Skip the chain-2 space. Chain 1, work 3 DC in the next chain-1 space, and continue this pattern around to the beginning. Chain 1 and slip stitch into the 3rd chain of the initial chain-3. Cut the yarn and secure the end.
Rows 15 to 20 – Color Changes: Add the third color at any point. Complete the last 6 rows following the same pattern as rows 7-10 of the inner granny square.
Outside Edge:
We’ll conclude with a Barred Single Crochet, a unique stitch of my own design that creates a beautifully finished two-sided edge. Given the effort we’ve put into making this a double-sided project, it only makes sense to match that with an equally versatile edge.
After finishing row 20 with a slip stitch, chain 1 and turn your work. This will allow you to use the backside of your project for this edge, ensuring a consistent finish all around.
Barred SC (Single Crochet): Use the side of your hook to pull the working yarn forward. Insert your hook into the top of the next double crochet (DC) stitch. To exaggerate your hook’s entry into the stitch, bend the handle of your hook down and in front. This will position the working yarn where you can catch it with your thumb on the edge of the stitch. Pull the working yarn through the stitch, then release the yarn from your thumb. Yarn over (YO) and complete the single crochet (SC) stitch as usual.
Summary: Drag the yarn forward, insert the hook, bend the handle, catch the yarn, pull the loop through, release the yarn, yarn over, and pull through the two loops.
Finish with a slip stitch to the starting chain and tie off.
Congratulations! You did it!
VIDEO TUTORIAL
Dear reader, we have put together a lovely and educational video tutorial for you. It is a perfect video from the YouTube channel Crafty Chrystal and you can watch it below:
Right Hand:
Left Hand:
Finally, the durability and comfort of the Squared Diamond Granny Throw make it a valuable addition to any home. Whether as a handmade gift or a personal décor item, this pattern not only adds a touch of elegance but also provides a sense of accomplishment. By embracing the Squared Diamond Granny Throw pattern, you’re not just creating a unique piece, but also celebrating the beauty and tradition of crochet.
What do you think of this beautiful crochet pattern, dear reader? It’s lovely, isn’t it? And it’s easier to make than you might imagine, so you should share it with your best friends right away, so even more people can create this beautiful pattern.
We are so happy to have you here with us in our lovely space of love. Here, we gather a variety of free crochet patterns, and you can explore them all in our different categories. I hope to see you here more often. Now, let’s put everything we’ve learned into practice. Grab your yarn and crochet hook, and let’s get to work! Have a beautiful day. XoXo