Half Log Cabin
Welcome to Handmade Learning Here, dear quilting friend. We’re so happy you stopped by today to spend a little creative time with us. Whether you’re a longtime quilter or just beginning your very first patchwork project, this cozy corner of the internet was made for makers who love fabric, handmade beauty, and the comforting rhythm of stitching something special with their own two hands. In today’s tutorial, we’ll be creating a lovely Half Log Cabin quilt, a timeless pattern with beautiful diagonal movement and a wonderfully relaxing piecing process. This beginner-friendly design is perfect for using your favorite fabric combinations while learning classic quilting techniques in a simple and enjoyable way. So pour yourself a warm cup of tea, settle into your sewing space, and let’s create something beautiful together.
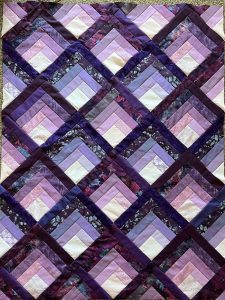
There’s something so comforting about a classic log cabin style quilt, isn’t there? The gentle rhythm of sewing strips around a center square has brought joy to quilters for generations, and the Half Log Cabin variation feels especially sweet and approachable. This lovely design is a simplified twist on the traditional Log Cabin block, using fewer fabric strips while still creating that beautiful sense of movement and warmth.
One of the things quilters adore about the Half Log Cabin is how wonderfully forgiving it is. Whether you enjoy carefully coordinated fabrics or a cheerful basket of scraps, this pattern allows every fabric to shine. It’s a marvelous project for beginners because the piecing is straightforward, yet experienced quilters can still have tremendous fun experimenting with color placement and layout possibilities.
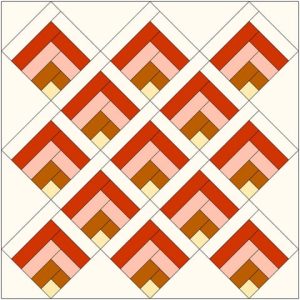
The classic arrangement often places the blocks on point, creating a graceful diagonal flow across the quilt top. Soft florals, rich jewel tones, farmhouse neutrals, or bright modern prints all work beautifully here. Some quilters prefer strong contrast between light and dark fabrics for dramatic visual movement, while others enjoy a softer blended palette for a more vintage appearance.
Why Quilters Love the Half Log Cabin
The charm of this pattern comes from its simplicity. Because each block uses fewer strips than a traditional Log Cabin, the quilt comes together more quickly without losing that lovely patchwork character. Many quilters also enjoy using this design for scrap quilting since even smaller leftover pieces can become part of something beautiful.
Another delightful feature is how versatile the layout can be. Simply rotating the blocks changes the entire mood of the quilt. You can create flowing diagonals, zigzags, stars, or gentle woven effects just by turning the blocks in different directions before sewing the rows together.
Finished Quilt Information
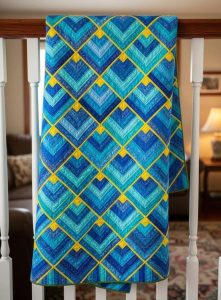
Finished quilt size: approximately 56.5” x 70.5”
Block layout: 4 blocks by 5 blocks set on point
Finished block size: 10”
Block size before sewing into the quilt: 10.5” including seam allowances
Materials You’ll Need
Before we begin sewing, gather your quilting supplies:
- Quilting cotton fabrics in assorted colors
- Rotary cutter and ruler
- Cutting mat
- Sewing machine
- Neutral piecing thread
- Iron and pressing mat
- Pins or clips
- Batting
- Backing fabric
- Binding fabric
The quilt uses multiple shades of purple, green, and pinkish-fuchsia fabrics for a rich scrappy appearance.
Cutting Instructions
For the Blocks
You’ll be making 32 Half Log Cabin blocks total.
Cut:
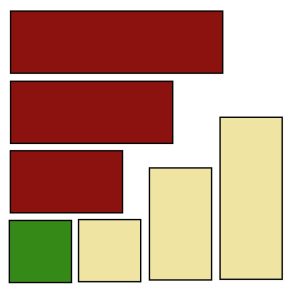
32 center squares measuring 4.5” x 4.5”
Fabric strips (“logs”) measuring 2.5” wide
Don’t worry too much about exact strip lengths right away. Many quilters simply cut longer strips and trim them after sewing.
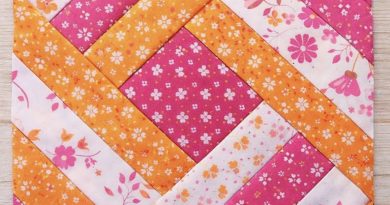
Understanding the Half Log Cabin Block
Unlike a traditional Log Cabin block that grows around all four sides, the Half Log Cabin grows around only two adjoining sides of the center square.
This creates the lovely angled “L” shape that gives the quilt its movement and diagonal flow.
The original pattern uses:
the center square,
plus three rounds of strips around it.
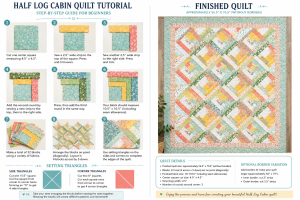
Step-by-Step Block Tutorial
Step 1 — Start with the Center Square
Place one 4.5” center square right side up on your sewing table.
This little square becomes the heart of your block.
Step 2 — Add the First Two Strips
Take two matching fabric strips.
- Sew one strip to the top edge
- Press outward
- Trim even with the square
Then:
- Sew the second strip to the side edge
- Press again
- Trim even
You’ll now begin to see the “L” shape forming.
Step 3 — Add the Second Round
Choose another fabric for the next round.
Again:
- Sew one strip to the top
- Press
- Trim
Then:
- Sew the matching strip to the side
- Press carefully
The block will continue growing diagonally.
Step 4 — Add the Third Round
Repeat the same process one final time using another pair of strips.
By the end of the third round, your unfinished block should measure approximately 10.5 inches square.
Continue sewing until you have all 32 blocks completed.
A Helpful Beginner Tip
The original designer mentions using chain piecing, which is a wonderful time-saving method for quilts with repeated blocks.
Instead of cutting thread after every seam:
- sew several pieces one after another,
- then clip them apart afterward.
This helps your quilt come together much more quickly.
Setting the Quilt On Point
This quilt is arranged diagonally, also called an on-point setting.
That simply means the blocks sit like diamonds instead of squares.
When laid out correctly, the blocks create beautiful flowing diagonal paths across the quilt top.
Before sewing rows together:
- spread the blocks out on a floor or large table,
- rotate them carefully,
- and admire how the design begins to dance across the quilt.
Cutting the Setting Triangles
To fill the outer edges of the quilt, you’ll need side and corner triangles.
Side Triangles
Cut:
- one 15.5” square
Then cut it diagonally both ways (forming an “X”).
This gives you:
- 4 side triangles
Corner Triangles
Cut:
- two 8” squares
Then cut each square diagonally once corner-to-corner.
This gives you:
- 4 corner triangles
Assembling the Quilt Top
Using your layout as a guide:
- Sew blocks into diagonal rows
- Add side triangles where needed
- Join the rows carefully
- Add the corner triangles last
Take your time here. On-point quilts may look complicated at first glance, but once everything is laid out, the sewing process becomes much easier to understand.
The original instructions recommend referring to a basic quilting guide if you’re unfamiliar with on-point assembly.
Optional Border Variation
The pattern also includes a larger bordered version of the quilt.
If you’d like to enlarge your quilt:
- Add an inner border cut at 2”
- Add an outer border cut at 3.5”
This creates a finished quilt measuring approximately 65” x 79”.
Quilting and Finishing
Once your quilt top is complete:
- Layer the backing, batting, and quilt top
- Baste securely
- Quilt as desired
Simple straight-line quilting works beautifully for beginners, especially since the block design already creates lovely movement.
Finish by adding binding around the edges and giving your quilt one final press.
Here we have a beautiful PDF with a tutorial for this lovely pattern. It was developed by the lovely Mary Johnson, and you can access it below.
A Few Cozy Quilting Tips
- Press after every seam for cleaner blocks
- Keep your seam allowance consistent at ¼”
- Scrappy fabrics make this quilt especially charming
- Don’t stress over perfection, quilts are meant to feel warm and loved
- Lay out your blocks before sewing to balance colors across the quilt
Most importantly, enjoy the process.
VIDEO TUTORIAL
Half Log Cabin quilts have a timeless feeling to them, the sort of quilt that looks beautiful folded over a rocking chair, spread across a guest bed, or wrapped around someone you love on a chilly evening.