Stair Blocks Quilt
Welcome to Handmade Learning Here, dear reader! We are so happy to have you visiting our cozy little quilting corner today. In this tutorial, we’ll be exploring the beautiful Stair Blocks Quilt, a striking geometric design filled with movement, contrast, and timeless patchwork charm. This quilt style is especially loved for the way its repeating “step” effect creates a bold and elegant visual pattern while still being wonderfully beginner friendly.
Whether you are just beginning your quilting journey or already have years of sewing experience, this project offers a relaxing and rewarding creative experience. So gather your favorite fabrics, settle into your sewing space, and let’s create something beautiful together, one stitch at a time.
There is something wonderfully satisfying about quilts that create movement through simple repeated shapes. The Stair Blocks Quilt is a perfect example of that magic. With its dramatic diagonal “step” effect, bold contrast, and clean geometric lines, this quilt creates the illusion of depth and motion while still being surprisingly beginner friendly.
This article presents an original educational interpretation inspired by traditional stepped quilt layouts and geometric strip-piecing techniques. It does not reproduce any commercial quilt pattern, template set, or copyrighted diagram. Instead, it offers beginner-friendly guidance for creating your own quilt inspired by timeless patchwork traditions.
So gather your favorite fabrics, dear friend, warm up your iron, and let us enjoy a cozy quilting day together, one beautiful seam at a time.
Why Quilters Love the Stair Blocks Quilt
This quilt style has become especially popular because it combines:
- bold movement
- simple construction
- dramatic contrast
- easy repetition
The “stair” effect appears when the blocks are rotated and arranged together across the quilt top.
And honestly?
That is one of quilting’s loveliest little secrets.
Simple blocks can create extraordinary designs.
A Wonderful Quilt for Beginners
If you are newer to quilting, this design is an excellent project because:
- most seams are straight
- the blocks repeat
- the piecing is predictable
- the layout does most of the visual work
Once you complete your first block, the rest become wonderfully relaxing to sew.
Many quilters describe projects like this as:
“comfort sewing.”
And truly…
they are.
Choosing Fabrics
This quilt depends heavily on contrast.
The stair effect becomes most visible when:
- light fabrics
- medium tones
- dark fabrics
are clearly separated.
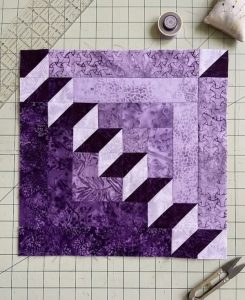
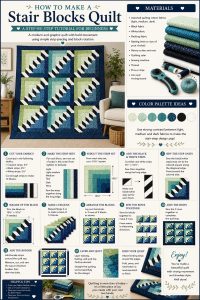
For the version shown here, cool tones create a beautiful modern appearance:
- teal
- aqua
- navy
- mint
- black
- white accents
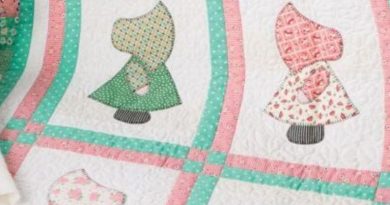
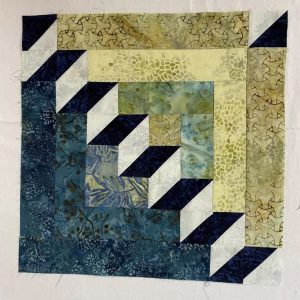
But this quilt can look stunning in many color palettes, including:
- blush pink and burgundy
- autumn rust and gold
- lavender and charcoal
- farmhouse neutrals
- bright rainbow scraps
That is part of the joy of quilting:
every version becomes unique.
Materials You Will Need
For a quilt in this style, gather:
- quilting cotton fabrics in light, medium, and dark values
- black fabric
- white fabric
- backing fabric
- batting
- rotary cutter
- quilting ruler
- cutting mat
- sewing machine
- thread
- pins or clips
- iron and ironing board
Precut fabric strips also work beautifully for this quilt style.
Before You Begin
Press Your Fabrics Carefully
My dear, pressing is one of the quiet secrets behind beautiful quilting.
Pressed fabrics create:
- cleaner cuts
- flatter seams
- more accurate blocks
- easier assembly
Never underestimate the power of a good iron.
Test Your Quarter-Inch Seam
This quilt uses repeated blocks, so accurate seams matter tremendously.
Before beginning:
- sew a small test seam
- measure carefully
- adjust if necessary
Tiny inaccuracies can slowly grow across an entire quilt top.
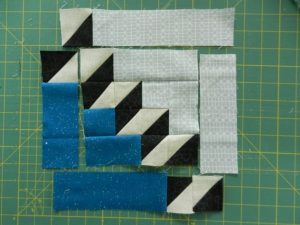
Understanding the Block Design
The Stair Blocks Quilt block is built from:
- layered strip sets
- high-contrast step units
- repeated geometric sections
When rotated and arranged together, the blocks create the illusion of staircases moving diagonally across the quilt.
The result feels:
- modern
- bold
- structured
- timeless all at once.
Step 1 — Cutting Your Fabric
Begin by sorting your fabrics into:
- light fabrics
- medium fabrics
- dark fabrics
Then cut:
- strips
- squares
- accent pieces
according to the block size you would like to create.
Larger blocks are usually easier for beginners because:
- there are fewer seams
- trimming is simpler
- alignment becomes easier
Take your time cutting.
Accurate cuts make quilting far more enjoyable later.
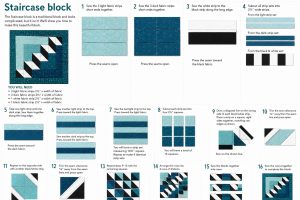
Step 2 — Sewing the Strip Sets
Now we begin building the foundation of each block.
Arrange your strips from:
- lightest
to - darkest
This gradual color transition creates the beautiful movement inside the finished quilt.
Sew the strips together along the long edges using a quarter-inch seam allowance.
After each seam:
- press carefully
- keep the strips flat
- avoid stretching
Good pressing improves everything.
And truly, dear friend…
experienced quilters press constantly.
Step 3 — Subcutting the Strip Sets
Once your strip sets are complete:
cut them into squares or rectangles depending on your chosen block size.
Use:
- a quilting ruler
- slow steady cutting
- clean measurements
Precise trimming helps every block fit together beautifully later.
Step 4 — Creating the Step Units
Now comes the feature that gives this quilt its dramatic appearance.
Cut:
- black strips
- white strips
Then sew them together to create long contrasting “step” units.
These black-and-white sections create the illusion of staircases running diagonally across the quilt.
This is usually the moment quilters begin getting excited because the design finally starts revealing itself.
Step 5 — Attaching the Step Section
Now sew the step unit onto the colored block section.
Carefully align the diagonal edge before stitching.
After sewing:
- press toward the darker fabric
And suddenly…
the block begins looking dimensional and full of movement.
It is one of those magical quilting moments that never gets old.
Step 6 — Squaring Up the Blocks
Trim each completed block carefully so all blocks are identical in size.
Use:
- a square ruler
- straight cutting lines
- slow trimming
This step greatly improves final quilt assembly.
Precise blocks create flatter, cleaner quilts.
Step 7 — Making Additional Blocks
Repeat the same process until you have enough blocks for your desired quilt size.
This quilt scales beautifully for:
- baby quilts
- throws
- bed quilts
- wall hangings
Because the blocks repeat, the sewing process becomes wonderfully relaxing after a few rounds.
Step 8 — Arranging the Quilt Layout
Lay all your blocks out on:
- a design wall
or - the floor
Rotate the blocks carefully until the movement flows diagonally across the quilt.
This arrangement stage creates:
- stair-step movement
- geometric flow
- dramatic visual depth
Take your time experimenting.
Sometimes tiny rotations completely change the personality of the quilt.
Step 9 — Sewing the Rows Together
Sew the blocks into rows first.
Then join the rows together carefully.
Pin generously where seams meet.
After each row:
- press carefully
- check alignment
- trim loose threads
Working row by row helps large quilt tops stay organized.
Step 10 — Adding Borders
Borders frame the quilt beautifully and help emphasize the movement inside the blocks.
Simple solid borders work especially well because they allow the stepped design to remain the star of the quilt.
Measure carefully before attaching borders.
Never stretch fabric to fit.
That small detail prevents wavy quilt edges later.
Step 11 — Layering and Quilting
Now comes the stage where texture brings everything to life.
Layer:
- backing
- batting
- quilt top
Then quilt as desired.
Beautiful quilting ideas for this design include:
- straight-line quilting
- diagonal quilting
- echo quilting
- geometric grids
- soft wave patterns
Straight-line quilting especially complements geometric quilts wonderfully.
Step 12 — Binding the Quilt
Binding is the final loving touch.
Join your binding strips using diagonal seams for smoother transitions.
Fold:
- wrong sides together
- press thoroughly
Then sew carefully around the quilt edges.
And suddenly…
all those little fabric pieces become a finished handmade quilt filled with warmth and personality.
Helpful Tips
Keep Your Blocks Organized
Stack completed blocks carefully to avoid confusion during layout.
Take Photos of Your Layout
This helps preserve your arrangement before sewing rows together.
Press Constantly
Good pressing improves:
- seam accuracy
- flatness
- alignment
- overall appearance
Enjoy the Process
Quilting is not about perfection.
It is about:
- patience
- comfort
- creativity
- handmade beauty
One stitch at a time.
And honestly, dear friend…
that is where the real magic lives.
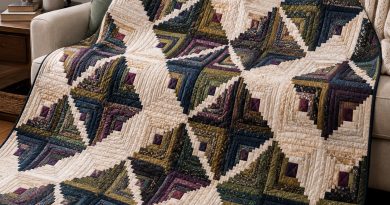
The Staircase Block quilt is a beautiful example of how simple geometric shapes can come together to create a design full of movement, contrast, and visual depth. With its striking diagonal “steps” flowing across the block, this quilt style feels both modern and timeless at the same time.
The combination of light, dark, and high-contrast fabrics gives the pattern a bold architectural appearance while still maintaining the warmth and charm that handmade quilts are known for. One of the loveliest things about this design is that, although it looks wonderfully intricate, it is created through a series of repetitive and beginner-friendly steps, making it both satisfying and relaxing to sew.
VIDEO TUTORIAL
This tutorial was inspired by traditional geometric strip-pieced quilts and stepped quilt layouts commonly found in quilting traditions. The article above presents an original educational interpretation created for inspiration, learning, and creative quilting enjoyment purposes. It is not a reproduction or redistribution of any commercial quilt pattern, template set, or copyrighted diagram.
Thank you so much for spending part of your day with us here at Handmade Learning Here! We truly hope this tutorial inspired you to start your own Stair Blocks Quilt and enjoy every step of the quilting process. Don’t forget to explore our other articles filled with unique quilt patterns, beginner-friendly tutorials, and creative handmade inspirations specially created for passionate quilters like you.
We’ll be sharing brand-new quilting projects and fresh ideas every single week, so we would absolutely love for you to come back and visit us again soon. Until next time, dear friend, have a beautiful day, enjoy every stitch, and happy quilting!