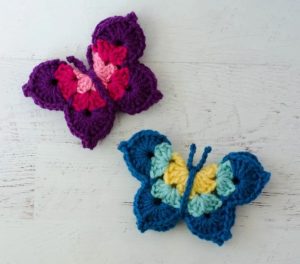
Crochet Butterfly Pattern
Hello dear friends and readers! As it has been, I hope you are all well and full of energy to start another week with a lot of learning and knowledge. I was here reading some e-mails that we received last week and we saw that many of you asked us to post crochet patterns to apply to quilts and decoration objects, so we prepared a tutorial that will delight everyone. A beautiful butterfly pattern.
We know that butterflies are very important because they pollinate flowers. These beautiful animals have a light body with wide and colorful wings, and feed on flowers, where they suck the sweet nectar. Many people believe that butterflies have the meaning of rebirth and that they bring good energy to the places they fly. And being such a beautiful animal, he is the subject of this wonderful tutorial that we have prepared.
Because it is such a beautiful animal, it is no coincidence that the crochet butterfly is such a success among the orders we receive. Just a quick search and you will see several beautiful works of this animal in the world of crafts. The crochet butterfly is a beautiful work that can be done using easy techniques and you don’t need to have an advanced level to try this pattern.
We have prepared a tutorial with PDF format that will help you to practice this pattern in a practical way. Once ready, they will be able to use it in the most diverse ways in pieces and decorative items. And if you don’t have a lot of crochet skills, don’t worry because the tutorial is easy to follow.
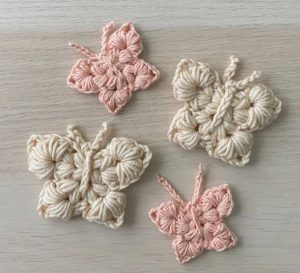
YOU HAVE MANY OPTIONS…
This tutorial, in addition to making beautiful wings for the butterfly, has beautiful details on its body that will make this crochet project even more beautiful, and can be applied to bedspreads, rugs, decorative objects and even clothing. We separate color inspirations to help you even more in choosing how to start your project. A beautiful handmade work that will make the crochet artist proud of having made this beautiful pattern, and with the right colors the result will be more beautiful than we can imagine.
There are different ideas to use the pattern of butterflies made through crochet, I will mention some in this tutorial. Can you imagine making our cloths that we use in our kitchens more beautiful? Yeah, with this tutorial it’s possible because we can use the butterflies that we’re going to make using a bar of cloth for the pantry. For an even more complete job, you can use painting techniques to make it even more beautiful.
A beautiful table runner with butterflies would not be a bad idea either, we can use the basic chain crochet technique, joined to this pattern to make a beautiful table runner, where we will unite several of our butterflies. For a beautiful work, this idea is very didactic and can help them a lot when using the butterfly as decoration.
Which yarn to use
The good thing about these crochet butterflies is that you don’t need a lot of yarn to make them and they can be made with almost any yarn of any color.
It’s great not to have to worry about color combinations for the butterflies, and you can use them according to your needs.
Here are the instructions with a clearer format
Skill Level: Easy
Materials:
- Crochet Hook: US size H/8 (5.0 mm)
- Yarn
- Accessories: Large Eye Yarn Needle
STITCH ABBREVIATIONS:
Ch(s) – Chain(s)
St(s) – Stitch(es)
Sl St – Slip Stitch
MC- Main color
CC1 – Contrasting color 1
CC2 – Contrasting color 2
Sp- Space
Sc – Single Crochet
Gauge: gauge is not crucial.
Finished Dimensions: approximately 3.75” in width and 2.5” in height.
Notes:
Puff Stitch: To create a puff stitch, yarn over, insert your hook into the stitch, and pull up a loop, repeating this process 3 times. Then, yarn over and pull through all seven loops on the hook. No chain 1 is needed to close each puff stitch. If the pattern does not specify “ch 1” after the puff stitch, simply leave the puff stitch open and proceed to start the next puff stitch. The smaller butterflies were crafted using a F/5-3.75 mm hook.
Crochet Butterfly Pattern Instructions:
Start with a magic circle (MC).
Round 1:
Ch 2, make a puff stitch, chain 1, make another puff stitch, chain 3, create another puff stitch, chain 1, make a puff stitch, chain 1, then slip stitch in the ring without joining. Tighten the circle to close. This round results in 4 puff stitches.
Round 2:
For Wing 1, which is worked in the chain 1 space between the first two puff stitches of round 1, join contrasting color 1 (CC1) in the chain-1 space, then make a puff stitch, chain 2, make two more puff stitches, and chain 1 in the same chain-1 space.
For Wings 2 and 3, worked in the chain 3 space between puffs 2 and 3 of round 1, start with a slip stitch, make a puff stitch, chain 2, make another puff stitch, chain 2, single crochet (sc), chain 2, make a puff stitch, chain 2, make another puff stitch, and chain 1, all in the chain-3 space.
For Wing 4, worked in the chain 1 space between the last two puff stitches of round 1, start with a slip stitch, make 2 puff stitches, chain 2, make a puff stitch, chain 1, then slip stitch in the same chain-1 space. This round results in a total of 10 puff stitches.
Round 3:
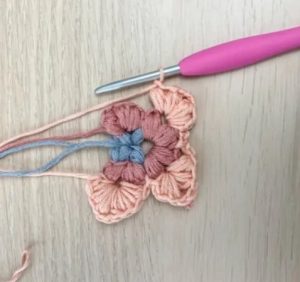
In Wing 1, worked in the chain 2 space between puffs 1 and 2 of round 2, join contrasting color 2 (CC2) in the chain-2 space. Then make 3 puff stitches, chain 3, make another 3 puff stitches, and chain 1 in the same chain-2 space. Slip stitch in the chain-1 space between puffs 3 and 4.
For Wing 2, worked in the chain 2 space between puffs 4 and 5 of round 2, start with a slip stitch, make 2 puff stitches, chain 3, and make 2 more puff stitches in the chain-2 space. Chain 2, then slip stitch in the single crochet. Chain 2 again.
In Wing 3, worked in the chain 2 space between puffs 6 and 7 of round 2, start with a slip stitch, make 2 puff stitches, chain 3, make 2 more puff stitches, and chain 1 in the chain-2 space. Slip stitch in the chain-1 space between puffs 7 and 8.
For Wing 4, worked in the chain 2 space between puffs 9 and 10 of round 2, start with a slip stitch, make 3 puff stitches, chain 3, make another 3 puff stitches, chain 1, and then slip stitch in the same chain-2 space. This round results in a total of 20 puff stitches.
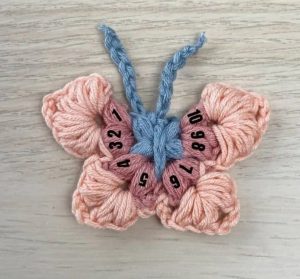
(BODY) Finishing:
Fasten off and weave in all ends.
For the body of the butterfly, using the main color (MC), create a chain of 24. Secure the ends of the chains with knots. Pull the chain between puffs 5 and 6 of round 2, ensuring the ends are even at the top of the butterfly. Tie/knot the chain and cut the ends.
Optionally, pin the antennae in the chain-3 spaces and lightly steam block, being cautious not to melt the yarn if you are using acrylic yarn.
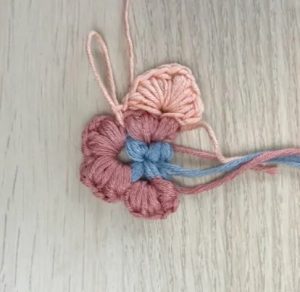
How to crochet a butterfly: Step by Step Photo Guide
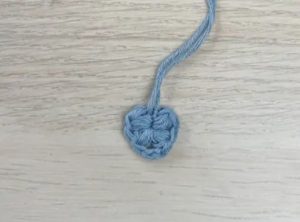
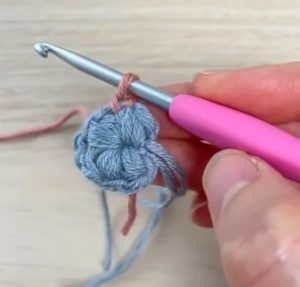
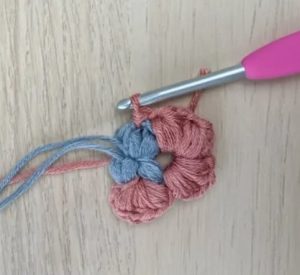
Round 1: Begin by creating a magic circle. In the magic circle, make 2 chain stitches (ch 2), then work a puff stitch, followed by 1 chain stitch (ch 1), another puff stitch, 3 chain stitches (ch 3), another puff stitch, 1 chain stitch (ch 1), another puff stitch, and finally 1 chain stitch (ch 1). To complete the round, slip stitch (sl st) in the magic circle, but do not join it. Instead, tighten the circle to close it. You should now have a total of 4 puff stitches in this round.
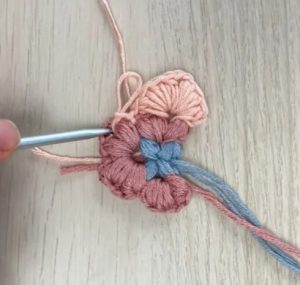
Round 2: For Wing 1, begin by working in the chain-1 space located between the first two puff stitches from round 1. Join CC1 (Color Change 1) in this chain-1 space.
In the chain-1 space, work (puff stitch, chain 2, 2 puff stitches, chain 1).
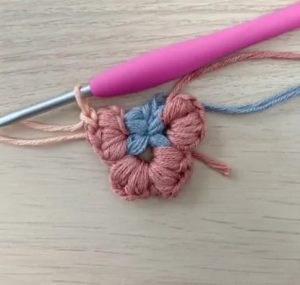
Wings 2 and 3 were crafted within the chain-3 space located between puffs 2 and 3 from round 1, accomplished through a slip stitch (sl st,
puff stitch, chain 2, puff stitch,

chain 2, sc,
ch 2, puff st, ch 2, puff st, ch 1) in chain 3 space,
Wing 4 – involves working into the chain 1 space positioned between the final two puff stitches from round 1, which begins with a slip stitch (sl st,
2 puff sts, ch 2, puff st, ch 1, sl st) in ch-1 sp.
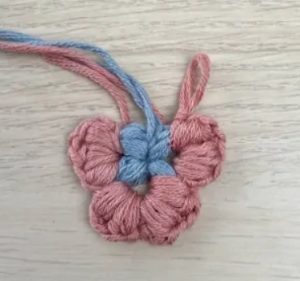
This round results in a total of 10 puff stitches.
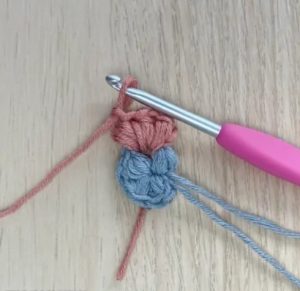
Round 3: Begin by attaching CC2 in the chain-2 space located between puff stitches 1 and 2 from round 2. (Join CC2 in ch-2 sp…,
(3 puff sts, chain 3, 3 puff sitches, chain 1) in chain 2 space,
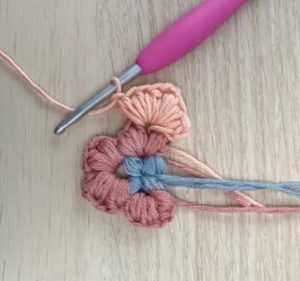
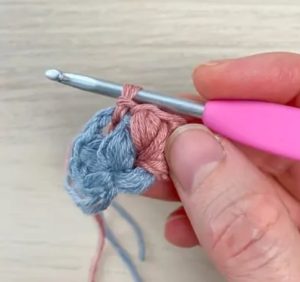
sl st in chain 1 space (between puffs 3 and 4),
Wing 2 involves working within the chain-2 space positioned between puffs 4 and 5 of round 2. (sl st,
2 puff sts, chain 3, 2 puff sts) in chain 2 space,
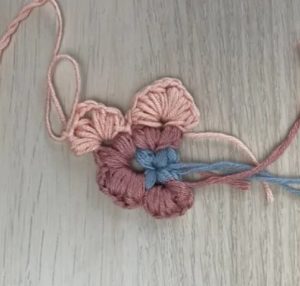
ch 2, sl st in sc, ch 2,
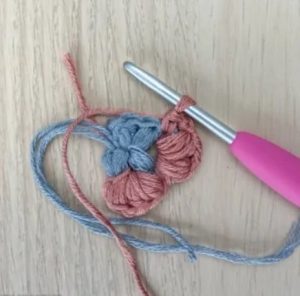
Wing 3 was created within the chain 2 space located between puffs 6 and 7 of round 2.
(sl st,
2 puff sts, chain 3, 2 puff sts, ch 1) in chain 2 space,
sl st in chain 1 space (between the puffs 7 and 8),
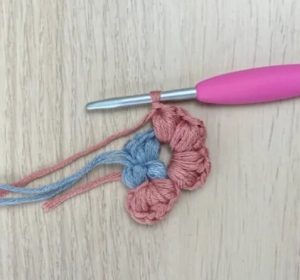
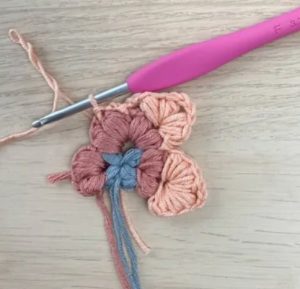
Wing 4 involves working within the chain 2 space located between puffs 9 and 10 of round 2.
(sl st,

3 puff sts, chain 3, 3 puff stiches, chain 1, sl st) in chain 2 space.
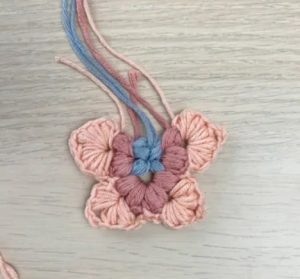
This round results in a total of 20 puff stitches.
Weave in all ends.
Body: with Main Color, Chain 24, secure the ends of the chains with knots. Next, thread the chain between puffs 5 and 6 of round 2, aligning the ends evenly at the top of the crochet butterfly.
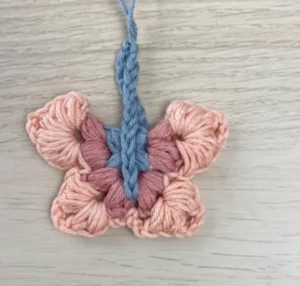
Fasten the chain with a knot, and then trim the ends.
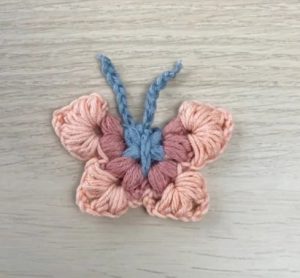
And now you have your beautiful butterfly completely ready! It’s very easy to do, don’t you think?
Dear reader, we have made a PDF version available here so that you can print it if necessary and follow it better, it is available below. Hope it’s useful!
Access the PDF/ Butterfly
Video Tutorial
Watch the video on how to make this beautiful project. The video is easy to follow and you will have great success making your beautiful butterflies, as many as you need to create wonderful pieces. The video was created by the Bella Coco channel. You can find the video tutorial here.
Well, if you’re still having doubts about your next crochet project and which pattern you’re actually going to use, here are some more model options to inspire you. Take a look below at some of our crochet models that we have selected exclusively for you:
Colorful Cardigan Granny Square
We would like to remind you that all our tutorial and color suggestions are just a guide for you to have, but of course each one has techniques that they have acquired over time.
We leave here some suggestions of patterns that have already been on our blog, and if you want, feel free to review.
Our team would like to thank you all for sharing some of your time with us and we hope you enjoyed this tutorial that we have made available. We wish you much success in executing this pattern and see you next week with another tutorial, see you soon. XoXo