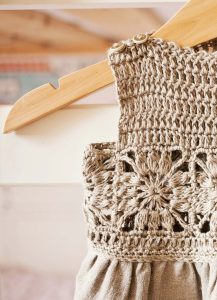
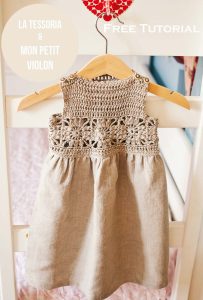
Granny Square Crochet/Fabric Dress
Hey there, lovely reader! 😊 Welcome to our delightful blog, Handmade Learning Here! Today, we’re bringing you a fabulous crochet pattern, or more specifically, a stunning crochet application on beautiful fabric dresses. This is the perfect way to make your piece even more enchanting!
Dresses that combine crochet with fabric have been gaining more and more popularity in the world of handmade crafts, especially those that use the classic granny square crochet pattern. This versatile and timeless pattern can transform a simple fabric dress into a stylish and original piece, offering endless opportunities for customization. In today’s post, we’ll explore how the Granny Square crochet pattern can be used to create a unique dress, blending the softness of fabric with the beauty of crochet.
Introduction to Granny Squares in Clothing
Granny Square is one of the most well-known and versatile crochet patterns. It consists of small crochet squares, often colorful, that can be joined together to make blankets, accessories, and, of course, clothing! Combining crochet with fabric is a technique that not only makes it easier to create garments but also adds an extra layer of charm. The texture and style of crochet enhance the flow of the fabric, creating a delightful contrast.
Granny Square dresses can range from simpler designs, where the squares are used as accents, to more elaborate pieces where crochet takes center stage. By using contrasting colors, different yarn weights, and complementary fabrics, you can create a completely personalized, handmade piece that reflects your own unique style.
How to Incorporate Granny Squares into a Dress
Creating a dress that blends Granny Squares and fabric starts with choosing the right materials. The yarn you use should complement the type of fabric you’re working with. Lightweight fabrics like cotton and linen pair well with cotton yarn or cotton-acrylic blends, which are light, breathable, and offer a nice drape.
Design Choices:
One of the greatest perks of using Granny Squares is the design freedom they offer. You could go for a dress where the Granny Squares are used on the top, creating a crochet bodice that flows into a fabric skirt. Another option is to use the squares as accents, like on the sleeves, hem, or even as a decorative belt.
Colors and Style:
Choosing the right colors is key for a harmonious look. Neutral crochet colors, like beige, gray, or white, pair well with vibrant or patterned fabrics, while bold-colored squares can add a pop of life to a solid-colored fabric. Additionally, you can vary the size of the squares to create interesting visual effects, such as a growing or shrinking pattern.
Assembly and Sewing:
Once you’ve made your squares, it’s important to join them carefully. You can connect them using your crochet hook or by sewing them directly onto the fabric. Make sure to measure the dress and the crochet pieces carefully so that they fit together perfectly and provide a comfortable wear. Sewing should be done with care to ensure that the crochet and fabric come together as one cohesive piece.
I hope you find this project as exciting as we do! Happy crocheting, and remember, every stitch you make adds a little bit of magic to your creation! ✨💕
The tutorial is designed for two sizes of crochet dress, but it can be easily adapted to any other size. Simply create as many squares as needed to fit around the child’s chest. Then, cut the fabric based on your own measurements for the desired length and width of the skirt.
Sizes:
Baby (9-12 months)
Toddler (up to 3 years)
Materials:
- Any sport weight yarn, approximately 50g for smaller sizes and up to 100g for larger sizes (I used a linen/viscose blend, but other yarns work well too. You can experiment with thicker yarns, which will require fewer squares).
- 3.25mm (D) crochet hook or a size that meets the gauge.
- 4 small buttons (you can use only 2 if preferred).
- Tapestry needle.
- Fabric (two pieces measuring 15×18 inches for baby size or 18×21 inches for toddler size).
- 4 stitch markers (optional, or use contrasting yarn to mark stitches).
- Pins (optional).
- Sewing machine (optional, as all seams can be hand-sewn).
GAUGE
11 double crochets and 5 rows = 2 inches.
ABBREVIATIONS (US TERMS)
st(s) – stitch(es)
ch – chain stitch
sc – single crochet
dc – double crochet
sl st – slip stitch
SPECIAL STITCHES
3-dc Bobble: Work 3 double crochet stitches, but stop before completing the last step of each, leaving the final loop of each stitch on the hook. You should have 4 loops on your hook. Yarn over and pull through all loops at once to complete the stitch.
4-dc Bobble: Work 4 double crochet stitches, stopping before the last step of each, leaving the final loop of each stitch on the hook. You should have 5 loops on your hook. Yarn over and pull through all loops to finish the stitch.
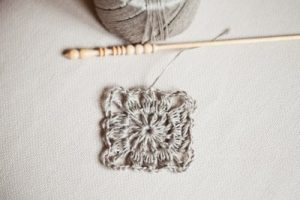
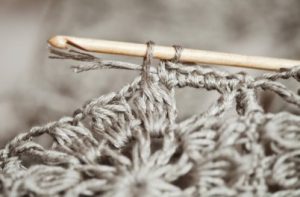
SQUARE
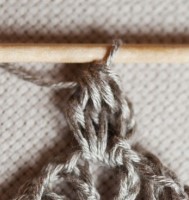
Foundation ring: MakeCh4 and join them to form a ring with a slip stitch.
Round 1: Chain 4 (this counts as the first double crochet and a chain stitch). *Double crochet into the ring, then chain 1*. Repeat from * to * 10 more times. Join the round with a slip stitch in the first double crochet.
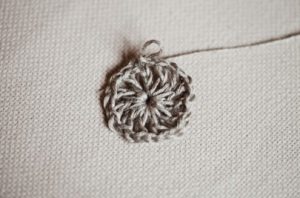
Rnd2: Slip stitch (sl st) into the first chain-1 space, chain 2 (ch 2), then make 3 double crochets (dc) all in the same chain-1 space.

*Chain 2 (ch 2), make 4 double crochets (dc) all in the next chain-1 space, chain 3 (ch 3), make a treble crochet (tr) in the next double crochet (dc), chain 3 (ch 3), make 4 double crochets (dc) all in the next chain-1 space, chain 2 (ch 2), and make 4 double crochets (dc) all in the next chain-1 space*.
Repeat from * twice more, then chain 2 (ch 2), make 4 double crochets (dc) all in the next chain-1 space, chain 3 (ch 3), make a treble crochet (tr) in the next double crochet (dc), chain 3 (ch 3), make 4 double crochets (dc) all in the next chain-1 space, chain 2 (ch 2), and join with a slip stitch (sl st) in the top of the first 3-double crochet bobble. Fasten off.
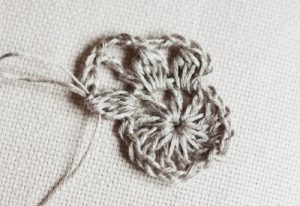
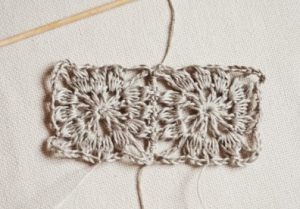
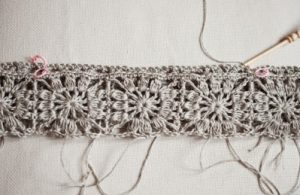
Make 8 squares for a baby size and 10 squares for a toddler size. Adjust the number of squares if you’re making a different size or using different yarn. First, weave in the ends that are left at the center of each square. We’ll take care of the other ends later. Next, you need to join the squares. Start at the treble crochet (tr) on the corner of one square and join it to another square by working single crochet (sc) stitches evenly across the edges.
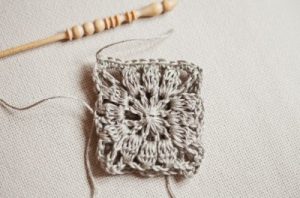
There are many ways to join squares, and this method is probably the simplest. Even though it’s basic, it works well, and I’m very happy with the results.
If you’re using very thick yarn, like worsted weight, it’s better to join the squares using a different method, such as sewing them together.
When joining the squares, make sure all the ends (tails) from each square are on the same side. In other words, leave fewer tails on the top part—only the ones from joining—and put all the other tails on the bottom. Join all the squares in a row until you have a long line. Then, join the first and last square in the same way to make a big ring. Fasten off.
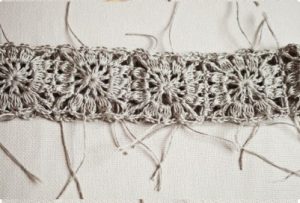
It might look a bit messy with all those tails, but don’t worry! We’ll clean them up easily. First, trim the tails so they’re all about the same length, around 2 inches long.
Then, on the edge with fewer tails (the top part), join your yarn in any seam and work single crochet (sc) stitches all around. As you crochet, hide the tails by working them between the stitches.
Make sure to hide all the tails as you crochet. Join with a slip stitch (sl st) in the first single crochet (sc). Don’t fasten off yet.
Next, mark where the armholes will be. For smaller sizes, leave space for one square for the armholes, and for larger sizes, you can leave up to two squares. You don’t have to leave an entire square; you can adjust it as needed. Just make sure it looks even. Place the first marker in the same stitch (or the one next to it) where the loop from the previous round is open.

And now work top front in the following way:
TOP FRONT
Row 1: Ch3 (counts as the first dc). Dc in each st until the next marker. Turn.
Row 2: Ch3 (counts as the first dc). Dc in each dc to the end of the row. Turn.
Repeat Row 2: For baby size: repeat 4 times. For toddler size: repeat 6 times. Keep repeating until you reach the desired length.
Last Row: *Ch3, skip the next st, sl st in the next st.* Repeat from * to the end of the row. Fasten off.
Tip: If you prefer using larger buttons, you can make ch4 or even ch5 instead of ch3 to create larger button loops.
TOP BACK
Skip the squares where the armhole will be. Attach the yarn to the next marked stitch. Follow the same instructions as for the Top Front.
WAIST PART
Attach Yarn: Start by joining the yarn at the bottom edge of the dress, on the side. Make sure to hide any loose ends by crocheting over them as you go.
Round 1: Work a single crochet (sc) evenly across the bottom edge. To finish, join the end of this round with a slip stitch (sl st) into the first single crochet.
Round 2: Chain 3 (this counts as the first double crochet). Work a double crochet (dc) into each stitch across the row. Finish by joining with a slip stitch into the top of the initial chain-3.
Rounds 3-5: Chain 1 (this does not count as a stitch). Work a single crochet (sc) into each stitch across. Finish each round by joining with a slip stitch into the first single crochet of that round.
SKIRT PART
Choose Your Skirt Option: You can either make the skirt from fabric or crochet the entire dress.
If Crocheting the Entire Dress:
- Don’t fasten off the yarn.
- Start the next round by increasing the stitches. You can make the skirt wider by doubling the number of stitches, or just increase a little.
How to Increase Stitches:
- *Work 2 double crochets (2dc) into the same stitch.
- You can either work 2dc in every stitch around or use this pattern: 2dc in one stitch, 1dc in the next stitch * and repeat this around the dress.
Continue Crocheting:
- Work double crochets (dc) evenly in each stitch until the dress reaches the desired length. Adjust the length based on the child’s needs and how the dress will be worn.
Add Edging:
- To finish, make the edging by working: *chain 3 (ch3), skip the next stitch, slip stitch (sl st) in the next stitch*.
- Repeat this pattern from * to the end around the edge.
- Fasten off the yarn.
If you prefer fabric skirt here is how to make it.
Choose Your Fabric: Pick a fabric that matches the yarn you used for the top. For example, if you used linen yarn, use linen fabric for the skirt. If you used cotton yarn, use cotton or jersey fabric. This will make your skirt look more professional.
Cut the Fabric: For a baby size skirt, cut two pieces of fabric, each 15×18 inches. For a toddler size, cut two pieces, each 18×21 inches.
Finish the Edges: If you’re using jersey fabric, you don’t need to worry about this step because it won’t fray. For other fabrics, you can use a zigzag stitch, a serger, or pinking shears to prevent the edges from fraying.
Sew the Side Seams: Place the right sides of the fabric pieces together. Sew along the side seams with a ½ inch seam allowance.
Attach the Skirt to the Crochet Top: Gather one edge of the skirt to fit it to the lower edge of the crochet top. Pin it in place and sew it on. Then, press a ¼ inch hem on the bottom edge of the skirt and sew it to your desired length.
You can sew by hand or use a sewing machine for this project.
PDF PATTTERN
Dear reader, we have separated for you a PDF version of this tutorial made by La Tessoria and Vita Apala. With this version you can print and have on hand, before making your beautiful dress. Access it below.
GRANNY CROCHET/FABRIC DRESS PDF TUTORIAL
The Granny Square fabric dress is the perfect blend of tradition and modern flair. This technique gives you so much creative freedom, making it an exciting choice for anyone looking to craft unique, personalized clothing. The charm of crochet, especially the classic Granny Square, truly elevates handmade work, adding a special touch to the dress—whether it’s for casual occasions or even something more formal, depending on how you mix colors and materials.
This project is ideal for crocheters who are ready to explore new possibilities and push beyond the usual accessories or traditional crochet pieces. Combining crochet with fabric not only brings beauty to your work but also adds comfort and originality.
Thank you so much for spending time with us here at our lovely blog, Handmade Learning Here, dear reader. I hope you enjoyed this article! We have plenty of free crochet patterns available for you, so feel free to browse through our categories. Now, let’s gather our materials, yarn, hooks, and fabric, and get to work on something beautiful. I hope to see you back here again soon. Have a wonderful day and happy crocheting! XoXo 😊💖