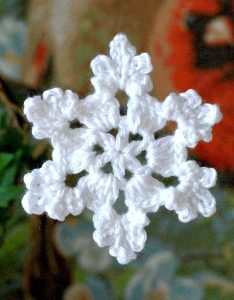
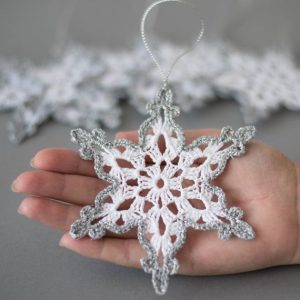
Crochet Snowflake Pattern
Hello my lovely friends and fellow yarn lovers! Welcome back to our lovely and adorable blog Handmade Learning Here, where every stitch tells a story and every project warms the heart.. Glad to see you here!
Today we’re going to make a delicate crochet snowflake… light, lacy, and perfect for decorating your Christmas tree or adding a handmade touch to your home. Don’t worry if you’re a beginner. I’ll guide you through every step slowly and kindly.
If you’ve ever dreamed of bringing a bit of winter sparkle into your home, without the freezing weather, this sweet little snowflake will do just that!
A Winter Project Full of Charm
There’s something so peaceful about crocheting snowflakes. Each one turns out slightly different, just like the real ones that fall from the sky. And the best part? You only need a bit of yarn, a small hook, and a few quiet moments to make something truly beautiful.
For this pattern, you’ll want to grab some cotton yarn (something soft and easy to work with) and a 1.75 mm crochet hook. Don’t worry if you’re new to fine crochet thread, this pattern works up quickly, and you’ll soon get the hang of it.
It’s made with simple stitches: chains, single crochets, double crochets, treble crochets, and slip stitches… all in US terms. So if you’re a beginner, this is a perfect project to practice those basic moves while creating something festive and delicate.
Finished Size
About 11 cm (4.3–4.5 inches) across, depending on your yarn and hook tension.
Materials You’ll Need
-
Cotton yarn – about 50g (200m per skein)
-
Crochet hook: size 1.75 mm (US 1/B)
-
Scissors
-
Yarn needle for weaving in ends
-
Starch or fabric stiffener (optional, for shaping)
Crochet Stitches (US Terms)
-
ch – chain
-
sc – single crochet
-
dc – double crochet
-
tr – treble crochet
-
sl st – slip stitch
If you’re new to these stitches, take your time. Practice a few chains and double crochets before starting, it makes a big difference! 💕
Instructions
Round 1
Make a chain of 7 and join with a slip stitch to form a ring.
Then chain 3 (this counts as your first dc), make 2 double crochets, then chain 3.
Repeat this sequence (3 dc, ch 3) six times in total around the ring.
Join with a sl st to the top of the first chain-3.
You should now have a little circle with six small spaces — those will be your foundation for the next round.
Round 2
Slip stitch into the next stitches until you’re inside one of the chain spaces.
Chain 3, then make 2 dc, chain 5, 3 dc, chain 1.
Repeat the same pattern in each chain space around: (3 dc, ch 5, 3 dc, ch 1).
Join with a sl st.
Your snowflake is starting to open up beautifully now!
Round 3
Again, slip stitch to reach the next open space.
Chain 3, make 2 dc, ch 3, 3 dc, ch 5, 3 dc, ch 3, 3 dc all in the same space.
Then repeat this complete group around the snowflake for all the other spaces.
Join with a sl st to finish the round.
Now your snowflake should have lovely layered points!
Round 4
This round adds texture and shape to your snowflake’s edges.
Work around the snowflake, filling the arches with single crochets and taller stitches to form the points.
Here’s an easy way to think of it:
-
In each small arch, make several scs to fill the space.
-
In each larger arch, create a little “snowflake tip” using sc, ch 2, dc, ch 2, sc, ch 3, tr, ch 3, sc, ch 2, dc, ch 2, sc.
Continue this pattern gently all around your snowflake, then close with a slip stitch and fasten off.
Weave in your yarn end.
Finishing Touches
To make your snowflake look crisp and flat:
-
Gently steam it or press it with a warm iron (using a cloth on top).
-
If you’d like it stiff, dip it in starch or fabric stiffener and pin it to shape while it dries.
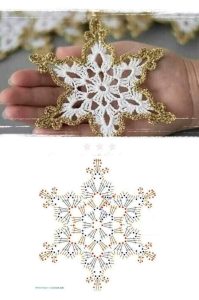
GRAPH
You Did It!
Congratulations, sweet crafter!
Your snowflake is ready to shine, whether you hang it on your Christmas tree, add it to a gift, or decorate your table. I’d love to see your beautiful work someday!
VIDEO TUTORIAL
How It Comes Together
You’ll start by crocheting a little ring — that’s the heart of your snowflake. Then you’ll build outward with beautiful arches and clusters, forming those classic six-pointed arms. With each round, your snowflake will grow more detailed, more lacy, and more magical.
What I adore about this pattern is how forgiving it is. Even if your stitches aren’t perfect, the snowflake still looks amazing! After all, no two snowflakes are ever the same.
Once you finish your rounds, you can lightly steam or block it, and if you want it to hold its shape, give it a quick dip in starch or fabric stiffener. When it dries, oh honey, it looks absolutely stunning!
So Many Ways to Use It
These crochet snowflakes are incredibly versatile. You can:
Hang them on your Christmas tree
Add one as a gift topper for a handmade touch
Use them as holiday ornaments or garlands
Or even turn them into coasters with a little extra size
I personally love making a bunch of them in one sitting, turning on a Hallmark Christmas movie, and sipping a cup of hot cocoa while I crochet away. It’s the coziest feeling in the world.
Crocheting snowflakes feels like bottling up a little bit of winter magic — something you can bring out year after year. Each one holds the warmth of your hands and the love you put into every stitch.
So, grab your yarn, cozy up in your favorite chair, and let’s make a flurry of handmade snowflakes together!
Thank you so much for stopping by Handmade Learning Here, dear friends. 💖
I hope this simple and sweet pattern brings you as much joy as it brings me. Remember, your hands can create wonders — one tiny snowflake at a time.
See you soon, my lovely crocheter!
With lots of yarny hugs,
your crochet friend at handmade learning here.